
Instructions / Assembly


14
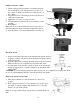
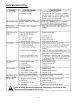
Setting drilling depth
Located around the Spindle Feed Shaft is a Depth Stop Collar (2)
with a scale. The collar is capable of turning about the shaft, and
may be locked in place by a Locking Screw (1).
1. Lower the drill (with the power OFF) so that it contacts the
material and hold in that position.
2. Loosen the locking screw and turn the collar so that the
measurement for the depth of the hole required is in line with
the pointer (3).
3. Lock the collar (2) in this position using the locking screw (1).
MAINTENANCE
Warning: Turn the power switch “OFF” and disconnect the plug from the outlet prior to adjusting or
maintaining the machine. DO NOT attempt to repair or maintain the electrical components of the motor.
Contact a qualified service technician for this type of maintenance.
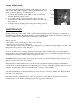
Before each use:
- Check the power cord and plug for any wear or damage.
- Check for any loose screws or hardware.
- Check the area to make sure it is clear of any misplaced tools, lumber, cleaning supplies, etc. that could
hamper the safe operation of the drill press.
To avoid a build-up of wood dust, regularly clean all parts of the machine using a soft cloth, brush or
compressed air. A general cleaning should be done after every use to avoid future problems and ensure
the machine is in ready condition for the next time it is used.
WARNING: If blowing sawdust, wear proper eye protection to prevent debris from blowing into eyes.
The use of dust collection is also advised.
Keep the table, column and base free of resin and rust. Clean them regularly with a non-flammable
solvent, then coat with a light film of dry lubricant spray, or wax, to keep their surfaces clean. Do not use
ordinary oil which will collect dust and hamper the operation of the machine.
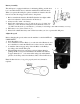
All of the ball bearings are lifetime lubricated, sealed, and do not need any further care. Keep the drive
belts free of oil and grease.
Check the belt tension after the first 3-5 hrs. of operation to ensure that the belts have not become
stretched and loose from their 'breaking in' use. See page 12 for instructions.
1
2
3