
Instructions / Assembly
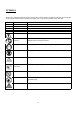


13
ASSEMBLY INSTRUCTION
WARNING:
Do not use this product if any parts on the packing list are already assembled to your product
when you unpack it. Parts on this list are not assembled to the product by the manufacturer
and require customer installation. Use of a product that may have been improperly assembled
could result in serious personal injury.
WARNING:
If any parts are damaged or missing do not operate this product until the parts are replaced.
Use of this product with damaged or missing parts could result in serious personal injury.
WARNING:
Do not attempt to modify this product or create accessories not recommended for use with
this product. Any such alteration or modification is misuse and could result in a hazardous
condition leading to possible serious personal injury.
WARNING:
Do not connect to power supply until assembly is complete. Failure to comply could result in
accidental starting and possible serious personal injury.
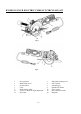
Blade Installation (Fig. 4, 5, 6)
Fig. 4 Fig. 5 Fig. 6
Warning: Always be sure that the tool is switched off and unplugged before assembly.
Place the saw on its side of a flat surface.
1. Unplug you saw.
2. Remove the blade clamp screw (3), the washer and the outer flange.
3. Lift the lower guard (10) by using the lower guard lever (4).
4. Clean the saw blade flanges and then mount the saw blade onto the spindle, which is against the inner
flange.
5. The arrow on the saw blade must match the arrow showing direction of rotation on the guard.
6. Reinstall the outer flange, washer and tighten the blade clamp screw (3) by turning it
counterclockwise with the wrench provided.