INSTRUCTION MANUAL 31cc 4-Cycle Gas 2 in 1 Brush Cutter &String Trimmer Model # PS4531 Have product questions or need technical support? Please feel free to contact us! Website: www.Amerisuninc.com www.powersmartusa.com Toll free: 1-800-791-9458 Mon-Fri 9-5 EST Email: support@amerisuninc.
CONTENTS Technical data…...………………………………………………………... Introduction………………………………………………………………. Safety information…….………………………………………………... General safety procedures ……....……………………………………… Knowing your brush cutter……………………………………………… Brush cutter preparation…………………………………….…………... Operation……………………....………………………………………… Maintenance……………………………………………………………... Storage……………………………………………………………………. Troubleshooting………………………………………………………….
INTRODUCTION Thank You for purchasing your PowerSmart® Product. This manual provides information regarding the safe operation and maintenance of this product. Every effort has been made to ensure accuracy of the information found in this manual. PowerSmart® reserves the right to change this product and specifications at any time without prior notice. Please keep this manual available to all users during the entire life of the product.
GENERAL SAFETY PROCEDURES For any questions regarding the hazard and safety notices listed in this manual or on the product, please call (800) 791-9458 Mon-Fri 9-5 EST. Please read and understand the instructions in this manual before starting the engine or attempting to operate this unit. Warning: When using the unit, all safety rules must be followed. Please read these instructions before operating the unit in order to ensure the safety of the operator and any bystanders.
Even if you use an engine correctly, CO may leak into the home. ALWAYS use a battery-powered or battery-backup CO alarm in the home. If you start to feel sick, dizzy, or weak after the engine has been running, move to fresh air RIGHT AWAY. See a doctor. You may have carbon monoxide poisoning. WARNING: The exhaust from this product contains chemicals known to the State of California to cause cancer, birth defects, or other reproductive harm.
• • Use only recommended accessories and replacement parts. Have all maintenance and service not explained in this manual performed by your authorized service dealer. CUTTING SAFETY WARNING: Inspect area before starting unit. Remove all debris and hard objects such as rocks, glass, wire, etc., that can ricochet, be thrown, or otherwise cause injury or damage during operation. • Keep others including children, animals, bystanders, and helpers at least 50 feet (15meters) away.
1. Keep children out of the mowing area and under the watchful care of a responsible adult other than the operator. 2. Be alert and turn mower off if a child enters the area. 3. Never allow children under the age of 16 to operate the product. 4. Use extra care when approaching blind corners, shrubs, trees, or other objects that may block your view of a child. Fuel safety 1. Safe Handling of Gasoline 2. To avoid personal injury or property damage, use extreme care in handling gasoline.
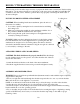
KNOWING YOUR BRUSH CUTTER Please use the illustration below to familiarize yourself with the location and function of the components that control of your brush cutter.
BRUSH CUTTER&STRING TRIMMER PREPARATION The following section describes steps necessary to prepare the brush cutter for initial use. If after reading this section, you are unsure about how to perform any of the steps please call (800) 791-9458 Mon-Fri 9-5 EST for customer service. Failure to perform these steps properly can damage the brush cutter or shorten its lifespan.
REPLACING THE BLADE WARNING: Wear protective gloves when handling or performing maintenance on the blade to avoid injury. The blade is sharp and can cut you even when it is not moving. WARNING: Do not attempt to use any blades, washers, nuts, or fastening hardware other than shown in the following illustrations. These parts must be provided by the manufacturer and installed as shown below. Failure to use proper parts can cause the blade to fly off and seriously hurt you or others. 1.
5. Next, insert the dipstick into the oil fill opening without screwing it in. Remove the dipstick to check the oil level mark. 6. If required, slowly add more oil until the mark reads just below the upper limit line on the dipstick. Do not overfill the crankcase. 7. Firmly tighten the dipstick and check for any leaks. ADD GASOLINE WARNING: This product may emit highly flammable and explosive gasoline vapors, which can cause severe burns or even death if ignited.
OPERATION WARNING: Be sure to read the fuel information in the safety rules before you begin. If you do not understand the safety rules, do not attempt to fuel your unit. Call customer support. STARTING A COLD ENGINE 1. Set unit on a flat surface. 2. Slowly press the primer bulb 3 times. 3. Move choke lever to the START position. 4. Pull recoil starter handle sharply 5 times. 5. Squeeze and hold trigger. 6. Pull recoil starter handle until engine starts.
• • • • • • • • • • Cut only grass, weeds, and woody brush up to 1/2 inch (1 cm) in diameter with the blade. Do not let the blade contact material it cannot cut such as stumps, rocks, fences, metal, etc., or clusters of hard, woody brush having a diameter greater than 1/2 inch (1 cm). Keep the blade sharp. A dull blade is more likely to snag and thrust. Cut only at full throttle. The blade will have maximum cutting power and is less likely to bind or stall.
MAINTENANCE WARNING: Disconnect the spark plug before performing any maintenance. CHECK FOR DAMAGED OR WORN PARTS Contact customer service for replacement of damaged or worn parts. ON/OFF Switch -- Ensure ON/OFF switch functions properly by pushing and releasing the switch. Make sure engine stops. Wait 5 seconds before attempting to restart unit to allow switch to reset. Restart engine and continue. Fuel Tank – Immediately discontinue use of unit if fuel tank shows signs of damage or leaks.
SEASONAL STORAGE Prepare your unit for storage at the end of season or, if it will not be used for 30 days or more. If your unit is to be stored for a period of time: 1. Clean the entire unit before lengthy storage. 2. Store in a clean dry area. FUEL SYSTEM Adding fuel stabilizer helps to minimize the formation of fuel gum deposits during storage. Add stabilizer to the gasoline in the fuel tank and/or fuel storage container.
EXPLODED VIEW AND PARTS LIST Engine exploded view 17
Engine parts list Item 1 Stock # 100002804 Description Breather Hose Qty 1 Item 48 2 100010417-0001 3 4 Stock # 100010576 Description Woodruff Key Screw M5×15 16 100002301 Valve Cover 100002788 Oil Block Qty 1 49 100003055 Piston 1 1 50 100003218 Circlip 2 1 51 100003112 Piston Pin 1 5 100011001-0001 Screw ST4.
Brush cutter &String trimmer exploded view 19
Brush cutter &String Trimmer parts list Item 1 2 3 4 5 6 7 8 9 10 11 12 13 14 15 16 17 Stock # 303190256 202310001 303020553 303020554 303020554 302100009 303020555 302100010 303030120 202110046 303010330 303010331 303010330 303030030 303020110 202310002 303020555 Description 31cc 4 Stroke Engine Connector Component Screw M5x12 Screw M6x30 Screw M6x30 Strap Hanging Ring Screw M5x25 Fixed Ring Nut M5 Straight Handle Component Screw ST4.2x15 Screw ST2.5x20 Screw ST4.
TWO (2) YEARS LIMITED WARRANTY PowerSmart is committed to building equipment that will provide years of dependable service. Our warranties are consistent with our commitment and dedication to quality. TWO (2) YEARS LIMITED WARRANTY OF POWER SMART PRODUCTS FOR HOME USE. PowerSmart (“Seller") warrants to the original purchaser only, that all PowerSmart consumer power tools will be free from defects in material or workmanship for a period of two (2) years from date of purchase.