
Instructions / Assembly


10
BRUSH CUTTER&STRING TRIMMER
PREPARATION
The following section describes steps necessary to prepare the brush cutter for initial use. If after reading
this section, you are unsure about how to perform any of the steps please call (800) 791-9458 Mon-Fri
9-5 EST for customer service. Failure to perform these steps properly can damage the brush cutter or
shorten its lifespan.
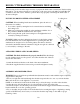
INSTALLING BRUSH CUTTER ATTACHMENT
CAUTION: When installing brush cutter attachment, place the unit on a
flat surface for stability.
1. Loosen the coupler by turning the knob counterclockwise and lifting
the locking lever.
2. Make sure to line up the small hole on the attachment, with the slot on
the powerhead. Push the attachment into the coupler.
3. Before using the unit, push down locking lever and tighten the knob
securely by turning it clockwise.
WARNING: Make sure the locking/release button is locked in the primary
hole and that the knob is securely tightened before operating the unit. All
attachments are designed to be used in the primary hole unless otherwise
stated in the attachment instruction manual. Using the wrong hole could lead
to serious injury or damage to the unit.
ATTACHING THE PLASTIC BLADE SHIELD
CAUTION: The blade shield must be properly installed. This shield helps
provide partial protection to the operator, and others from the risk of thrown
objects and other debris.
1. Attach the shield and bracket to the shaft of the cutter attachment.
2. Install the supplied hex head screws using a wrench and tighten securely.
ASSEMBLY OF SHOULDER STRAP
WARNING: Proper shoulder strap and handlebar adjustments must be made with the engine completely
stopped before using unit.
1. Insert your right arm and head through the shoulder strap and allow it to rest on your left shoulder.
Make sure the hook is to the right side of your waist.
NOTE: A one-half twist is built in the shoulder strap to allow the strap to rest flat on the shoulder.
2. Adjust the strap, allowing the hook to be about 6 inches (15 cm) below the waist.
3. Fasten the strap hook to the clamp located between the throttle trigger and the handlebar mounting
bracket and lift the tool to the operating position.
4. Try on shoulder strap and adjust for fit and balance before starting the engine or beginning a cutting
operation. NOTE: It may be necessary to relocate the shoulder strap clamp on the shaft for proper
balancing of unit.
Locking lever