
Instructions / Assembly


11
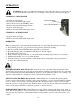
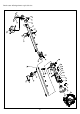
REPLACING THE BLADE
WARNING: Wear protective gloves when handling or performing maintenance on the blade to avoid
injury. The blade is sharp and can cut you even when it is not moving.
WARNING: Do not attempt to use any blades, washers, nuts, or fastening hardware other than shown in
the following illustrations. These parts must be provided by the manufacturer and installed as shown
below. Failure to use proper parts can cause the blade to fly off and seriously hurt you or others.
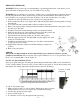
1. Align hole in dust cup with hole in side of gearbox by rotating the blade.
2. Insert a small screwdriver or into aligned holes. This will keep the shaft from turning while loosening
the blade nut.
3. Loose blade nut with a wrench while holding screwdriver in position.
4. Remove the cupped washer, retaining washer and blade from the threaded shaft of the gearbox. Leave
the dust cup on the shaft.
5. Install the new blade and the retaining washer over the threaded shaft.
6. Make sure the raised part of the retaining washer is facing the gearbox and
the raised area fits into the hole in the center of the blade.
7. Slide the blade and retaining washer onto the shaft of the gearbox.
8. Place the cupped washer onto the shaft. Make sure the cupped side of the
washer is toward the blade.
9. Install the bottom blade nut by threading onto the shaft counterclockwise
(looking from bottom of unit).
10. Tighten blade nut firmly with a wrench while holding screwdriver in
position.
11. Remove the screwdriver.
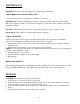
ADD OIL
This product is shipped without oil. User must add the proper amount of oil before operating the
product for the first time. The oil capacity of the engine crankcase is 2.7 fl. oz. For general use (above
40° F), we recommend 30W, 4-stroke engine oil.
ENGINE OIL RECOMMENDATIONS
Select good quality detergent oil bearing the American Petroleum Institute (API) service classifications
SJ, SL, or SM (synthetic oils may be used). Use the ASE viscosity grade of oil from the following chart
that matches the starting temperature anticipated before the next oil changes.
Engine Oil Temperature Recommendations
To add oil, follow these steps:
1. Make sure the product is on a level surface. Tilting the product to assist in
filling will cause oil to flow into engine areas and will cause damage.
2. Unscrew the dipstick from the engine.
3. Slowly add the engine oil.
4. To check the oil level, wipe the dipstick with a clean rag.
Location of oil fill
& dipstick