INSTRUCTION MANUAL 18V Lithium-Ion Cordless Blower Model # PS76101A Have product questions or need technical support? Please feel free to contact us! Website: www.Amerisuninc.com Toll free: 1-800-791-9458 M-F 9-5 EST Email: support@amerisuninc.
CONTENTS Technical data…...………………………………………………………... General safety rules…….………………………………………………... Symbols………………………………………………………………….. Knowing your blower……. ..…………………………………………… Assembly instruction……………………………………………………… Operating instruction…………………………………………………...... Maintenance.……………………………………………………………… Environmentally safe battery disposal……………………………………... Troubleshooting………………………………………………………….
GENERAL SAFETY RULES Safety is a combination of common sense, staying alert, and knowing how your blower works. SAVE THESE SAFETY INSTRUCTIONS. WARNING: Do not operate this unit until you read this instruction manual for safety, operation and maintenance instructions. Failure to follow all instructions listed below may result in electric shock, fire, and/or serious personal injury. Do not operate power tools in explosive atmospheres, such as in the presence of flammable liquids, gases, or dust.
Do not operate this unit when you are tired, ill, or under the influence of alcohol, drugs, or medication. Keep all parts of your body away from any moving parts and all hot surfaces of the unit. Do not put any object into openings. Do not use with any opening blocked; keep openings free of dust, lint, hair, and anything that may reduce air flow. Check the work area before each use.
vinegar. If liquid gets into your eyes, flush them with clean water for at least 10 minutes, then seek immediate medical attention. Following this rule will reduce the risk of serious personal injury. If the power supply cord is damaged, it must be replaced only by the manufacturer or by an authorized service center to avoid risk. Do not point the blower nozzle in the direction of people or pets. Never run the unit without the proper equipment attached. Always ensure the sweeper tubes are installed.
Some of the following symbols may be used on this product. Please study them and learn their meaning. Proper interpretation of these symbols will allow you to operate the product better and safer. SYMBOL V A Hz W min NAME Volts Amperes Hertz Watts Minutes Safety Alert DESIGNATION/EXPLANATION Voltage Current Frequency (cycles per second) Power Time Precautions that involve your safety.
SYMBOL SIGNAL MEANING DANGER Indicates an imminently hazardous situation, which, if not avoided, will result in death or serious injury. WARNING Indicates a potentially hazardous situation, which, if not avoided, could result in death or serious injury. CAUTION Indicates a potentially hazardous situation, which, if not avoided, may result in minor or moderate injury. CAUTION (Without Safety Alert Symbol) Indicates a situation that may result in property damage.
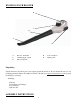
KNOWING YOUR BLOWER B C E A D A C E Blower small tube On/Off trigger switch Blower big tube B D Lock off button Battery pack Unpacking Unpack the blower and all its parts, and compare against the list below. Do not discard the carton or any packaging materials. Please call 1-800-791-91458 or E-mail us at support@amerisuninc.com if any parts are damaged or missing.
INSTALLING THE BLOWER TUBE CAUTION: Always ensure that the tool is switched off and the battery is removed before making any adjustments or maintenance procedures. Slide the small tube (C) over the big tube (B) until the latch on the big tube is inserted into the end of the opening on the small tube and locks into position (see fig.1) Align the widest end of the big tube (B) with the front opening on the blower (A). (see fig 2) Fig. 1 C B Fig.
To install the battery pack into the tool, align the rails of the battery pack with the rails in the tool and push the battery into the handle. To connect the battery, slide the battery pack fully forward. Until the latch locks into place. WARNING: Follow these instructions in order to avoid injury and to reduce the risk of electric shock or fire: Replace the battery pack or the charger immediately if the battery case or charger cord is damaged.
MAINTENANCE WARNING: In order to avoid personal injury and the risk of fire and electric shock, remove the battery pack before adjusting, inspecting, or cleaning the blower. CLEANING Remove the battery pack. Brush or blow dust and debris out of the air vents using compressed air or a vacuum. Keep the air vents free of obstructions, sawdust, and wood chips. Do not spray, wash, or immerse the air vents in water. Wipe off the housing and the plastic components using a moist, soft cloth.
The batteries used in this blower's battery pack contain the following toxic and corrosive material: LITHIUM-ION. WARNING: Toxic materials must be disposed of in a specified manner in order to prevent contamination of the environment. Before disposing of damaged or worn out Lithium-Ion battery packs, contact your local waste disposal agency for information and specific instructions. Take the batteries to a local recycling and/or disposal centre that is certified for disposal.
TROUBLE SHOOTING The following form lists the common operating system with problem and solutions. Please read the form carefully and follow it. PROBLEMS POSSIBLE CAUSES Battery is not secure. SOLUTION To secure the battery pack, make sure the latches on the top of the battery pack snap into place. Battery is not charged. Charge the battery pack according to the Instruction included with your model. Unit will not start Defective power switch.
Item Stock# Description QTY 1 PS76101A-001 left front cover 1 2 PS76101A-002 left housing 1 3 PS76101A-003 motor 1 4 PS76101A-004 motor retaining plate 1 5 PS76101A-005 shock pad 4 6 PS76101A-006 screw ST4x10 2 7 PS76101A-007 fan 1 8 PS76101A-009 button spring 1 9 PS76101A-010 switch button 1 10 PS76101A-011 un-locked button spring 1 11 PS76101A-012 un-locked button 1 12 PS76101A-013 lead wire 1 13 PS76101A-014 switch 1 14 PS76101A-015 18V battery 1.
PowerSmart® is committed to building tools that are dependable for years. Our warranties are consistent with our commitment and dedication to quality. TWO (2) YEARS LIMITED WARRANTY OF POWER SMART PRODUCTS FOR HOME USE. PowerSmart (“Seller") warrants to the original purchaser only, that all PowerSmart consumer power tools will be free from defects in material or workmanship for a period of two (2) years from date of purchase.