INSTRUCTION MANUAL EN 20" 3-in-1 Self Propelled Lawn Mower ES 20" 3-en-1Cortadora de césped autopropulsad Model # PSM2020 Have product questions or need technical support? Please feel free to contact us! Website: www.Amerisuninc.com www.powersmartusa.com Toll free: 1-800-791-9458 Mon-Fri 9-5 EST Email: support@amerisuninc.
CONTENTS EN Technical data…...………………………………………………………... Introduction………………………………………………………………. Safety information…….………………………………………………... General safety procedures ……....……………………………………… Important safety instructions……………………………………………. Knowing your lawn mower……………………………………………… Lawn mower preparation………………………………………………... Operation……………………....………………………………………… Maintenance……………………………………………………………... Storage……………………………………………………………………. Troubleshooting………………………………………………………….
INTRODUCTION Thank You for Purchasing a PowerSmart® Product. This manual provides information regarding the safe operation and maintenance of this product. Every effort has been made to ensure the accuracy of the information in this manual. PowerSmart® reserves the right to change this product and specifications at any time without prior notice. Please keep this manual available to all users during the entire life of the lawn mower.
GENERAL SAFETY PROCEDURES For any questions regarding the hazard and safety notices listed in this manual or on the product, please call (800) 791-9458 Mon-Fri 9-5 EST before using the engine. DANGER: CARBON MONOXIDE Using an engine indoors CAN KILL YOU IN MINUTES. Engine exhaust contains carbon monoxide (CO). This is a poison gas you cannot see or smell. If you can smell the engine exhaust, you are breathing CO. But even if you cannot smell the exhaust, you could be breathing CO.
IMPORTANT SAFETY INSTRUCTIONS General Operation Read, understand, and follow all instructions on the machine and in the manual(s) before starting. 1. Do not put hands or feet near or under the machine. Keep clear of the discharge opening at all times. 2. Only allow responsible adults, who are familiar with the instructions, to operate this machine. 3. Clear the area of objects such as rocks, wire, toys, etc., which could be thrown by the blade. Stay behind the handle when the engine is running. 4.
4. Use extra care when approaching blind corners, shrubs, trees, or other objects that may block your view of a child. Service 1. Safe Handling of Gasoline 2. To avoid personal injury or property damage, use extreme care in handling gasoline. Gasoline is extremely flammable and the vapors are explosive. 3. Extinguish all cigarettes, cigars, pipes, and other sources of ignition. 4. Only use a US EPA approved compliant portable fuel container. 5. Never remove gas cap or add fuel with the engine running.
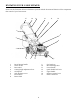
KNOWING YOUR LAWN MOWER Please use the illustration below to familiarize yourself with the location and function of the components that control of your lawn mower.
LAWN MOWER PREPARATION The following section describes steps necessary to prepare the lawn mower for use. If after reading this section, you are unsure about how to perform any of the steps please call (800) 791-9458 Mon-Fri 9-5 EST for customer service. Failure to perform these steps properly can damage the lawn mower or shorten its lifespan. UNPACKING Unpack the lawn mower and all its parts, and compare against the list below.
ATTACH THE FRONT WHEEL ASSEMBLY The front wheel assembly attaches to the front of the deck. To attach the front wheel to the deck, perform the following steps: 1. Mount the single wheel to the wheel bar with the mounting screw. 2. Attach front wheel and bar assembly to the deck with four M6 screws, four washers and four M6 nuts. M6 Screw ATTACH LOWER & UPPER HANDLE 1. Take lower handle and line up the hole in the lower handle with the hole on the handle bracket. 2.
GRASS CATCHER Attach grass catcher 1. Lift mower rear discharge door. 2. Place grass catcher into the slots in the handle brackets. 3. Release the rear discharge door so that it rests on the grass catcher. Caution: Make sure that the mulch plug adapter has been removed from of the rear deck door’s opening. Remove grass catcher 1. 2. 3. 4. Lift mower rear discharge door. Lift grass catcher up and off the slots in the handle bracket. Slide the mulch plug into the ejector opening.
ADJUSTING THE CUTTING HEIGHT Warning! Cutting height adjustments should only be performed after the engine and blades have come to a complete stop! It is always best to begin cutting your lawn with a higher deck height to prevent scalping your lawn. Rear wheel The cutting height for the rear wheels is adjusted with a single lever. Actuate the adjustment lever and pull it to the required position. Please make sure that the lever locks into position.
ENGINE OIL RECOMMENDATIONS Oil is a major factor effecting performance and service life. We recommend the use of a good detergent automotive oil.30W is recommended for most applications. Other viscosity grades shown below may be acceptable for use in these engines. 12 To add oil, follow these steps: 1. Make sure the engine is on a travel surface. Tilting the engine to assist in filling will cause oil to flow into engine areas and will cause damage. 2. Remove the dipstick form the engine. 3.
ENGINE START/STOP LEVER Engine start/stop lever This lawn mower comes equipped with an engine start/stop lever to prevent unintentional starting and to ensure safe operation. Releasing this lever will quickly stop the blade in case of danger. The lever must be actuated before the lawn mower is started. When the engine start/stop lever is released, it must return to its initial position.
It’s import to keep the underside of the mower deck clean and remove grass build-up. This buildup will decrease mulching quality, and make it harder for the equipment to bag the grass. Always mow along inclines (not up and down). You can prevent the lawn mower from slipping down by holding a position at an angle upwards. Select the cutting height according to the length of the grass. If necessary, mow a number of times so that you never cut more than 2 inches of grass in one go.
MAINTENANCE Proper routine maintenance of this mower will help prolong the life of the machine. Always observe safety rules when performing any maintenance. The warranty on this lawn mower does not cover items that have been subjected to operator abuse or negligence. To receive full valve from warranty, operator must maintain the lawn mower as instructed here. Changing of engine-governed speed will void engine warranty. All adjustments should be checked at least once each season.
CHECKING THE OIL The oil capacity of the engine crankcase is 16.9 fl. oz. Check the oil level of the engine according to the Recommended Maintenance Schedule. The lawn mower should be checked before each use for proper oil level. This is a critical step for proper engine starting. To check the oil level: 1. Make sure the lawn mower is on a level surface. 2. Clean around oil fill. Remove dipstick and wipe the dipstick with a clean rag. Insert the dipstick into the oil fill opening without screwing in.
2. Unscrew the spark plug from the engine using the spark plug wrench provided. There is limited space for the wrench to turn. Use both rows of holes in the spark plug wrench to gain leverage to loosen the plug. 3. Visually inspect the spark plug for cracks or excessive electrode wear. Replace as necessary. 4. Measure the plug gap with a wire gauge. The gap should be 0.7 to 0.8 mm (0.028-0.031 in). 5.
STORAGE CAUTION: Never place any type of storage cover or tarp on the MOWER while it is still hot. If the MOWER is being stored for extended periods of time (30 days or more), drain fuel tank and carburetor bowl. NOTE: Keeping the fuel tank full, reduces the amount of air and vapor and helps reduce deterioration of the fuel. This will also help minimize moisture accumulation common with ethanol blended fuels. When storing the mower for extended periods of time: 1.
TROUBLESHOOTING Problem Engine fails to start Engine runs erratic. Engine overheats. Idles poorly. Excessive vibration/noise Mower will not mulch grass. Uneven cut. Cause Engine start/stop lever disengaged. Spark plug wire disconnected. Fuel tank empty or stale fuel. Engine not primed. Faulty spark plug. Blocked fuel line. Engine flooded. Spark plug wire loose. Blocked fuel line or stale fuel. Water or dirt in fuel system. Dirty air filter Engine oil lever low. Air flow restricted.
EXPLODED VIEW AND PARTS LIST 21 21
Item Stock# 1 303010269 2 303160611A 3 303042116 4 203021302 5 303123021 6 303070984A 7 8 9 Qty Item Stock# Screws 8 47 203050380 Wrench screws 2 48 203021293A 2 49 203021294A Speed wrench 2 50 303130335 Cylindrical pin M5*26 2 51 303090066A Upper handle 1 52 303160456 303020503 Hexagon flange bolt M6×35 4 53 303180926 303080316 Flameout lever Φ8 1 54 303042023 Sponge pipe Φ22×Φ32× 640mm 1 55 303041022 302020019A Description Flat washer Description 1
38 303180892A 39 203050341B 40 303020339 41 303130322 42 203050326 43 303043039 44 203010806A 45 303160471 46 203040021A Rear axle seaming Height adjusting stick riveting Hexagon bolt M6×14mm Balance tension spring Height adjusting handle Flat washer 11.5-inch dust cover Gear left 11.
ENGINE EXPLODE VIEW AND PART LIST 24
Item Stock # E01-1 11310-Z3C0110-00A0 E01-9 16061-Z2P0110-00A0 Description CRANKCASE SUBASSEMBLY.
THREE (3) YEARS LIMITED WARRANTY PowerSmart is committed to building equipment that will provide years of dependable service. Our warranties are consistent with our commitment and dedication to quality. THREE (3) YEARS LIMITED WARRANTY OF POWER SMART PRODUCTS FOR HOME USE. PowerSmart (“Seller") warrants to the original purchaser only, that all PowerSmart consumer power tools will be free from defects in material or workmanship for a period of three (3) years from date of purchase.
Tabla de contenidos ES Datos técnicos…...……………………………………………………….. 27 Introducción………………………………………………………………. 28 Información de seguridad…….… ……………………………………... 28 Procedimientos generales de seguridad … …………………………… 29 Instrucciones importantes de seguridad…………………………………. 30 Conocer tu cortadora de césped………………………………………… 32 Preparaciones de la cortadora de césped…………………………………... 33 Manejo……………………....……………………………………….......… 37 Mantenimiento……………………………………………………………... 41 Almancenamiento………………………………………………………….
Introducción Gracias por Comprar el producto de PowerSmart®. Este manual proporciona información sobre el manejo seguro y el mantenimiento de este producto. Se han realizado todos los esfuerzos para garantizar la exactitud de la información contenida en este manual. PowerSmart® se reserva el derecho de cambiar este producto y sus especificaciones en cualquier momento sin previo aviso. Mantenga este manual a disposición de todos los usuarios durante toda la vida útil de la cortadora de césped.
PROCEDIMIENTOS GENERALES DE SEGURIDAD Si tiene alguna pregunta sobre los avisos de peligro y seguridad que figuran en este manual o en el producto, llame al (800) 791-9458 de lunes a viernes de 9 a 17 EST horas antes de usar el motor. PELIGRO: MONOXIDO DE CARBONO U Usar un motor bajo techo PUEDE MATARLE EN MINUTOS. El escape del cortacésped contiene monóxido de carbono (CO). Este es un gas venenoso que no puede ver ni oler. Si puede oler el escape del motor, está respirando (CO).
INSTRUCCIONES IMPORTANTES DE SEGURIDAD Manejo General Lea, comprenda y siga todas las instrucciones en la máquina y en los manuale(s) antes de comenzar.. 1. No poner las manos o los pies cerca o debajo de la máquina. Mantener el conducto de descarga libre de obstáculos durante todo el tiempo. 2. Solo permita que los adultos responsables que están familiarizados con las instrucciones manejen esta máquina. 3. Limpiar el área de objetos tales como piedras, cables, juguetes, etc.
3. Nunca permita que niños menores de 16 años operen la cortadora de césped. 4. Tenga especial cuidado al acercarse a esquinas ciegas, arbustos, árboles u otros objetos que puedan bloquear su visión de un niño. Servicio 1. Manejo seguro de la gasolina 2. Para evitar lesiones personales o daños a la propiedad, tenga mucho cuidado al manejar la gasolina. La gasolina es extremadamente inflamable y los vapores son explosivos. 3. Apague todos los cigarrillos, puros, pipas y otras fuentes de ignición. 4.
Conocer su cortacésped Por favor use la imagen debajo para famializarse con la localización y la función de los componentes que controlan su cortacésped.
PREPARACIONES DEL CORTACÉSPED La siguiente sección describe los pasos necesarios para preparar la cortadora de césped para su uso. Si después de leer esta sección, no está seguro de cómo realizar alguno de los pasos, llame al (800)791-9458 de lunes a viernes de 9 a 17 horas, Hora Estánder de Oriente (EST) para obtener ayuda del departamento de servicio al cliente. Si no realiza estos pasos correctamente puede dañar la cortadora de césped o acortar su vida útil.
CONEXIÓN DEL CONJUNTO DE RUEDA DELANTERA El conjunto de la rueda delantera se adhiere a la parte delantera de la cubierta. Para adjuntar la rueda delantera a la cubierta, realice los siguientes pasos: 1. Monte la rueda única en la barra de la rueda con el tornillo de montaje. 2. Adjusta la rueda delantera y el montaje de barra a la cubierta con cuatro tornillos M6, cuatro arandelas y cuatro tuercas M6.
BOLSA DE RECOGIDA DE HIERBA Fijar la bolsa de recogida de hierba 1. Levante la puerta trasera de descarga del cortacésped 2. Coloque la bolsa de recogida de hierba a las ranuras del soporte de manija. 3. Suelte la puerta trasera de descarga para que quede en el regogedor de hierba Atención: asegúresee de que el adapatador del encufe de pajote haya sido retirado de l abertura de la puerta de la cubierta trasera Quitar la bolsa de recogida de hierba. 1. Levante la puerta trasera de descarga. 2.
AJUSTER LA HAUTEUR DE DECOUPE Avertissement ! Les réglages de la hauteur de découpe ne doivent être effectués qu'après l'arrêt complet du moteur et des lames ! Il est toujours préférable de commencer à couper votre pelouse avec une hauteur de pont plus élevée pour éviter de scalper votre pelouse. La hauteur de découpe est ajustée avec un seul levier. Actionnez le levier de réglage et tirez-le dans la position souhaitée. Assurez-vous que le levier se verrouille en position.
OPÉRATION REMPLISSAGE DE GAZ ET D'HUILE Le moteur est expédié sans huile ni essence. Assurez-vous d'ajouter de l'huile et de l'essence avant de démarrer le moteur. 1. Ajouter de l'huile avant de démarrer la tondeuse pour la première fois. 2. Faites le plein d’essence conformément aux instructions . Avertissement: Faites très attention lorsque vous manipulez de l'essence. L'essence est extrêmement inflammable et ses vapeurs sont explosives.
AGREGAR GASOLINA ADVERTENCIA: Este motor puede emitir vapores de gasolina altamente inflamables y explosivos, que pueden causar quemaduras graves o incluso la muerte si se encienden. Una llama abierta cercana puede provocar una explosión incluso si no está directamente en contacto con la gasolina. Utilisez de l'essence sans plomb fraîche (dans les 30 jours suivant l'achat) avec un indice d'octane minimum de 87. Ne mélangez pas l'huile avec de l'essence. Pour ajouter de l’essence, procédez comme suit: 1.
fonctionnent correctement. Répétez le test plusieurs fois après le démarrage du moteur. Lorsque le levier de démarrage / d'arrêt du moteur est relâché, le moteur doit s'arrêter en quelques secondes. Lorsque le levier de démarrage / d'arrêt du moteur est relâché, le moteur doit s'arrêter en quelques secondes. Avertissement : La lame commence à tourner dès que le moteur est démarré. DÉMARRER LE MOTEUR 1. Se asrgure de que el cable de encendido se conecte con la bujía.. 2. Se encuentre detrás del cortacésped.
Éteignez le moteur avant de faire des vérifications sur la lame. Gardez à l'esprit que la lame continue de tourner pendant quelques secondes après l'arrêt du moteur. N'essayez jamais d'arrêter manuellement la lame. Vérifiez régulièrement si la lame est solidement fixée, en bon état et bien affûtée. Si dans cas contraire, affûtez la lame ou remplacez-la. Dans le cas où la lame heurte un objet, éteignez immédiatement la tondeuse à gazon et attendez que la lame s'arrête complètement.
Se usa como una bolsa trasera Use cesta de recogida para coleccionar los recortes cuando estoy operando el corta cortacésped 1.Fijar cesta de recogida persigue la instrucción a la preparación del cortacésped. Los recortes de hierba se recogerán automáticamente en la bolsa en cuanto funcione el cortacésped. Opere el cortacésped hasta la cesta de recogida resulta llena. 2. Pare el motor por completo por medio de la suelta de la palanca de arranque/ parada del motor.
Advertencia: Nunca incline el cortacésped más de 90 ° en ninguna dirección y no deje el cortacésped inclinado durante ningún período de tiempo. El aceite puede drenar hacia la parte superior del motor causando un problema de arranque. HOJA DEL CORTACÉSPED Para garantizar un funcionamiento seguro, todos los trabajos de afilado, balanceo y montaje de las cuchillas deben ser realizados por un centro de servicio autorizado. Para lograr resultados óptimos, recomendamos que se revise la hoja una vez al año.
MANTENIMIENTO DE LIMPIADOR DE AIRE El mantenimiento rutinario para el purificador de aire ayudará mantener el flujo de aire adecuado al carburador. De vez en cuando, verifique que el purificador de aire esté libre de suciedad excesiva. Consulte el Programa de Mantenimiento Recomendado para detalles del mismo: 1. Abra la tapa del purificador de aire. 2. Retire el elemento esponjoso de la carcasa. 3. .Limpie la suciedad del interior de la carcasa vacía del purificador de aire vacío. 4.
Programa de mantenimiento Antes de cada uso Ítem Acción Espada Tornillo de montaje de cuchilla Aceite de motor Inspeccionar x Inspeccionar x Verificar Cambiar Verificar Limpiar Reemplazar x Verificar x Verificar x Filtro de aire Bolsa de hierba Operación con control de cuchilla Bujía Uso de Uso de 5 primeras horas o primer mes 25 horas x x x1 Uso de 50 horas o cada 6 meses Uso de 150 Uso de 100 horas o horas o cada dos cada año años x2 x x1 x1 x x x Verificar Reemplazar x x Depó
ALMACENAMIENTO PRECAUCIÓN: Nunca coloque ningún tipo de cubierta de almacenamiento o lona en el CORTACÉSPED mientras aún esté caliente. Si la cortadura de césped se está almacenanda por períodos prolongados (30 días o más), drene el tanque de combustible y el recipiente del carburador. Al almacenar el cortacésped durante largos períodos de tiempo: 1. Arranque el motor y hágalo funcionar hasta que el tanque, la cubeta del carburador y la línea de combustible estén completamente vacíos y que el motor se pare.
SOLUCIÓN DE PROBLEMAS Problema El motor no arranca Causa Palanca de arranque / parada del motor desconectada. Cable de bujía desconectado. Depósito de combustible vacío o combustible rancio. El motor no está cebado. Bujía defectuosa. El motor funciona de forma errática. El motor se sobrecalienta. Marcha en vacío deficiente. Vibración / ruido excesivo El cortacésped no cubre la hierba. Corte desigual. Línea de combustible bloqueada. Motor inundado. Cable de bujía suelto.
VISTA DETALLADA Y LISTADO DE PIEZAS 47
Item Stock# 1 303010269 2 Qty Item Stock# Tornillo 8 47 203050380 303160611A Tornillo de llave 2 48 3 303042116 Arandela plana 2 4 203021302 5 303123021 6 303070984A 7 303020503 8 303080316 9 302020019A 10 303080369 11 303200099 12 303160531A 13 303030065 14 303030025 15 303070983A 16 303180891A 17 302120035 18 303070981A 19 303070982A 20 303030036 21 303070976A 22 303020332 23 203050264 24 203050345A 25 303030032 26 303070980A 27 303042043
28 303010108 29 203090013A 30 303060104A 31 303020468 32 303160470 33 303160607A 34 303123017A 35 303240487A 36 303050007 37 303100002 38 303180892A 39 203050341B 40 303020339 41 303130322 42 203050326 43 303043039 44 203010806A 45 303160471 46 203040021A Tornillo 5x16mm Pieza de oreja derecha Placa de ajustes Tornillo hexagonal M6X10 Engranaje derecho Muelle tensor para caja de engranajes Pasador cilíndrico Conjunto de caja de engranajes Collar de eje flexxible Φ12 Con
Vista detallada del motor y lista de piezas 50
Cantidad Ítem E01-1 Ítem 11310-Z3C0110-00A0 CARTER SUBCONJUNTO.
TRES (3) AÑOS DE GARANTÍA LIMITADA PowerSmart se compromete a construir equipos que brinden años de servicio confiable. Nuestras garantías son consistentes con nuestro compromiso y dedicación a la calidad. GARANTÍA LIMITADA DE TRES (3) AÑOS DE PRODUCTOS POWER SMART PARA USO DOMÉSTICO.