
Use and Care Manual


4
English
UNPACKING AND CONTENT
IMPORTANT! Due to modern mass production techniques, it is unlikely the product is
faulty or that a part is missing. If you find anything wrong, do not operate the product until the
parts have been replaced or the fault has been rectified. Failure to do so could result in serious
personal injury.
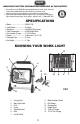
CONTENTS IN PACKAGE
Description QTY Description QTY
Work Light 1 120V AC Power Charger 1
12V DC Car Charger 1 Operator's Manual 1
ASSEMBLY & ADJUSTMENT
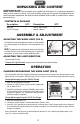
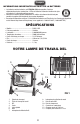
ADJUSTING THE WORK LIGHT (FIG 2)
This work light is fully assembled out of the box. It can be unfolded
to a standing postion, or be folded to a flat storage positon. See
FIG 2.
NOTE: The maximum turn angle between the frame and the base
is limited. There are marks on the adjustable joint (5) showing the
turning limits. Do not over force it when unfolding the light.
ADJUSTING THE LIGHT DIRECTION
Your work light tilts 360°.
To Adjust the Light Direction, simply rotate the work light head to desired position.
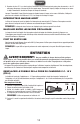
OPERATION
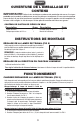
CHARGING/RECHARGING THE WORK LIGHT (FIG 3)
This rechargeable work light is shipped with the battery partially charged. Charge the work light after purchase and
before the first use by using the 120V AC charger (12) for 3-5 hours or until the battery charge indicator turns green.
Charging/Recharging Using the 120V AC Charger
1. Make sure the work light is turned off.
2. Connect the 120V AC power charger and the charging port
(10) as shown in FIG 3.
3. Plug the AC charger into a standard 120V/60Hz power outlet
to start charging. A lit red "PowerSmith" logo (A) indicates the
charging is in progress. The "PowerSmith" logo turns green
when the charging is completed.
Charging/Recharging Using the 12V DC Car Charger
1. Make sure the work light is off.
2. Connect the 12V DC charger (13) and the work light as shown in FIG 3.
3. Insert the 12V DC plug into the accessory outlet of a vehicle or other 12 volt DC power outlet to start charging. A
lit red "PowerSmith" logo (A) indicates the charging is in progress. The "PowerSmith" logo turns green when the
charging is completed.
When "PowerSmith" logo (A) turns red and flashing while the light is in use, it indicates the battery power is less
than 15%, it is time to charge the light.
FIG 2
FIG 3
10 A
13
12