
Replacement Part List

4
Assembly Instructions
Tools Required For Assembly
(1) Pair of Pliers
(2) 9/16” Wrenches
(2) 3/4” Wrenches
Optional Tools
(1) Utility Knife
(1) Hammer
Remove from Carton
Remove all parts and hardware packages from the
carton. Lay out all parts and hardware and identify
them using the illustrations on pages 2 and 3.
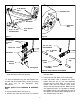
1. Inspect axle ends. If there is excessive plastic,
trim with knife using extreme caution.
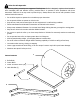
2. Place a 5/8” Flat Washer over axle on Roller
Body on both ends. See Figure 1.
3. Place one end of the Center Brace over one side
of the axle then the opposite end. See Figure 1.
NOTE: You my have to pull (spread out) one
end of the Center Brace to get it to go over the
axle. See Figure 2.
4. Place one 5/8” Flat Washer on the outside of
Center Brace on both ends.
5. Insert a 3/16” Cotter Pin into the hole of the
axle NOTE: It maybe necessary to use a
hammer to get the Cotter Pin into place. Then,
spread the legs of the pin to secure into place.
Repeat this procedure for the other side of the
axle. See Figure 1.
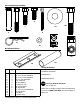
6. Attach the Hitch Side Bars to the Center Brace,
using 3/8” x 1” Hex Head Bolts and 3/8” NyLock
Nuts. See Figure 3.
7. Insert the 3/8” x 3/8” Spacer between the two
Hitch Side Bars. The Spacer needs to be
attached to the second hole back from the front
of the Hitch Side Bars. Secure the Spacer in
place by inserting a 3/8” x 1-1/2” Hex Head Bolt
through one Hitch Side Bar then the 3/8” x 3/8”
Spacer and the other Hitch Side Bar. Thread a
3/8” NyLock Nut onto the ends. NOTE: Do not
tighten this bolt and nut yet. See Figure 3
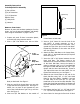
8. Attach the two Clevis Plates to the end of the
Hitch Side Bar using 3/8” x 2-1/4” Hex Head
Bolts for the Clevis Plates. “Straddle” (one bolt
on each side) of the front 3/8” x 1-1/2” Hex
Head Bolt on the end of the Hitch Side Bar. This
keeps the Clevis Plate assembly from slipping off
the Hitch Side Bars when the unit is in use. See
Figure 4.
9. Now tighten the four 3/8” x 1-1/2” and the 3/8”
x 2 - 1/4” and 3/8” Nylock Nuts. See Figure 4.
10. Insert Clevis Pin through the first hole of Hitch
Figure 1
Roller Body
5/8” Flat Wash-
er
3/16”
Cotter Pin
Roller
Body Axle
Center Brace
Figure 2
(spread out)
Center Brace