
Replacement Part List
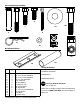

5
Plate and secure with #14 Hitch Pin.
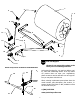
11. Insert a Expansion Plug into the fill/drain hole
on each end of the Roller Body. Secure by turning
the wing nut on the Expansion Plug.
See Figure 5.
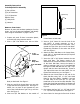
Handle option is for PLR1824 & PLR1836T
only.
To use the handle option: See Figure 6.
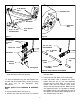
1. Remove the Clevis Pin and Clevis Pin Clip from
Figure 4
the Hitch Plate.
2. Loosen the two 3/8” Bolts on the Clevis Plate.
3. Place the Handle Tube in between the Clevis
Plates. Insert the 1/2” x 2-1/2” Hex Head Bolt
through the top Clevis Plate, the hole in the
Handle Tube and the bottom Clevis Plate.
Secure with 1/2” Nylock Lock Nut. NOTE: Do not
over tighten this bolt. It is possible to damage
the Handle Tube by over tightening the bolt. If
the Handle Tube does become damaged; do not
use. Personal injury can occur.
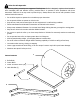
Figure 3
3/8” NyLock
Nuts
3/8” Spacer
3/8” NyLock
Nuts
3/8” x 1”-1/2”
Hex Head Bolt
3/8” x 1”
Hex Head
Figure 5
Figure 6—Only PLR1824 & PLR1836H
3/8” x 2-1/4
Hex Head
Bolt
Clevis Pin
Hitch Plates
3/8” NyLock
#14 Clevis
Pin Clip
Fill/Drain Hole
Expansion
Plug
Handle
Tube
1/2” x 2-1/2”
Hex Head Bolt
1/2” Nylon
Lock Nut
1” Handle
Grip
1” Handle
Grip