
Operation Manual


IMPORTANT
Installer and Users please note:
These instructions should be read carefully and left with the
user of the product for future reference.
INSTALLATION
For free-standing use: attach the feet to the underneath of
the heater using the four 12mm (½") screws.
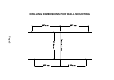
To wall-mount: Firstly, remove the lower brackets from the
back of the heater, turn them upside down and replace them,
so that the tags protrude below the heater.
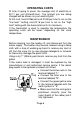
Referring to the diagram opposite, draw two horizontal lines
on the wall 308mm (12¼") apart, the lower line more than
50mm (2") from the floor.
On the upper line, drill holes 250mm (9¾") from the centre
line, using a 6mm (¼") masonry bit, and insert a wall plug.
Insert a screw into the hole and almost fully tighten.
On the upper line, drill holes 233mm (9¼") from the centre
line, using a 6mm (¼") masonry bit, and insert a wall plug.
Hang the heater on the two top brackets using the keyhole
slots on the back.
The lower brackets should now line up with the lower holes.
Insert a screw into the each of the holes through the
brackets, and fully tighten.
Page 2