
Installation manual
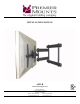

AM3-B
Installation Manual Page - 9 -
Mount Installation
NOTE: Before proceeding with the mount installation, you should already have the mounting holes pre-
drilled. Please use the template (supplied) and follow the instructions.
NOTE
: For ease of installation, it is recommended that two people perform the installation.
WARNING: WHEN MOUNTING THE AM3-B, THE SIDE THAT THE SWINGOUT ARM IS LOCATED
ON MUST HAVE A LAG BOLT MOUNTED ON AT LEAST ONE SIDE ( FIGURE 4, PAGE
8), TOP AND BOTTOM.
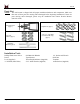
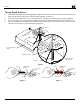
1. After the holes have been pre-drilled, line up the mounting slot openings with the pre-drilled holes.
2. Insert four (4) 5/16” x 3” lag bolts (or six, depending on your mount location) and washers into the
mounting holes and tighten (Figure 6).
3. Before tightening down the lag bolts, place a level (supplied) on the top rail and make sure that the mount
is level. Once the mount is level, tighten all of the lag bolts using a 1/2” deep set socket.
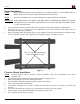
Figure 6
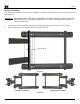
Concrete Mount Installation
NOTE: Concrete anchors must be used for concrete installation. They can be purchased at your local
hardware store.
1. Begin by placing the mount into position against the wall, keeping it level.
2. Mark off four holes to be used for securing the mount.
3. Next, drill holes using the appropriate masonry bit for your anchors.
4. Insert a concrete anchor into each hole.
5. If necessary, a hammer can be used to lightly tap each anchor into place so that they are flush with
the wall.
6. Once all of the anchors are in place, move the mount into position (over each anchor).
7. Attach the nut onto the threaded shaft that is protruding from the wall.
8. Do not tighten until all nuts are in place.
5/16” x 3” Lag Bolts and Washers
(wood stud installation only)