Troubleshooting and Warranty Technical Information Tutorials Studio One Artist Connecting to a Computer ™ www.presonus.
Important Safety Instructions The exclamation point within an equilateral triangle is intended to alert the user to the presence of important operating and maintenance (servicing) instructions in this manual. The lightning flash with arrowhead symbol within an equilateral triangle is intended to alert the user to the presence of uninsulated “dangerous” voltage within the product’s enclosure that may be of sufficient magnitude to constitute a risk of electric shock to humans.
5.0 Tutorials — 30 1.0 Overview — 1 5.1 1.4 What is in the Box — 3 5.1.4 Microphone Placement — 31 5.2 A Brief Tutorial on Dynamics Processing — 34 2.0 Hookup — 4 5.2.1 Common Questions Regarding Dynamics Processing — 34 2.1 Front-Panel Connections — 4 2.2 Rear-Panel Connections — 6 5.2.2 Types of Dynamic Processing — 35 2.3 Basic Hookup Diagram — 7 3.0 Connecting to a Computer — 8 5.2.3 Compression Settings: Some Starting Points — 39 5.3 Equalizers — 42 5.3.1 What is an EQ? — 42 3.
Overview Hookup Connecting to a Computer Studio One Artist Tutorials Technical Information Troubleshooting and Warranty iv PreSonus AudioBox™ USB Current Section Current Sub Section 0 0.
Owner’s Manual Overview Overview Studio One Artist Connecting to a Computer Hookup Introduction Tutorials Thank you for purchasing the PreSonus AudioBox™ USB. PreSonus Audio Electronics has designed the AudioBox USB utilizing high-grade components to ensure optimum performance that will last a lifetime. Loaded with 2 highheadroom, Class A, microphone preamplifiers; a built-in 2x2 USB 1.
1 1.2 Overview 1.2 Overview Summary of AudioBox USB Hardware Features PreSonus AudioBox™ USB Summary of AudioBox USB Hardware Features •• 24-bit/48 kHz sampling rate •• 2 Class A microphone preamplifiers Hookup •• 2 Instrument inputs •• MIDI I/O •• 2x2 USB 1.
Owner’s Manual 1 1.4 Overview What is in the Box Connecting to a Computer Hookup Your AudioBox USB package contains the following: PreSonus AudioBox USB recording interface Studio One Artist 6’ (1.8m) USB cable Tutorials Software library containing •• PreSonus Studio One Artist program DVD plus gigabytes of third-party content Technical Information •• AudioBox driver and manual CD Troubleshooting and Warranty 1.
2 2.1 Overview 2.0 2.1 PreSonus AudioBox™ USB Hookup Front-Panel Connections Hookup Front-Panel Connections Hookup Connecting to a Computer Studio One Artist Microphone/Instrument Inputs. Both channels of the AudioBox USB have Mic/ Instrument combo jacks. This convenient connector accepts either a ¼-inch phone plug or an XLR plug. •• Microphone Inputs. The XLR inputs on channels 1 and 2 are equipped with two custom PreSonus microphone preamplifiers.
Hookup Front-Panel Connections 2 2.1 Overview Owner’s Manual •• XLR Microphone Instrument inputs: 40 dB of variable gain (-10 to +30 dB) •• TS ¼-inch Instrument Level inputs: 60 dB of variable gain (0 dB to +60 dB) Hookup Input Gain/Trim Control. These knobs provide the following gain structure: Connecting to a Computer Clip Indicator. All channels feature clip LEDs next to the trim controls. The red clip indicator LED will illuminate when the channel’s input signal reaches 0 dBFS.
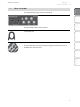
2 2.2 PreSonus AudioBox™ USB Hookup Rear-Panel Connections Overview 2.2 Rear-Panel Connections Hookup Connecting to a Computer ¼-inch Phones (headphone) Jack. This is where you connect headphones to your AudioBox USB. Studio One Artist Tutorials Main Out. These are the main outputs for the AudioBox USB. The output level of the Main Outs is controlled by the Main volume knob on the front of the unit.
Owner’s Manual 2 2.3 Overview Basic Hookup Diagram 48V Hookup AUDIOBOX USB Power Clip 0 1 60 +30 11 Connecting to a Computer -10 Clip Mic•Instrument 2 -10 0 60 +30 INPUTS -80 PLAYBACK 10 Tutorials Studio One Artist 1 headphones Designed by PreSonus in the USA. Manufactured in PRC. vocal mic IN OUT Technical Information guitar L Troubleshooting and Warranty 2.
3 3.1 Connecting to a Computer System Requirements Overview 3.0 PreSonus AudioBox™ USB Connecting to a Computer Your AudioBox USB is a rugged USB 1.1 audio interface with zerolatency analog monitoring control and professional audio tools. Hookup 3.1 System Requirements Below are the minimum computer-system requirements for PreSonus Studio One Artist and AudioBox USB.* Connecting to a Computer Mac •• Operating Systems: Studio One Artist •• Mac OS X 10.
The AudioBox installer requires that your AudioBox USB be connected to your computer. Connect your AudioBox USB to an available USB port and insert the Installation CD into your disc drive. The AudioBox installer will auto-launch and take you through each step of the installation process. Please read each message carefully. It is recommended that you quit all applications before you start the installation.
3 3.3 PreSonus AudioBox™ USB Connecting to a Computer Installation for Mac OS X Overview 3. The installer will now scan your computer, you will be prompted to begin the installation. If your AudioBox is not detected by the installer, you will prompted to connect it. Hookup Click “Install Driver.” Connecting to a Computer Studio One Artist 4. Once the driver has been installed successfully, you will be alerted. Click “Next” to finish the installation.
Owner’s Manual 3 3.4 Using the AudioBox USB with Popular Audio Applications Overview 3.4 Connecting to a Computer Using the AudioBox USB with Popular Audio Applications Hookup Complete setup instructions for Studio One Artist and a brief tutorial on its features can be found in Section 4 of this manual. However, you can use your AudioBox USB with any audio-recording application that supports Core Audio or ASIO.
3 3.4 Connecting to a Computer Using the AudioBox USB with Popular Audio Applications PreSonus AudioBox™ USB Overview Cakewalk Sonar 6+ 1. Launch Sonar. 2. Go to Options | Audio... and click on the Advanced tab. Hookup 3. Change the Driver Mode to “ASIO.” (Using WDM, rather than ASIO, for pro-audio applications is not recommended.) Connecting to a Computer 4. Click the “OK” button. 5. Restart Sonar. Studio One Artist 6. Go to Options | Audio... and click on the Drivers tab. 7.
Owner’s Manual 3 3.5 Overview Windows Control Panel Your AudioBox USB features a control panel on Windows systems that allows you to adjust the buffer size and sample rate. When this is enabled, the AudioBox USB Control Panel will automatically launch each time you boot your Windows. Sample Rate Selector Changes Sample Rate. Studio One Artist Sets the sample rate to 44.1 or 48 kHz. A higher sample rate will increase the fidelity of the recording.
4 4.1 PreSonus AudioBox™ USB Studio One Artist Installation and Authorization Overview 4.0 Studio One Artist Quick Start Hookup Connecting to a Computer Studio One Artist Tutorials Technical Information Troubleshooting and Warranty Your AudioBox USB comes with Studio One Artist recording and production software. Whether you are about to record your first album or your fiftieth, Studio One Artist provides you with all of the tools necessary to capture and mix a great performance.
4 4.1 Creating a User Account 2. If you are a new Studio One user, you will need to create a user account. Click on the “Create New Account” link if your computer is connected to the Internet. •• If you already have a PreSonus user account, you can skip to “Activating Studio One Artist On Line.” 3. Fill out the user registration form. You will be asked to create a username and password. This information will be used to access your PreSonus user account on the PreSonus Web site.
4 4.1 PreSonus AudioBox™ USB Studio One Artist Installation and Authorization Overview Activating Studio One Artist Online Hookup Now that you have created a user account, you can activate your copy of Studio One Artist. Click on the Activate Online link and enter your previously created account username, password, and the product key you received with the Studio One Artist installation disc. Your Studio One Product Key is located on the Studio One Artist disc wallet.
4 4.1 5. Click on the “Download License” link. A file called “Studio One 2 Artist.license” will be saved onto your computer. You will need to copy this onto a piece of removable media and transfer it onto the computer on which you want to run Studio One Artist. Connecting to a Computer 6. Launch Studio One Artist. Overview Studio One Artist Installation and Authorization Hookup Owner’s Manual From the Activate Studio One Menu, click on the “Activate Offline” link.
4 4.1 Studio One Artist Installation and Authorization PreSonus AudioBox™ USB Overview 2. At the top of the installation menu, select the source from which the content will be installed, as well as the location where you wish to install the content. The source of the content will be the same DVD from which you installed Studio One Artist. By default, Studio One Artist will point to your DVD drive as the content source. Listed in the installation menu are separate entries for each available item.
4 4.2 Overview Enabling the Audio Driver Connecting to a Computer Hookup Studio One Artist was designed with PreSonus interfaces in mind, so AudioBox USB setup is quick and easy. When Studio One Artist is launched, by default you will be taken to the Start page. On this page, you will find document-management and device-configuration controls, as well as a customizable artist profile, a news feed, and links to demos and tutorials from PreSonus.
4 4.3 Overview 4.3 PreSonus AudioBox™ USB Studio One Artist Configuring MIDI Devices Configuring MIDI Devices Hookup From the External Devices window in Studio One Artist, you can configure your MIDI keyboard controller, sound modules, and control surfaces. This section will guide you through setting up your MIDI keyboard controller and sound module. Please consult the Reference Manual located on your Studio One Artist installation DVD for complete setup instructions for other MIDI devices.
Owner’s Manual Studio One Artist Configuring MIDI Devices 4 4.3 Studio One Artist Connecting to a Computer Hookup Overview 3. Click the Add button. 6. You must specify which MIDI channels will be used to communicate with this keyboard. For most purposes, you should select all MIDI channels. If you are unsure of which MIDI channels to choose, select all 16. 7. In the Receive From drop-down menu, select the MIDI-interface input from which Studio One Artist will receive MIDI data.
4 4.3 PreSonus AudioBox™ USB Studio One Artist Configuring MIDI Devices Overview If you have a sound module that you’d like to connect, leave the External Devices window open and proceed to the next part of this section. If not, you can close this window and skip to Section 4.4. Hookup Setting up an External MIDI Sound Module from the Start Page Connecting to a Computer MIDI instrument controllers (keyboards, MIDI guitars, etc.
4 4.4 Overview 3. The Add Device window will launch. Tutorials 6. In the Send To drop-down menu, select the MIDI-interface output from which Studio One Artist will send MIDI data to your sound module—in this case, via the AudioBox USB. Studio One Artist 5. Specify which MIDI channels will be used to communicate with this keyboard. For most purposes, you should select all MIDI channels. If you are unsure of which MIDI channels to select, we suggest you select all 16.
4 4.4 Studio One Artist Creating a New Song Overview 4.4 PreSonus AudioBox™ USB Creating a New Song Now that you’ve configured your MIDI devices, let’s create a new Song. We‘ll start by setting up your default audio I/O. Hookup 1. From the Start page, select “Create a new Song.” Connecting to a Computer 2. In the browser window, name your Song and choose the directory in which you’d like it saved. You’ll notice a list of templates on the left.
4 4.4 10. If you would like the same inputs to be available every time you launch Studio One Artist, click the “Make Default” button. 11. Click on the Outputs tab, and you will see all of the available outputs on your AudioBox USB. We recommend that you create stereo outputs for the Main outputs on your AudioBox USB. 12. In the lower right corner, you will see the Audition select menu.
4 4.5 Overview 4.5 Studio One Artist Creating Audio Tracks PreSonus AudioBox™ USB Creating Audio Tracks Hookup 1. In the upper left corner of the Arrange window, you will notice several buttons. The third button from the left is the Add Tracks button. Click this button to bring up the Add Tracks window. Connecting to a Computer 2.
Owner’s Manual Studio One Artist Creating MIDI Tracks 4 4.6 Level Mute Hookup Solo Overview Anatomy of an Audio Track Meter Rec Arm ST/Mono Connecting to a Computer Audio Input Creating MIDI Tracks 1. Click on the Add Tracks button. When the Add Tracks window launches, select Instrument as the track format and click the OK button. Troubleshooting and Warranty 4.6 Technical Information Tutorials Studio One Artist Mon (In S1) 2.
4 4.7 Studio One Artist Adding Vitrual Instruments and Effects to Your Song PreSonus AudioBox™ USB Overview 6. At the bottom of the Inspector menu, you will see your Bank and Program selections. From here, you can remotely change the patch on your sound module. Hookup MIDI data does not contain audio signals. To hear your sound module, you must connect the audio output of the sound module to an AudioBox input, then connect the AudioBox’s audio outputs to a sound system.
4 4.7 Drag-and-Drop Effects Audio and MIDI files can be quickly located, auditioned, and imported into your Song by dragging them from the file browser into the Arrange view. If you drag the file to an empty space, a new track will be created with that file placed at the position to which you dragged it. If you drag the file to an existing track, the file will be placed as a new part on the track.
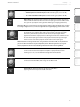
5 5.1 PreSonus AudioBox™ USB Tutorials Microphone Types Overview 5.0 5.1 Tutorials Microphone Types Hookup The AudioBox USB work with most types of microphones, including dynamic, ribbon, and condenser microphones. 5.1.1 Condenser Connecting to a Computer Studio One Artist Condenser microphones generally capture sound with excellent fidelity and are among the most popular microphone choices for studio recording and, increasingly, for live performance as well.
5 5.1 Overview Microphone Placement Hookup The following are a few recording applications to help you get started with your AudioBox USB. These are by no means the only ways to record these instruments. Microphone selection and placement is an art. For more information, visit your library or local bookstore, as there are many books and magazines about recording techniques. The Internet is also a great source of recording information, as are instructional videos.
5 5.1 Tutorials Microphone Types PreSonus AudioBox™ USB Overview Acoustic Guitar Hookup Point a small-diaphragm condenser microphone at the 12th fret, approximately 8 inches away. Point a large-diaphragm condenser microphone at the bridge of the guitar, approximately 12 inches from the guitar. Experiment with distances and microphone placement. Another popular method is using an XY microphone placement with two small-diaphragm condenser microphones. (See drum-overheads photo on the next page.
5 5.1 Drum Overheads (XY example) Point a dynamic microphone at the center of the snare, making sure it is placed so that the drummer will not hit it. Place a small-diaphragm condenser microphone under the drum, pointed at the snares. Experiment with the placement of both microphones. Also experiment with inverting the phase of the bottom microphone. This technique can be used in live applications.
5 5.2 Tutorials A Brief Tutorial on Dynamic Processing Overview 5.2 PreSonus AudioBox™ USB A Brief Tutorial on Dynamics Processing Hookup Studio One Artist software is included with the AudioBox USB. This powerful DAW includes an assortment of dynamics plug-ins. What follows is an excerpt from a brief tutorial on dynamics processing written by PreSonus president and founder Jim Odom. It is included to help you get the most out of Studio One Artist.
5 5.2 Overview Why do the best consoles in the world put compressors on every channel? The answer is simply that most instruments need some form of compression, often very subtle, to be properly heard in a mix. Hookup Why do we need noise gates? Studio One Artist Connecting to a Computer Consider the compressed-vocal example discussed earlier; you now have a 20 dB dynamic range for the vocal channel. Problems arise when noise or instruments (air conditioner, loud drummer, etc.
5 5.2 Tutorials A Brief Tutorial on Dynamic Processing PreSonus AudioBox™ USB Overview Hookup As the compression threshold is lowered, more of the input signal is compressed (assuming a nominal input-signal level). Care must be taken not to overcompress a signal, as too much compression destroys the acoustic dynamic response of a performance.
5 5.2 Hard/Soft Knee. With hard-knee compression, the gain reduction applied to the signal occurs as soon as the signal exceeds the level set by the threshold. With soft-knee compression, the onset of gain reduction occurs gradually after the signal has exceeded the threshold, producing a more musical response (to some folks). Connecting to a Computer Tutorials Tutorials Auto. Places a compressor in automatic attack and release mode.
5 5.2 Tutorials A Brief Tutorial on Dynamic Processing PreSonus AudioBox™ USB Overview the level of a signal by a factor of two. (e.g., if a level drops 5 dB below the expansion threshold, the expander will reduce it to 10 dB below the threshold.) Hookup Commonly used for noise reduction, expansion is very effective as a simple noise gate.
5 5.2 Overview Frequency Key Filter. Some gates offer a variable frequency control allowing the user to set a specific frequency band that the will cause the gate to open or close. Connecting to a Computer Hookup Noise Gating. Noise gating is the process of removing unwanted sounds from a signal by attenuating all signals below a set threshold. As described, the gate works independently of the audio signal after being “triggered” by the signal crossing the gate threshold.
5 5.2 PreSonus AudioBox™ USB Tutorials A Brief Tutorial on Dynamic Processing Overview Left/Right (Stereo) Overheads. The low ratio and threshold in this setting gives a “fat” contour to even out the sound from overhead drum mics. Low end is increased, and the overall sound is more present and less ambient. You get more “boom” and less “room.” Hookup Thresholdhold -13.7 dB RatRatioio 1.3:1 AttAttackack 27 ms Release 128 ms Fretted Instruments Connecting to a Computer Electric Bass.
Tutorials A Brief Tutorial on Dynamic Processing 5 5.2 Stereo Mix Stereo Limiter. Just as the name implies, this is a hard limiter, or “brickwall,” setting— ideal for controlling the level to a two-track mixdown deck or stereo output. RatRatioio 7.1:1 AttAttackack 0.001 ms Release 98 ms Hookup Thresholdhold 5.5 dB Contour. This setting fattens up the main mix. RatRatioio 1.2:1 AttAttackack 0.002 ms Release 182 ms Connecting to a Computer Thresholdhold -13.4 dB Effects RatRatioio 2.
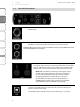
5 5.3 PreSonus AudioBox™ USB Tutorials Equalizers Overview 5.3 Equalizers Hookup Studio One Artist also includes several EQ plug-ins. Here’s a brief explanation of how an EQ functions, as well as some charts to help you navigate the frequency ranges of various instruments so you can quickly choose the best EQ settings for your recordings and live mixes. 5.3.
Owner’s Manual Tutorials Equalizers 5 5.3 Overview 5 kHz. By setting a narrow bandwidth and boosting the attack a bit, you can achieve a punchier kick drum without overpowering the rest of the mix. Connecting to a Computer Hookup A broad bandwidth accentuates or attenuates a larger band of frequencies. The broad and narrow bandwidths (high and low Q) are usually used in conjunction with one another to achieve the desired effect. Let’s look at our kick drum again.
5 5.3 PreSonus AudioBox™ USB Tutorials Equalizers Overview High Mids (2 kHz to 4 kHz). The attack portion of percussive and rhythm instruments occurs in this range. High mids are also responsible for the projection of midrange instruments. Hookup Presence (4 kHz to 6 kHz). This frequency range is partly responsible for the clarity of a mix and provides a measure of control over the perception of distance. If you boost this frequency range, the mix will be perceived as closer to the listener.
Owner’s Manual Tutorials Equalizers 5 5.
Overview Table 2 Hookup Connecting to a Computer Studio One Artist Tutorials Tutorials Technical Information Troubleshooting and Warranty 46 PreSonus AudioBox™ USB Tutorials Equalizers 5 5.
Owner’s Manual 5 5.3 General EQ Suggestions Overview 5.3.3 Tutorials Equalizers Connecting to a Computer Hookup Studio One Artist includes two different EQ plugins, Channel Strip and Pro EQ. Like every plugin in Studio One Artist, both EQ plugins come with a complete collection of factory presets and allow you to both customize factory presets and create your own. What follows are a few generic EQ settings for some of the most common instruments. As with the compression settings in Section 5.2.
5 5.3 PreSonus AudioBox™ USB Tutorials Equalizers Overview Percussion Snare Hookup Connecting to a Computer LOW ON/OFF ON LOW PEAK/SHELF PEAK LOW FREQ (Hz) 130 LOW GAIN -4 LOW MID ON/OFF ON LOW MID HI/LOW Q LOW LOW MID FREQ (Hz) 665 LOW MID GAIN +4 HI MID ON/OFF ON HI MID LO/HI LO HI MID FREQ (kHz) 1.6 HI MID GAIN +4 HI ON/OFF ON HI PEAK/SHELF SHELF HI FREQ (kHz) 4.
Owner’s Manual Tutorials Equalizers 5 5.3 LOW FREQ (Hz) 320 LOW GAIN +6 LOW MID ON/OFF ON LOW MID HI/LOW Q LOW LOW MID FREQ (Hz) 960 LOW MID GAIN 0 HI MID ON/OFF ON HI MID LO/HI HI HI MID FREQ (kHz) 3.
5 5.4 PreSonus AudioBox™ USB Tutorials Digital Effects Overview 5.4 Digital Effects Studio One Artist includes an array of time-based and modulation effects. What follows is a brief description of how each type works. Hookup 5.4.1 Reverb Connecting to a Computer Reverberation—or reverb, as it is more commonly known—is perhaps the most widely used effect. Natural reverb is created by sound waves reflecting off of a surface or many surfaces.
Owner’s Manual 5 5.4 Delay Overview 5.4.2 Tutorials Digital Effects Hookup A delay essentially creates an echo, although you can often use delays to create more complex time-based effects. The source signal is delayed so that it is heard later than it actually occurred. Connecting to a Computer elay Time. Delay time is the time between the source signal and its D echo. The simplest delay effect is a single repeat.
6 6.1 PreSonus AudioBox™ USB Technical Information AudioBox USB Specifications Overview 6.0 Technical Information 6.1 AudioBox USB Specifications Hookup Microphone Preamp Connecting to a Computer Studio One Artist Mic Preamp EIN -115 dB, 20 kHz BW, max gain, Rs=40Ω, A-wtd Frequency Response 14 Hz - 70 kHz, +/- 0.3 dB, unity gain THD+N 0.
Owner’s Manual Techincal Information AudioBox USB Specifications 6 6.1 Reference Level of 0dBFS +4 dBu ADC Dynamic Range 102 dB, 48 kHz sample rate, A-wtd DAC Dynamic Range 110 dB, 48 kHz sample rate, A-wtd MIDI I/O 5-pin DIN connectors Hookup 44.1 kHz, 48 kHz, Connecting to a Computer Sample Rates Studio One Artist 24-bit Tutorials Bit Depth Technical Information USB 1.
7 7.1 Troubleshooting and Warranty Troubleshooting Overview 7.0 7.1 PreSonus AudioBox™ USB Troubleshooting and Warranty Troubleshooting Hookup Many technical issues can arise when using a standard computer as a digital audio workstation (DAW). PreSonus can only provide support for issues that directly relate to the AudioBox interface and Studio One™ digital audio workstation software.
PreSonus Audio Electronics, Inc. 7257 Florida Blvd. Baton Rouge, LA 70806 55 Connecting to a Computer Studio One Artist PreSonus Audio Electronics, Inc., warrants this product to be free of defects in materials and workmanship for a period of one year from the date of original retail purchase. This warranty is enforceable only by the original retail purchaser. To be protected by this warranty, the purchaser must complete and return the enclosed warranty card within 14 days of purchase.
PreSonus AudioBox™ USB Overview Index Hookup Connecting to a Computer Studio One Artist A K Ableton Live 12 Attack 37, 38 Audio Device Studio One Artist 19 Audio I/O Set-up Studio One Artist 24–29 Key Filter 39 Key Listen 38 B M Buffer Size (see also, Latency) 13 Makeup Gain 37 MIDI Controller 20 MIDI Sound Module 22 C Tutorials Compressor Definition 35–36 Suggested Settings 39 Terminology Associated With 36 Cubase 11 D Technical Information Decay 50 Delay 51 Delay Time 51 Downward Expansio
Owner’s Manual Hookup Overview Declaration of Conformity 7257 Florida Blvd., Baton Rouge, LA 70806 USA Phone: 225-216-7887 declares that AudioBox™ USB complies with Part 15 of the FCC rules. Studio One Artist Address: Connecting to a Computer Responsible Party: PreSonus Audio Electronics Tutorials Operation is subject to the following two conditions: 1. This device may not cause harmful interference, and; Technical Information 2.
Overview Hookup Connecting to a Computer Studio One Artist Tutorials Technical Information Troubleshooting and Warranty 58 PreSonus AudioBox™ USB Current Section Current Sub Section 0 0.
Overview Added bonus: PreSonus’ previously Top Secret recipe for… Jambalaya Connecting to a Computer 5 lbs link andouille sausage 3 lbs boneless chicken 2 lbs ground beef 3 lbs onions (yellow or purple) 2 stalks of celery 1 lb bell peppers (green or red) 1 batch green onions 3 lbs rice Tony Chachere’s Cajun Seasoning 1 bottle chicken stock concentrate (or 3 cubes chicken bullion) 1 can Rotel tomatoes with chilies, diced (regular hot) Tabasco sauce Studio One Artist •• •• •• •• •• •• •• •• •• •• •• ••
AudioBox USB ™ Owner’s Manual EMC Statement: NOTE: This equipment has been tested and found to comply with the limits for a Class B digital device, pursuant to part 15 of the FCC Rules. These limits are designed to provide reasonable protection against harmful interference in a residential installation. This equipment generates, uses, and can radiate radio frequency energy and, if not installed and used in accordance with the instructions, may cause harmful interference to radio communications.