AudioBox™ USB Français Deutsch Español English Quick Start Guide ® www.presonus.
0.1 Important Safety Instructions The exclamation point within an equilateral triangle is intended to alert the user to the presence of important operating and maintenance (servicing) instructions in this manual. The lightning flash with arrowhead symbol within an equilateral triangle is intended to alert the user to the presence of uninsulated “dangerous” voltage within the product’s enclosure that may be of sufficient magnitude to constitute a risk of electric shock to humans.
CE This product complies with the European Union Council Directives and Standards relating to electromagnetic compatibility EMC Directive (2006/95/EC) and the Low Voltage Directive (2004/108/EC). English Español REACh This product is compliant with the European Union Directive EC1907/206 for the Registration, Evaluation, Authorization, and Restriction of chemicals (REACh) and contains none or less than 0.1% of the chemicals listed as hazardous chemicals in the REACh regulation.
PreSonus AudioBox™ USB 1 English 2 3 Español 4 Deutsch 5 Hook Up your AudioBox USB 2 Consult the Front and Rear Panel Connections drawings on page 2-3 and the basic hookup diagram on page 4. Install the AudioBox Driver 5 Your AudioBox USB is quick and easy to install.
Quick Start Guide English Introduction A Quick Note About This Quick Start Guide: This Quick Start Guide is written to help you get acquainted with your AudioBox USB. Complete information is in the Owner’s Manual located on your AudioBox Driver disc. We suggest that you use the Owner’s Manual to familiarize yourself with the features, applications, and correct connection procedures for your AudioBox before trying to connect it to your computer.
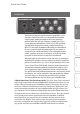
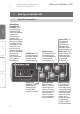
1 1.1 Hook Up your AudioBox USB Front Panel Connections 1.0 Hook Up your AudioBox USB 1.1 Front Panel Connections English Español Deutsch Microphone / Instrument Preamps. Each channel of the AudioBox USB has a microphone preamp and an instrument preamp. The combo connector lets you use either ¼” phone or XLR connectors in the same jack. Use the ¼” jacks to connect guitars or other unamplified instruments. Use the XLR jacks to connect your favorite microphone. 48V Button.
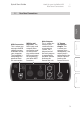
Quick Start Guide 1 1.2 Rear Panel Connections ¼” Stereo Headphone Output. This is where you connect your headphones. The output level is controlled by the Phones volume knob on the front of the unit. Deutsch Main Outputs. This is where you connect your studio monitors or monitoring system. The output level of the main outputs is controlled by the Main volume knob on the front of the unit. Français USB Connection. This is where you connect the USB cable from your AudioBox USB to your computer.
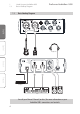
1 1.3 PreSonus AudioBox™ USB Hook Up your AudioBox USB Basic Hookup Diagram 1.3 Basic Hookup Diagram AUDIOBOX USB 48V Power Clip -10 0 1 60 +30 11 Clip English 1 Mic•Instrument 2 -10 0 60 +30 INPUTS -80 PLAYBACK 10 Español headphones guitar Deutsch Designed by PreSonus in vocal mic IN OUT L the USA. Manufactured in PRC.
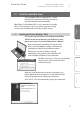
Quick Start Guide 2.0 Install the AudioBox Driver Installing the Driver (Windows Only) 2 2.1 Install the AudioBox Driver Your AudioBox USB is a rugged USB 1.1 audio interface with zero-latency analog monitoring control and professional audio tools. Installing the Driver (Windows® Only) For step-by-step instructions on installing the AudioBox USB driver and control panel on your Windows system, please see Section 3 in your AudioBox Owner’s Manual.
3 Install and Authorize Studio One Artist 3.0 PreSonus AudioBox™ USB Install and Authorize Studio One Artist For complete information on using, installing and authorizing Studio One see Section 4 in your AudioBox USB Owner’s Manual or Studio One User Manual (located in the Studio One Help menu). English Your AudioBox USB comes with Studio One Artist recording and production software. Studio One Artist provides you with all of the tools necessary to capture and mix a great performance.
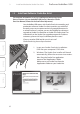
Quick Start Guide 3 3.1 Authorizing Studio One Artist Make sure that your computer is connected to the I nternet. (For instructions on authorizing Studio One without an Internet connection, please consult Section 4.1 of the AudioBox USB manual. 2. Launch the Studio One Artist program by double-clicking on its icon on your desktop or in your applications folder. The Activate Studio One menu will appear. 3. Click the Create a New Account link. Deutsch Español English 1. Français 3.
3 3.1 Install and Authorize Studio One Artist Authorizing Studio One Artist PreSonus AudioBox™ USB Fill out the form, making sure that your email is correct. When you are finished, click Register. 5. Write down the username and password you chose. This is the information you will use to register all your PreSonus products as well as to log into the PreSonus forum. English 4. Español USERNAME _______________________ PASSWORD _______________________ 6.
Quick Start Guide 3 3.2 Enter the username and password you just created and the product key from your Studio One Artist installation disc. Click on the Activate button to finish the activation process. Studio One Artist comes with many audio loops and instruments that are organized into Soundsets, as well as demo songs and third-party plug-in instruments.
3 3.2 Install and Authorize Studio One Artist Installing the Studio One Artist Content PreSonus AudioBox™ USB To install any of the third-party content, click on the arrow button next to its name in the content list (Celemony Melodyne Trial, Native Instruments Komplete Player) to launch its installer. 4. Notice that next to Native Instruments Komplete Player there is a serial number listed. You will need this numbers to authorize this plug-in the first time you open it. 5.
Quick Start Guide 4 Set your Levels and Record! Before you begin, there are a few general rules of thumb that we recommend you follow: •• A lways turn both the Main and Phones knobs on the front panel down before making connections. English •• Before plugging or unplugging a microphone or engaging phantom power, make sure the trim level has been turned all the way down for that channel. Español •• Do not allow your inputs to clip.
4 4.1 Set your Levels and Record! Creating a Monitor Mix 4.1 PreSonus AudioBox™ USB Creating a Monitor Mix Turn all the knobs on your AudioBox all the way counter-clockwise. 2. Connect your AudioBox USB to your computer and make sure that the power LED is illuminated. 3. Grab a microphone and a mic cable and plug them into the AudioBox’s Channel 1 mic input. 4. Connect the Main Outputs of your AudioBox to your power amplifier or powered monitors using balanced cables. 5.
Quick Start Guide 9. Set your Levels and Record! Creating a Monitor Mix 4 4.1 Launch Studio One Artist. NOTE: The rest of this section describes using your AudioBox USB with Studio One Artist. However, most of these steps can be generally applied to any DAW. Consult the documentation that came with your DAW for specific application instructions. Section 3 of your AudioBox USB Owner’s Manual includes setup instructions for some of the most popular DAW applications. English 10.
4 4.1 Set your Levels and Record! Creating a Monitor Mix PreSonus AudioBox™ USB 14. Turn the AudioBox Phones volume control to the 12 o‘clock position. English 15. Click on the MIX button to open the Console in Studio One Español 16. Speak into the microphone while watching the meter on Channel 1 in Studio One and slowly turning the AudioBox Input 1 Trim knob clockwise.
Quick Start Guide Set your Levels and Record! Creating a Monitor Mix 4 4.1 English 17. Turn the Mixer knob on the front panel of your AudioBox to the 12 o’clock position. This will allow you to hear both your inputs and the playback from the computer. You are now ready to record. Español 18. Click the “Record“ button in Studio One Artist and begin recording your first masterpiece! Français Deutsch 19.
5 Want to Learn More? PreSonus AudioBox™ USB 5.0 Want to Learn More? AudioBox USB Information Complete information about your AudioBox USB can be found in the Owner’s Manual. Your Owner’s Manual is located on the AudioBox installation disk. The AudioBox USB Owner’s Manual contains complete operating instructions for your interface.
Quick Start Guide Added bonus: PreSonus’ previously Top Secret recipe for… Jambalaya Ingredients: English 5 lbs link andouille sausage 3 lbs boneless chicken 2 lbs ground beef 3 lbs onions (yellow or purple) 2 stalks of celery 1 lb bell peppers (green or red) 1 batch green onions 3 lbs rice Tony Chachere’s Cajun Seasoning 1 bottle chicken stock concentrate (or 3 cubes chicken bullion) 1 can Rotel tomotoes with chilies, diced (regular hot) Tabasco sauce Español •• •• •• •• •• •• •• •• •• •• •• •• 1. 2.
AudioBox™ USB Quick Start Guide EMC Statement: English Español NOTE: This equipment has been tested and found to comply with the limits for a Class B digital device, pursuant to part 15 of the FCC Rules. These limits are designed to provide reasonable protection against harmful interference in a residential installation.