R-Series R65 V2 and R80 V2 Active AMT Studio Monitors Owner’s Manual ® www.presonus.
Table of Contents 1 Overview — 1 1.1 Introduction — 1 1.2 Product Registration — 2 1.3 What’s in the Box — 2 2 Hookup — 3 2.1 Rear Panel Connections and Controls — 3 2.2 2.1.1 Inputs — 3 2.1.2 Power — 3 2.1.3 Acoustic Tuning Controls — 4 Hookup Diagrams — 5 2.2.1 Basic Setup — 5 2.2.2 Advanced Setup with Monitor Controller and Speaker Switching — 6 3 Application Guide — 7 3.1 Monitor Placement and Acoustic Space Settings — 7 3.
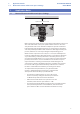
1 1.1 Overview Introduction 1 Overview 1.1 Introduction R-Series R65 V2 and R80 V2 Owner’s Manual Thank you for purchasing the PreSonus® R65 V2 or R80 V2 active AMT studio monitor. PreSonus Audio Electronics has designed the R65 V2 and R80 V2 utilizing high-grade components to ensure optimum performance that will last a lifetime.
1 1.2 1.2 Overview Product Registration R-Series R65 V2 and R80 V2 Owner’s Manual Product Registration PreSonus is committed to delivering the best experience for our customers. MyPreSonus is a one-stop portal for all our registered customers’ needs. From your my PreSonus account, you can view all your PreSonus hardware and software registrations; contact support; track orders and more. To register your R-Series studio monitor, go to My.PreSonus.com and follow the onscreen instructions.
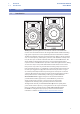
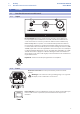
2 2.1 Hookup Rear Panel Connections and Controls 2 Hookup 2.1 Rear Panel Connections and Controls 2.1.1 Inputs R-Series R65 V2 and R80 V2 Owner’s Manual Line-level Inputs. The R-Series studio monitors provide a choice of three linelevel input types: balanced XLR, balanced ¼” TRS, and unbalanced RCA. Do not connect more than one source to your R-Series studio monitors simultaneously.
2 2.1 Hookup Rear Panel Connections and Controls R-Series R65 V2 and R80 V2 Owner’s Manual AC Select Switch. The input-power voltage is set at the factory to correspond with the country to which the R-Series studio monitor was shipped. Use this switch only if you are using your R-Series monitor in a country that uses a different standard voltage than is used in the country where your purchased your monitor originally. 2.1.3 Acoustic Tuning Controls High Frequency.
2 2.2 Hookup Hookup Diagrams R-Series R65 V2 and R80 V2 Owner’s Manual Acoustic Space. Cuts the level of all frequencies below 800 Hz by either -4 dB or -2 dB to compensate for the bass boost that naturally occurs when a speaker is placed near a wall or a corner. If your R-Series monitors can be placed away from the walls in your mix space, leave this control set to 0 dB. Power User Tip: The closer your studio monitors are to a wall or a corner, the more the boundary bass will be boosted.
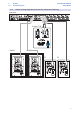
2 2.2 Hookup Hookup Diagrams 2.2.
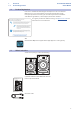
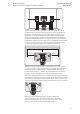
3 3.1 Application Guide Monitor Placement and Acoustic Space Settings 3 Application Guide 3.1 Monitor Placement and Acoustic Space Settings R-Series R65 V2 and R80 V2 Owner’s Manual Speakers 8” to 12” from wall Before placing your studio monitors in your mixing environment, position your desk or monitor stands so that your speakers will be at least 8 to 12 inches away from walls and corners.
3 3.1 Application Guide Monitor Placement and Acoustic Space Settings R-Series R65 V2 and R80 V2 Owner’s Manual If possible, your mix position should be placed on the center of a wall as this will provide a more balanced listening position. Place your speakers so that they are the same distance from the sides of the room.
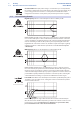
3 3.2 Application Guide Calibrating Using 85 dB SPL “Standard” Reference R-Series R65 V2 and R80 V2 Owner’s Manual Creating the sweet spot is relatively easy. Simply angle, or “toe-in,” each speaker so that the tweeters form an equilateral triangle with your head—that is, the speakers are the same distance from each other as they are from you. The monitors should be angled, or “toed in,” so that they are each directed to an ear, rather than pointed straight ahead.
3 3.2 Application Guide Calibrating Using 85 dB SPL “Standard” Reference R-Series R65 V2 and R80 V2 Owner’s Manual You should calibrate the right and left monitors independently to ensure that both monitors are set to the same acoustic level. This will ensure that your stereo mixes are balanced and will translate well across different speaker systems.
4 4.1 Resources Technical Specifications 4 Resources 4.1 Technical Specifications R-Series R65 V2 and R80 V2 Owner’s Manual IINPUTS (R65 V2 and R80 V2) 1 - Balanced XLR 1 - Balanced ¼” TRS 1 - Unbalanced RCA PERFORMANCE Frequency Response (-3 dB) R65 V2 45 Hz – 22 kHz R80 V2 40 Hz – 22 kHz Crossover Frequency R65 V2 2.7 kHz R80 V2 2.
4 4.1 Resources Technical Specifications R-Series R65 V2 and R80 V2 Owner’s Manual Mid-frequency Control Settings +/- 6dB @ 1kHz Low Cut Settings Flat, 80Hz, or 100Hz Acoustic Space Settings Flat, -2dB or -4dB PROTECTION (R65 V2 and R80 V2) RF interference Output-current limiting Over-temperature Turn-on/off t ansient Subsonic fil er External mains fuse POWER R65 V2 and R80 V2 100-120V ~50/60 Hz or 220-240V ~50/60 Hz Energy Conservation Mode <0.
4 4.2 4.2 Resources Troubleshooting R-Series R65 V2 and R80 V2 Owner’s Manual Troubleshooting No Power. First ensure that your R-Series studio monitor is plugged in. If it’s connected to a power conditioner, verify that the power conditioner is turned on and functioning. If problem still exists, disconnect the power cable from your studio monitor and check the fuse on the back panel. The fuse housing is located directly beneath the IEC power cable connection.
Dinner is Served Added bonus: PreSonus’ previously Top Secret recipe for… Red Beans and Rice Ingredients: • • • • • • • • • • 1 lb dried Red Kidney Beans 1 large onion (diced) 3 celery stalks (diced) 1 large green bell pepper (diced) 6-8 C vegetable stock 1 Tbs. Old Bay seasoning ½ fresh parsley 2 tsp. kosher salt 2 Tbs. olive oil 1 smoked ham hock (optional) Cooking instructions: 1. 2. Rinse red beans in cold water. In a pressure cooker, heat olive oil on medium high.
R-Series R65 V2 and R80 V2 Active AMT Studio Monitors Owner’s Manual ® Baton Rouge • USA www.presonus.