
Instruction Manual


© Audio Trade GmbH · Pro-Ject Pre Box · Revision 15.10.10/15.12.10
2
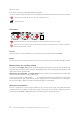
Dear music lover,
thank you for purchasing a PRO-JECT AUDIO preamplifier.
In order to achieve maximum performance and reliability you should study these instructions for use carefully.
!
Warning of a hazard for the user, the unit or possible misuse.
Important notice.
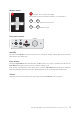
Connectors
!
Make all connections whilst the preamplifier is disconnected from the power supply.
!
Take care to connect the left and right channels correctly. The right channel is usually marked red,
the left channel black or white.
Pre out
A power amplifier or active loudspeakers can be connected to the output sockets marked Out.
Inputs
Line level sources such as CD player radio or TV can be connected to the input sockets marked In 1 or In 2.
Remote power-on, switching voltage
The socket marked Trigger Amp provides a 12V DC switched output voltage for remote power-on of units with
this facility (such as the Pro-Ject Amp Box or Pro-Ject Amp Box Mono), which corresponds to the position (on/off)
of the power switch on the front panel.
Optional Pro-Ject Switch Box. The Trigger Switch socket connects the input expander Pro-Ject Switch Box.
The Switch Box provides three extra line-level inputs.
A 45cm remote power-on cable (polarity
+
) is supplied with the Pro-Ject amplifiers for connecting the
remote-switched power socket to the Pro-Ject Pre Box. Longer cables are available from your Pro-Ject dealer.
Do not use this trigger output for any other connections for which it is not designed.
Mains power connection
The unit is supplied with a power supply suitable for your country's mains supply. Check the label before
connecting to ensure compliance with the mains rating in your house. Connect the low voltage plug from the
power supply to the Power ~16V socket before connecting the power supply to the mains.