
Installation Sheet


PROFLO.COM
Distributed Exclusively by Ferguson and Wolseley Canada
© 2018 Ferguson Enterprises, Inc. 0718 892675
4
6. Clean Inlet Screen
A. Clean the inlet screen by turning off the water
supply, disconnecting the water supply line from
the supply shank and removing the screen with a
paper clip (Fig. 9).
B. Clean screen (Fig. 10) and replace.
6. Nettoyage de la grille d’entrée
A. Pour nettoyer la grille d’entrée, fermez le robinet
d’alimentation en eau, débranchez le tuyau d’al-
imentation en eau de la tige d’alimentation, puis
retirez la grille à l’aide d’un trombone (fig. 9).
B. Nettoyez la grille (fig. 10), puis remettez-la en
place.
6. Limpie la pantalla de admisión
A. Limpie la pantalla de admisión cerrando el sumin-
istro de agua, desconectando el tubo de suministro
de agua del vástago de suministro y retirando la
pantalla con un clip para papeles (Fig. 9).
B. Limpie la pantalla (Fig. 10) y reemplácela.
Other Points to Remember
1. Pressure-assist toilets get their energy from the
water supply.
2. All pressure-assist toilets get their energy from the
water supply line. It is important to have sufficient
pressure at the supply. The minimum line pressure
is 25 psi for a 1.0 gpf system.
3. A blocked bowl or drain will affect the fixture’s
performance. To check for this, pour 2 to 3 gallons
of water into the bowl. If the bowl accumulates
water in it, this would indicate that something is
blocking the bowl/drain. If you need additional help,
please contact the manufacturer of the flushing
system, or do a word search on “pressure-assist
toilets” on the web.
Autres points à ne pas oublier
1. Toutes les toilettes à pression tirent leur énergie du
tuyau d’alimentation.
2. Toutes les toilettes à pression tirent leur énergie du
tuyau d’alimentation. Il est donc important d’avoir
suffisamment de pression d’alimentation. La
pression du tuyau d’alimentation pour un système
être d’au moins 20 psi, et d’au moins 25 psi pour
1 gpc.
3. Une cuvette bloquée ou un drain bloqué influera
sur la performance de l’appareil sanitaire. Pour
vérifier s’il y a une obstruction, versez 2 ou 3
gallons d’eau dans la cuvette. Si l’eau s’accumule
dans la cuvette, cela signifie que la cuvette ou le
drain est bloqué. Si vous désirez obtenir de l’aide
supplémentaire, veuillez contacter le fabricant du
système de chasse d’eau ou faites une recherche
sur Internet à l’aide des mots «toilettes à pression»
Otros puntos que debe recordar
1. Los excusados asistidos por presión obtienen su
energía del suministro de agua.
2. Todos los excusados asistidos por presión obtienen
su energía de la tubería de suministro de agua. Es
importante tener presión suficiente en el suministro.
La presión mínima de la tubería de agua para un
sistema de 25 psi para un dispositivo de 1.0 gpf.
3. Una taza o drenaje bloqueados afectará el desem-
peño del dispositivo. Para comprobar esto, vierta 2
ó 3 galones de agua en la taza. Si la taza acumula
agua en su interior, esto indicaría que algo está
bloqueando la taza o el drenaje. Si necesita más
ayuda, comuníquese con el fabricante del sistema
de descarga, o haga una búsqueda de las palabras
“pressure-assist toilets” en la Web.
-2-
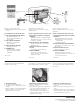
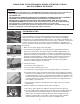
Step 1. Check Flush Cartridge
A. Turn off water supply and flush toilet.
B. Pour water onto top of cartridge (Fig. 1) and turn on water.
C. Watch for air bubbles. Consistent flow of bubbles indicates cartridge needs to be
replaced. No bubbles visible, move on to Step 4.
Step 2. Flush Cartridge Replacement
A. Turn off water and flush the toilet.
B. Use the handle end of pliers (Fig. 2) to unscrew the cartridge from the vessel.
C. Drop in new cartridge and screw in until one female thread (Fig. 3) of vessel
is showing.
D. Turn on water. Continue to screw in cartridge slowly, 1/8 to 1/4 turn increments
until water stops running into the bowl and tank pressurizes.
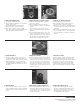
Step 3. Actuator Adjustment
A. Start by loosening the setscrew in the center of the actuator. Adjust the height of
the actuator by screwing it up or down. There should be a gap (Fig. 4) (about the
thickness of a penny) between the rod and actuator when gently lifting the rod.
When accomplished tighten the setscrew in the center of the actuator.
Step 4. Check Air Inducer
A. Place several drops of water over hole on top of air inducer and flush toilet (Fig. 5).
If drop is vacuumed in, move onto step 6. If not, air inducer needs to be cleaned.
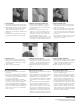
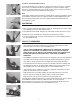
Step 5. Clean Air Inducer
A. Turn off water and flush toilet. Unscrew the cap of the air inducer (the smaller of
the two caps) (Fig. 6).
B. Pull the duckbill out from the cap and clean it by gently squeezing it (Fig. 7)
between your fingers under a flow of water. Inspect the lips of the duckbill.
If they are deformed, the duckbill needs to be replaced.
C. Reassemble, insert the duct bill into the housing (Fig. 8) body and reinstall the cap
to hand tight.
Step 6. Clean Inlet Screen
A. Clean the inlet screen by turning off the water supply, disconnecting the water
supply line from the supply shank and removing the screen with a paper
clip (Fig. 9).
B. Clean screen (Fig. 10) and replace.
Other Points to Remember
1. Pressure-assist toilets get their energy from the water supply.
2. All pressure-assist toilets get their energy from the water supply line. It is important
to have sufficient pressure at the supply. The minimum line pressure for a 1.6 gpf
system is 20 psi and 25 psi for 1.0 gpf.
3. A blocked bowl or drain will affect the fixture’s performance. To check for this, pour
2 to 3 gallons of water into the bowl. If the bowl accumulates water in it, this would
indicate that something is blocking the bowl/drain. If you need additional help,
please contact the manufacturer of the flushing system, or do a word search on
“pressure-assist toilets” on the web.
Fig. 1
Fig. 9
Fig. 4
Fig. 6
Fig. 7
Fig. 8
Fig. 2
Fig. 3
Operation
Fig. 10Fig. 5
All pressure-assist toilets get their energy from the water supply line. It is
important to have sufficient pressure at the supply. The minimum line
pressure for a 1.6 gpf system is 20 psi and 25 psi for 1.0 gpf.
All pressure-assist toilets get their energy from the water supply line. It
is important to have suffi cient pressure at the supply. The minimum line
pressure is 25 psi for 1.0 gpf.
Step 1. Check Flush Cartridge
A. Turn off water supply and fl ush toilet.
B. Pour water onto top of cartridge (Fig. 1) and turn on water.
C. Watch for air bubbles. Consistent fl ow of bubbles indicates cartridge needs to be
replaced. No bubbles visible, move on to Step 4.
Step 2. Flush Cartridge Replacement
A. Turn off water and fl ush the toilet.
B. Use the handle end of pliers (Fig. 2) to unscrew the cartridge from the vessel.
C. Drop in new cartridge and screw in until one female thread (Fig. 3) of vessel
is showing.
D. Turn on water. Continue to screw in cartridge slowly, 1/8 to 1/4 turn increments
until water stops running into the bowl and tank pressurizes.
Step 3. Actuator Adjustment
A. Start by loosening the setscrew in the center of the actuator. Adjust the height of
the actuator by screwing it up or down. There should be a gap (Fig. 4) (about the
thickness of a penn
y) between the rod and actuator when gently lifting the rod.
When accomplished tighten the setscrew in the center of the actuator.
Step 4. Check Air Inducer
A. Place several drops of water over hole on top of air inducer and fl ush toilet (Fig. 5).
If drop is vacuumed in, move onto step 6. If not, air inducer needs to be cleaned.
Step 5. Clean Air Inducer
A. Turn off water and fl ush toilet. Unscrew the cap of the air inducer (the smaller of
the two caps) (Fig. 6).
B. Pull the duckbill out from the cap and clean it by gently squeezing it (Fig. 7)
between your fi ngers under a fl o w o f water. Inspect the lips of the duckbill.
If they are deformed, the duckbill needs to be replaced.
C. Reassemble, insert the duct bill into the housing (Fig. 8) body and reinstall the ca
p
to hand tight.
Step 6. Clean Inlet Screen
A. Clean the inlet screen by turning off the water supply, disconnecting the water
supply line from the supply shank and removing the screen with a paper
clip (Fig. 9).
B. Clean screen (Fig. 10) and replace.
Other Points to Remember
1. Pressure-assist toilets get their energy from the water supply.
2. All pressure-assist toilets get their energy from the water supply line. It is important
to have suffi cient pressure at the supply. The minimum line pressure is 25 psi
for a 1.0 gpf system.
3. A blocked bowl or drain will affect the fi xture’s performance. To check for this, pour
2 to 3 gallons of water into the bowl. If the bowl accumulates water in it, this would
indicate that something is blocking the bowl/drain. If you need additional help,
please contact the manufac
turer of the fl ushing system, or do a word search on
“pressure-assist toilets” on the web.
-2-
Step 1. Check Flush Cartridge
A. Turn off water supply and flush toilet.
B. Pour water onto top of cartridge (Fig. 1) and turn on water.
C. Watch for air bubbles. Consistent flow of bubbles indicates cartridge needs to be
replaced. No bubbles visible, move on to Step 4.
Step 2. Flush Cartridge Replacement
A. Turn off water and flush the toilet.
B. Use the handle end of pliers (Fig. 2) to unscrew the cartridge from the vessel.
C. Drop in new cartridge and screw in until one female thread (Fig. 3) of vessel
is showing.
D. Turn on water. Continue to screw in cartridge slowly, 1/8 to 1/4 turn increments
until water stops running into the bowl and tank pressurizes.
Step 3. Actuator Adjustment
A. Start by loosening the setscrew in the center of the actuator. Adjust the height of
the actuator by screwing it up or down. There should be a gap (Fig. 4) (about the
thickness of a penny) between the rod and actuator when gently lifting the rod.
When accomplished tighten the setscrew in the center of the actuator.
Step 4. Check Air Inducer
A. Place several drops of water over hole on top of air inducer and flush toilet (Fig. 5).
If drop is vacuumed in, move onto step 6. If not, air inducer needs to be cleaned.
Step 5. Clean Air Inducer
A. Turn off water and flush toilet. Unscrew the cap of the air inducer (the smaller of
the two caps) (Fig. 6).
B. Pull the duckbill out from the cap and clean it by gently squeezing it (Fig. 7)
between your fingers under a flow of water. Inspect the lips of the duckbill.
If they are deformed, the duckbill needs to be replaced.
C. Reassemble, insert the duct bill into the housing (Fig. 8) body and reinstall the cap
to hand tight.
Step 6. Clean Inlet Screen
A. Clean the inlet screen by turning off the water supply, disconnecting the water
supply line from the supply shank and removing the screen with a paper
clip (Fig. 9).
B. Clean screen (Fig. 10) and replace.
Other Points to Remember
1. Pressure-assist toilets get their energy from the water supply.
2. All pressure-assist toilets get their energy from the water supply line. It is important
to have sufficient pressure at the supply. The minimum line pressure for a 1.6 gpf
system is 20 psi and 25 psi for 1.0 gpf.
3. A blocked bowl or drain will affect the fixture’s performance. To check for this, pour
2 to 3 gallons of water into the bowl. If the bowl accumulates water in it, this would
indicate that something is blocking the bowl/drain. If you need additional help,
please contact the manufacturer of the flushing system, or do a word search on
“pressure-assist toilets” on the web.
Fig. 1
Fig. 9
Fig. 4
Fig. 6
Fig. 7
Fig. 8
Fig. 2
Fig. 3
Operation
Fig. 10
Fig. 5
All pressure-assist toilets get their energy from the water supply line. It is
important to have sufficient pressure at the supply. The minimum line
pressure for a 1.6 gpf system is 20 psi and 25 psi for 1.0 gpf.
All pressure-assist toilets get their energy from the water supply line. It
is important to have suffi cient pressure at the supply. The minimum line
pressure is 25 psi for 1.0 gpf.
Step 1. Check Flush Cartridge
A. Turn off water supply and fl ush toilet.
B. Pour water onto top of cartridge (Fig. 1) and turn on water.
C. Watch for air bubbles. Consistent fl ow of bubbles indicates cartridge needs to be
replaced. No bubbles visible, move on to Step 4.
Step 2. Flush Cartridge Replacement
A. Turn off water and fl ush the toilet.
B. Use the handle end of pliers (Fig. 2) to unscrew the cartridge from the vessel.
C. Drop in new cartridge and screw in until one female thread (Fig. 3) of vessel
is showing.
D. Turn on water. Continue to screw in cartridge slowly, 1/8 to 1/4 turn increments
until water stops running into the bowl and tank pressurizes.
Step 3. Actuator Adjustment
A. Start by loosening the setscrew in the center of the actuator. Adjust the height of
the actuator by screwing it up or down. There should be a gap (Fig. 4) (about the
thickness of a penn
y) between the rod and actuator when gently lifting the rod.
When accomplished tighten the setscrew in the center of the actuator.
Step 4. Check Air Inducer
A. Place several drops of water over hole on top of air inducer and fl ush toilet (Fig. 5).
If drop is vacuumed in, move onto step 6. If not, air inducer needs to be cleaned.
Step 5. Clean Air Inducer
A. Turn off water and fl ush toilet. Unscrew the cap of the air inducer (the smaller of
the two caps) (Fig. 6).
B. Pull the duckbill out from the cap and clean it by gently squeezing it (Fig. 7)
between your fi ngers under a fl o w o f water. Inspect the lips of the duckbill.
If they are deformed, the duckbill needs to be replaced.
C. Reassemble, insert the duct bill into the housing (Fig. 8) body and reinstall the ca
p
to hand tight.
Step 6. Clean Inlet Screen
A. Clean the inlet screen by turning off the water supply, disconnecting the water
supply line from the supply shank and removing the screen with a paper
clip (Fig. 9).
B. Clean screen (Fig. 10) and replace.
Other Points to Remember
1. Pressure-assist toilets get their energy from the water supply.
2. All pressure-assist toilets get their energy from the water supply line. It is important
to have suffi cient pressure at the supply. The minimum line pressure is 25 psi
for a 1.0 gpf system.
3. A blocked bowl or drain will affect the fi xture’s performance. To check for this, pour
2 to 3 gallons of water into the bowl. If the bowl accumulates water in it, this would
indicate that something is blocking the bowl/drain. If you need additional help,
please contact the manufacturer of the fl ushing system, or do a word search on
“pressure-assist toilets” on the web.
5. Clean Air Inducer
A. Turn off water and flush toilet. Unscrew the cap of
the air inducer (the smaller of the two caps) (Fig. 6).
B. Pull the duckbill out from the cap and clean it by
gently squeezing it (Fig. 7) between your fingers
under a flow of water. Inspect the lips of the
duckbill. If they are deformed, the duckbill needs to
be replaced.
C. Reassemble, insert the duct bill into the housing
(Fig. 8) body and reinstall the cap to hand tight.
5. Nettoyage de la soupape d’entrée d’air
A. Fermez le robinet d’alimentation en eau, puis
déclenchez la chasse. Dévissez le capuchon de
la soupape d’entrée d’air (le plus petit des deux
capuchons) (fig. 6).
B. Retirez le bec de canard du capuchon, puis
nettoyez-le en le pressant délicatement entre vos
doigts (fig. 7) sous l’eau courante. Examinez les
lèvres du bec de canard. Si elles sont déformées,
vous devez remplacer le bec de canard.
C. Montez la soupape à nouveau en insérant le bec de
canard dans le corps du boîtier (fig. 8), puis remet-
tez le capuchon et vissez-le fermement à la main.
5. Limpie el inductor de aire
A. Corte el agua y descargue el excusado. Desator-
nille la tapa del inductor de aire (la más pequeña
de las dos tapas) (Fig. 6).
B. Saque el pico de pato del tapón y límpielo oprim-
iéndolo suavemente (Fig. 7) entre los dedos bajo
un chorro de agua. Inspeccione los labios del pico
de pato. Si están deformados, debe reemplazar el
pico de pato.
C. Vuelva a armar, inserte el pico de pato en el cuerpo
de la carcasa (Fig. 8) y vuelva a instalar la tapa
apretando sólo con la mano.
-2-
Step 1. Check Flush Cartridge
A. Turn off water supply and flush toilet.
B. Pour water onto top of cartridge (Fig. 1) and turn on water.
C. Watch for air bubbles. Consistent flow of bubbles indicates cartridge needs to be
replaced. No bubbles visible, move on to Step 4.
Step 2. Flush Cartridge Replacement
A. Turn off water and flush the toilet.
B. Use the handle end of pliers (Fig. 2) to unscrew the cartridge from the vessel.
C. Drop in new cartridge and screw in until one female thread (Fig. 3) of vessel
is showing.
D. Turn on water. Continue to screw in cartridge slowly, 1/8 to 1/4 turn increments
until water stops running into the bowl and tank pressurizes.
Step 3. Actuator Adjustment
A. Start by loosening the setscrew in the center of the actuator. Adjust the height of
the actuator by screwing it up or down. There should be a gap (Fig. 4) (about the
thickness of a penny) between the rod and actuator when gently lifting the rod.
When accomplished tighten the setscrew in the center of the actuator.
Step 4. Check Air Inducer
A. Place several drops of water over hole on top of air inducer and flush toilet (Fig. 5).
If drop is vacuumed in, move onto step 6. If not, air inducer needs to be cleaned.
Step 5. Clean Air Inducer
A. Turn off water and flush toilet. Unscrew the cap of the air inducer (the smaller of
the two caps) (Fig. 6).
B. Pull the duckbill out from the cap and clean it by gently squeezing it (Fig. 7)
between your fingers under a flow of water. Inspect the lips of the duckbill.
If they are deformed, the duckbill needs to be replaced.
C. Reassemble, insert the duct bill into the housing (Fig. 8) body and reinstall the cap
to hand tight.
Step 6. Clean Inlet Screen
A. Clean the inlet screen by turning off the water supply, disconnecting the water
supply line from the supply shank and removing the screen with a paper
clip (Fig. 9).
B. Clean screen (Fig. 10) and replace.
Other Points to Remember
1. Pressure-assist toilets get their energy from the water supply.
2. All pressure-assist toilets get their energy from the water supply line. It is important
to have sufficient pressure at the supply. The minimum line pressure for a 1.6 gpf
system is 20 psi and 25 psi for 1.0 gpf.
3. A blocked bowl or drain will affect the fixture’s performance. To check for this, pour
2 to 3 gallons of water into the bowl. If the bowl accumulates water in it, this would
indicate that something is blocking the bowl/drain. If you need additional help,
please contact the manufacturer of the flushing system, or do a word search on
“pressure-assist toilets” on the web.
Fig. 1
Fig. 9Fig. 4
Fig. 6
Fig. 7
Fig. 8
Fig. 2
Fig. 3
Operation
Fig. 10Fig. 5
All pressure-assist toilets get their energy from the water supply line. It is
important to have sufficient pressure at the supply. The minimum line
pressure for a 1.6 gpf system is 20 psi and 25 psi for 1.0 gpf.
All pressure-assist toilets get their energy from the water supply line. It
is important to have suffi cient pressure at the supply. The minimum line
pressure is 25 psi for 1.0 gpf.
Step 1. Check Flush Cartridge
A. Turn off water supply and fl ush toilet.
B. Pour water onto top of cartridge (Fig. 1) and turn on water.
C. Watch for air bubbles. Consistent fl ow of bubbles indicates cartridge needs to be
replaced. No bubbles visible, move on to Step 4.
Step 2. Flush Cartridge Replacement
A. Turn off water and fl ush the toilet.
B. Use the handle end of pliers (Fig. 2) to unscrew the cartridge from the vessel.
C. Drop in new cartridge and screw in until one female thread (Fig. 3) of vessel
is showing.
D. Turn on water. Continue to screw in cartridge slowly, 1/8 to 1/4 turn increments
until water stops running into the bowl and tank pressurizes.
Step 3. Actuator Adjustment
A. Start by loosening the setscrew in the center of the actuator. Adjust the height of
the actuator by screwing it up or down. There should be a gap (Fig. 4) (about the
thickness of a penn
y) between the rod and actuator when gently lifting the rod.
When accomplished tighten the setscrew in the center of the actuator.
Step 4. Check Air Inducer
A. Place several drops of water over hole on top of air inducer and fl ush toilet (Fig. 5).
If drop is vacuumed in, move onto step 6. If not, air inducer needs to be cleaned.
Step 5. Clean Air Inducer
A. Turn off water and fl ush toilet. Unscrew the cap of the air inducer (the smaller of
the two caps) (Fig. 6).
B. Pull the duckbill out from the cap and clean it by gently squeezing it (Fig. 7)
between your fi ngers under a fl o w o f water. Inspect the lips of the duckbill.
If they are deformed, the duckbill needs to be replaced.
C. Reassemble, insert the duct bill into the housing (Fig. 8) body and reinstall the ca
p
to hand tight.
Step 6. Clean Inlet Screen
A. Clean the inlet screen by turning off the water supply, disconnecting the water
supply line from the supply shank and removing the screen with a paper
clip (Fig. 9).
B. Clean screen (Fig. 10) and replace.
Other Points to Remember
1. Pressure-assist toilets get their energy from the water supply.
2. All pressure-assist toilets get their energy from the water supply line. It is important
to have suffi cient pressure at the supply. The minimum line pressure is 25 psi
for a 1.0 gpf system.
3. A blocked bowl or drain will affect the fi xture’s performance. To check for this, pour
2 to 3 gallons of water into the bowl. If the bowl accumulates water in it, this would
indicate that something is blocking the bowl/drain. If you need additional help,
please contact the manufac
turer of the fl ushing system, or do a word search on
“pressure-assist toilets” on the web.
-2-
Step 1. Check Flush Cartridge
A. Turn off water supply and flush toilet.
B. Pour water onto top of cartridge (Fig. 1) and turn on water.
C. Watch for air bubbles. Consistent flow of bubbles indicates cartridge needs to be
replaced. No bubbles visible, move on to Step 4.
Step 2. Flush Cartridge Replacement
A. Turn off water and flush the toilet.
B. Use the handle end of pliers (Fig. 2) to unscrew the cartridge from the vessel.
C. Drop in new cartridge and screw in until one female thread (Fig. 3) of vessel
is showing.
D. Turn on water. Continue to screw in cartridge slowly, 1/8 to 1/4 turn increments
until water stops running into the bowl and tank pressurizes.
Step 3. Actuator Adjustment
A. Start by loosening the setscrew in the center of the actuator. Adjust the height of
the actuator by screwing it up or down. There should be a gap (Fig. 4) (about the
thickness of a penny) between the rod and actuator when gently lifting the rod.
When accomplished tighten the setscrew in the center of the actuator.
Step 4. Check Air Inducer
A. Place several drops of water over hole on top of air inducer and flush toilet (Fig. 5).
If drop is vacuumed in, move onto step 6. If not, air inducer needs to be cleaned.
Step 5. Clean Air Inducer
A. Turn off water and flush toilet. Unscrew the cap of the air inducer (the smaller of
the two caps) (Fig. 6).
B. Pull the duckbill out from the cap and clean it by gently squeezing it (Fig. 7)
between your fingers under a flow of water. Inspect the lips of the duckbill.
If they are deformed, the duckbill needs to be replaced.
C. Reassemble, insert the duct bill into the housing (Fig. 8) body and reinstall the cap
to hand tight.
Step 6. Clean Inlet Screen
A. Clean the inlet screen by turning off the water supply, disconnecting the water
supply line from the supply shank and removing the screen with a paper
clip (Fig. 9).
B. Clean screen (Fig. 10) and replace.
Other Points to Remember
1. Pressure-assist toilets get their energy from the water supply.
2. All pressure-assist toilets get their energy from the water supply line. It is important
to have sufficient pressure at the supply. The minimum line pressure for a 1.6 gpf
system is 20 psi and 25 psi for 1.0 gpf.
3. A blocked bowl or drain will affect the fixture’s performance. To check for this, pour
2 to 3 gallons of water into the bowl. If the bowl accumulates water in it, this would
indicate that something is blocking the bowl/drain. If you need additional help,
please contact the manufacturer of the flushing system, or do a word search on
“pressure-assist toilets” on the web.
Fig. 1
Fig. 9Fig. 4
Fig. 6
Fig. 7
Fig. 8
Fig. 2
Fig. 3
Operation
Fig. 10Fig. 5
All pressure-assist toilets get their energy from the water supply line. It is
important to have sufficient pressure at the supply. The minimum line
pressure for a 1.6 gpf system is 20 psi and 25 psi for 1.0 gpf.
All pressure-assist toilets get their energy from the water supply line. It
is important to have suffi cient pressure at the supply. The minimum line
pressure is 25 psi for 1.0 gpf.
Step 1. Check Flush Cartridge
A. Turn off water supply and fl ush toilet.
B. Pour water onto top of cartridge (Fig. 1) and turn on water.
C. Watch for air bubbles. Consistent fl ow of bubbles indicates cartridge needs to be
replaced. No bubbles visible, move on to Step 4.
Step 2. Flush Cartridge Replacement
A. Turn off water and fl ush the toilet.
B. Use the handle end of pliers (Fig. 2) to unscrew the cartridge from the vessel.
C. Drop in new cartridge and screw in until one female thread (Fig. 3) of vessel
is showing.
D. Turn on water. Continue to screw in cartridge slowly, 1/8 to 1/4 turn increments
until water stops running into the bowl and tank pressurizes.
Step 3. Actuator Adjustment
A. Start by loosening the setscrew in the center of the actuator. Adjust the height of
the actuator by screwing it up or down. There should be a gap (Fig. 4) (about the
thickness of a penny) between the rod and actuator when gently lifting the rod.
When accomplished tighten the setscrew in the center of the actuator.
Step 4. Check Air Inducer
A. Place several drops of water over hole on top of air inducer and fl ush toilet (Fig. 5).
If drop is vacuumed in, move onto step 6. If not, air inducer needs to be cleaned.
Step 5. Clean Air Inducer
A. Turn off water and fl ush toilet. Unscrew the cap of the air inducer (the smaller of
the two caps) (Fig. 6).
B. Pull the duckbill out from the cap and clean it by gently squeezing it (Fig. 7)
between your fi ngers under a fl o w o f water. Inspect the lips of the duckbill.
If they are deformed, the duckbill needs to be replaced.
C. Reassemble, insert the duct bill into the housing (Fig. 8) body and reinstall the ca
p
to hand tight.
Step 6. Clean Inlet Screen
A. Clean the inlet screen by turning off the water supply, disconnecting the water
supply line from the supply shank and removing the screen with a paper
clip (Fig. 9).
B. Clean screen (Fig. 10) and replace.
Other Points to Remember
1. Pressure-assist toilets get their energy from the water supply.
2. All pressure-assist toilets get their energy from the water supply line. It is important
to have suffi cient pressure at the supply. The minimum line pressure is 25 psi
for a 1.0 gpf system.
3. A blocked bowl or drain will affect the fi xture’s performance. To check for this, pour
2 to 3 gallons of water into the bowl. If the bowl accumulates water in it, this would
indicate that something is blocking the bowl/drain. If you need additional help,
please contact the manufac
turer of the fl ushing system, or do a word search on
“pressure-assist toilets” on the web.
-2-
Step 1. Check Flush Cartridge
A. Turn off water supply and flush toilet.
B. Pour water onto top of cartridge (Fig. 1) and turn on water.
C. Watch for air bubbles. Consistent flow of bubbles indicates cartridge needs to be
replaced. No bubbles visible, move on to Step 4.
Step 2. Flush Cartridge Replacement
A. Turn off water and flush the toilet.
B. Use the handle end of pliers (Fig. 2) to unscrew the cartridge from the vessel.
C. Drop in new cartridge and screw in until one female thread (Fig. 3) of vessel
is showing.
D. Turn on water. Continue to screw in cartridge slowly, 1/8 to 1/4 turn increments
until water stops running into the bowl and tank pressurizes.
Step 3. Actuator Adjustment
A. Start by loosening the setscrew in the center of the actuator. Adjust the height of
the actuator by screwing it up or down. There should be a gap (Fig. 4) (about the
thickness of a penny) between the rod and actuator when gently lifting the rod.
When accomplished tighten the setscrew in the center of the actuator.
Step 4. Check Air Inducer
A. Place several drops of water over hole on top of air inducer and flush toilet (Fig. 5).
If drop is vacuumed in, move onto step 6. If not, air inducer needs to be cleaned.
Step 5. Clean Air Inducer
A. Turn off water and flush toilet. Unscrew the cap of the air inducer (the smaller of
the two caps) (Fig. 6).
B. Pull the duckbill out from the cap and clean it by gently squeezing it (Fig. 7)
between your fingers under a flow of water. Inspect the lips of the duckbill.
If they are deformed, the duckbill needs to be replaced.
C. Reassemble, insert the duct bill into the housing (Fig. 8) body and reinstall the cap
to hand tight.
Step 6. Clean Inlet Screen
A. Clean the inlet screen by turning off the water supply, disconnecting the water
supply line from the supply shank and removing the screen with a paper
clip (Fig. 9).
B. Clean screen (Fig. 10) and replace.
Other Points to Remember
1. Pressure-assist toilets get their energy from the water supply.
2. All pressure-assist toilets get their energy from the water supply line. It is important
to have sufficient pressure at the supply. The minimum line pressure for a 1.6 gpf
system is 20 psi and 25 psi for 1.0 gpf.
3. A blocked bowl or drain will affect the fixture’s performance. To check for this, pour
2 to 3 gallons of water into the bowl. If the bowl accumulates water in it, this would
indicate that something is blocking the bowl/drain. If you need additional help,
please contact the manufacturer of the flushing system, or do a word search on
“pressure-assist toilets” on the web.
Fig. 1
Fig. 9Fig. 4
Fig. 6
Fig. 7
Fig. 8
Fig. 2
Fig. 3
Operation
Fig. 10Fig. 5
All pressure-assist toilets get their energy from the water supply line. It is
important to have sufficient pressure at the supply. The minimum line
pressure for a 1.6 gpf system is 20 psi and 25 psi for 1.0 gpf.
All pressure-assist toilets get their energy from the water supply line. It
is important to have suffi cient pressure at the supply. The minimum line
pressure is 25 psi for 1.0 gpf.
Step 1. Check Flush Cartridge
A. Turn off water supply and fl ush toilet.
B. Pour water onto top of cartridge (Fig. 1) and turn on water.
C. Watch for air bubbles. Consistent fl ow of bubbles indicates cartridge needs to be
replaced. No bubbles visible, move on to Step 4.
Step 2. Flush Cartridge Replacement
A. Turn off water and fl ush the toilet.
B. Use the handle end of pliers (Fig. 2) to unscrew the cartridge from the vessel.
C. Drop in new cartridge and screw in until one female thread (Fig. 3) of vessel
is showing.
D. Turn on water. Continue to screw in cartridge slowly, 1/8 to 1/4 turn increments
until water stops running into the bowl and tank pressurizes.
Step 3. Actuator Adjustment
A. Start by loosening the setscrew in the center of the actuator. Adjust the height of
the actuator by screwing it up or down. There should be a gap (Fig. 4) (about the
thickness of a penn
y) between the rod and actuator when gently lifting the rod.
When accomplished tighten the setscrew in the center of the actuator.
Step 4. Check Air Inducer
A. Place several drops of water over hole on top of air inducer and fl ush toilet (Fig. 5).
If drop is vacuumed in, move onto step 6. If not, air inducer needs to be cleaned.
Step 5. Clean Air Inducer
A. Turn off water and fl ush toilet. Unscrew the cap of the air inducer (the smaller of
the two caps) (Fig. 6).
B. Pull the duckbill out from the cap and clean it by gently squeezing it (Fig. 7)
between your fi ngers under a fl o w o f water. Inspect the lips of the duckbill.
If they are deformed, the duckbill needs to be replaced.
C. Reassemble, insert the duct bill into the housing (Fig. 8) body and reinstall the ca
p
to hand tight.
Step 6. Clean Inlet Screen
A. Clean the inlet screen by turning off the water supply, disconnecting the water
supply line from the supply shank and removing the screen with a paper
clip (Fig. 9).
B. Clean screen (Fig. 10) and replace.
Other Points to Remember
1. Pressure-assist toilets get their energy from the water supply.
2. All pressure-assist toilets get their energy from the water supply line. It is important
to have suffi cient pressure at the supply. The minimum line pressure is 25 psi
for a 1.0 gpf system.
3. A blocked bowl or drain will affect the fi xture’s performance. To check for this, pour
2 to 3 gallons of water into the bowl. If the bowl accumulates water in it, this would
indicate that something is blocking the bowl/drain. If you need additional help,
please contact the manufac
turer of the fl ushing system, or do a word search on
“pressure-assist toilets” on the web.