
Installation Sheet
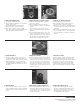
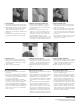
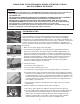

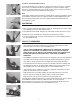

Figure 1
Figure 2
Figure 3
Figure 4
Figure 5
PLEASE READ THE ENTIRE MANUAL BEFORE ATTEMPTING TO MAKE
ANY ADJUSTMENTS OR REPAIRS.
WARNING:
• When replacing components on the
FLUSHMATE
®
Flushometer-Tank System, make certain that the
water supply valve is turned off and the toilet has been flushed to relieve pressure in the
FLUSHMATE
®
tank.
• USE OF PETROLEUM-BASED LUBRICANTS OR CORROSIVE CLEANING PRODUCTS CONTAINING
CHLORINE, SUCH AS HOUSEHOLD BLEACH, DROP-IN BLOCKS OR TABLETS, OR
DISINFECTANTS, THAT ARE APPLIED INSIDE THE CHINA HOLDING TANK WILL VOID YOUR
FLUSHMATE
®
WARRANTY. The exterior of the tank and the entire bowl can be cleaned following
the manufacturer’s recommendations or in the same fashion as any other toilet.
•
FLUSHMATE
®
Flushometer-Tank Systems are designed to be used with a cold water supply only
and use of a tempered or hot water supply will void your warranty.
TROUBLESHOOTING
A) Condition:
Water runs and will not shut off
A run-on condition may be caused by insufficient water pressure, an improperly
adjusted Flush Valve Cartridge, or a clogged inlet screen. Refer to “Installation
Requirements” for recommended minimum pressure. (See “Points to Remember” for
a simple method to determine whether your water pressure is adequate). Check water
pressure, marginal pressure can cause any of these conditions. If sufficient water
pressure has been verified and the toilet continues to run-on, the following steps may
be required:
1. Make sure the water supply valve is fully open.
2. Check the Actuator adjustment. The Flush Rod (I) or push button should not
interfere with the Actuator. The proper clearance should be approximately 1/8”
when the push button or flush-handle is stationary. On push button type fixtures,
loosen the setscrew on the Actuator (see F on the component list) and rotate the
Actuator up (counterclockwise) or down (clockwise) until the proper clearance is
obtained. For flush-handle fixtures, observe the clearance.
(See Figure 1)
If
necessary, adjust the Actuator to allow for proper clearance. When proper
clearance is obtained, tighten the setscrew.
3. Check Inlet Screen
a. Turn off the water supply valve.
b. Flush the toilet to relieve the pressure.
c. Disconnect the water supply line from the Supply Shank (A).
(See Figure 6)
d. Examine the inlet screen and remove anything that may be blocking the flow of
water into the
FLUSHMATE
®
tank. The inlet screen can be removed by inserting
a small pointed object (such as a large paperclip or the blade of a penknife) into
the lower Supply Shank and working the inlet screen loose.
(See Figures 7a, 7b,
7c)
Reinstall the inlet screen by pushing it upward into the Supply Shank with
your fingertip.
(See Figure 7d)
e. Reattach water supply line and fully open water supply valve. Test setup by
flushing toilet.
4. Remove, examine, and reinstall the Flush Valve Cartridge (3).
a. Turn off the water supply valve and flush the toilet to relieve the pressure.
b. On flush-handle fixtures, disengage the Flush Rod from the handle linkage and
flip it away from the Flush Valve Cartridge. It is not necessary to loosen the
retainer clips.
(See Figure 3)
Remove the Flush Valve Cartridge using the
handles of a pair of pliers.
(See Figure 2)
. Turn the Flush Valve Cartridge
counterclockwise until you can lift it out of the
FLUSHMATE
®
tank.
5