
Installation Sheet


2
CAP15/10 REV.A www.PROFLO.com
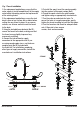
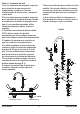
Fig. 1 Faucet installation
1.For replacement applications, ensure that the
water supply is turned completely off at the supply
valve before attempting remove and replacement
of the existing faucet.
2.For replacement applications, ensure the sink
deck is clear of any surface dirt or debris before
setting the new faucet in place. On an uneven
surface, use silicone sealant to seal the faucet
to the deck.
3.Using the included brass locknuts (No.22) ,
secure the faucet to the deck, making sure that
the faucet secures tightly to prevent any
movement or shifting.
4.Connect the hot cold water supply
connectors to the appropriate inlet. If you
are using coned supply risers, use the brass
coupling nuts (No.24) included with
the faucet kit. For installations employing
other types of supply connectors, consult the
manufacturer's installation instructions.
5.To install the spout, insert the spout assembly
into the receiver of the spout canopy (No.3).
6.Thread the spout nut onto the spout canopy
and tighten using an appropriately sized wrench.
7.Turn the water on and check for leaks. To
correct for leaks at a supply connection, gently
tighten the faucet coupling nut until the leak stops.
8.Turn the faucet on and check for adequate flow
rate. If flow rate is low, remove
aerator, flush and reassemble.
PFX3085
1/2”-14NPSM
21
1
HOT IN
COLD IN
8
7