
Manual


10
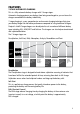
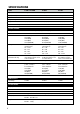
ADJUSTABLE CHARGE RATES: 12 VOLT BATTERIES
STEP 5 – SET BATTERY CHEMISTRY TYPE
Battery Chemistry should be selected by the type of battery being charged (refer to
the battery manufacturer’s specifications for battery type). Refer to page 12 for a
detailed explanation.
For example if you are charging an AGM battery, then AGM mode will need to be
selected. This can be done by the following procedure:
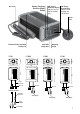
a. Press the Mode or Charge Rate button.
b. Press the Mode button repeatedly until the correct battery type is selected.
STEP 6 – CHARGING
During the charge process, the CHARGING and FULLY CHARGED LED will flash various
patterns. This is normal and indicates the various charge stages. Refer to “How can I tell
what stage the battery charger is in” in the FAQ section, page 14.
When the FULLY CHARGED LED remains on, this is known as the float stage and the
charger can be left connected to the battery without over charging.
If the POWER LED is flashing, there is a fault; refer to “Fault Codes” explanation on
page 13 of this manual.
STEP 7 – DISCONNECTION
Ensure the 240V mains switch is turned off and the charger is disconnected from the
240V mains power.
Battery out of vehicle
Remove the BLACK lead (battery clip) from the battery.
Remove the RED lead (battery clip) from battery.
Battery in vehicle
Remove the chassis connection.
Remove the battery terminal connection.
Battery in vehicle using harness (IC700 only)
Unplug the harness from the charger’s output lead.
Current AH CCA MCA
setting C-7 C-20 C-7 C-20 C-7 C-20 Time
1A 7 20 40 120 55 170 7 – 24h
2A 14 40 80 240 110 330 7 – 24h
4A 30 80 180 480 250 650 7 – 24h
6A 40 120 240 720 330 1000 7 – 24h
7A 50 140 300 800 350 900 7 – 24h
8A 60 160 360 1000 500 1300 7 – 24h
10A 70 200 450 1000 500 1200 6 – 20h
15A 85 300 465 2000 600 2500 6 – 20h