
Manual

6
Installation Guidelines
Installation Continued
2. Confirm the selected mounting location allows for a minimum of 8 inches of free space
around front and sides of the ProMite charger. Do not install charger on carpeted ,
upholstered , vinyl or varnished areas. Be sure to place the ProMite in an accessible
area where all indicators are viewable. Confirm all battery cables can reach each of the
batteries.
3. Using the ProMite as a template use a small awl or screwdriver to mark the position
of each mounting hole.
4. Using a 1/8" drill bit, drill pilot holes in the (4) marked locations as described in step 3.
Apply a silicon sealer in each of the mounting locations to waterproof the screw holes.
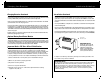
5. Position the ProMite over the mounting holes and secure with a power screwdriver
by installing 4 marine grade or stainless steel screws. (mounting screws not included)
1/8" pilot hole
with silicon sealer
IMPORTANT NOTICE
Confirm the surface you will
be mounting the charger to is
adequate in strength and
thickness to hold the ProMite
in place with the mounting
screws you have selected.
6. Prepare each battery in advance by cleaning each terminal post with a wire
brush until a shiny surface is obtained.
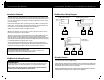
IMPORTANT NOTICE
As you prepare to attach the positive (red) and negative (yellow or black wires)
to the batteries there will be brief low power spark that is generated as you
make the connection. This is due to the high frequency capacitors taking a charge.
Make sure the (black or yellow) wires are connected as illustrated to the
negative side of the battery and the red wires are connected to the positive
side or the battery.
Charging Batteries Continued
3. Connect a heavy duty U.L. approved extension cord to the ProMite charger first. After
connecting the extension cord to the charger then proceed to plug the extension cord to
a nearby 120VAC GFCI protected (Ground Fault Circuit Interrupt) outlet.
4. Observe the on-board LED indicators for a solid green and red Indication. This will tell
you the batteries are in the charging process.
5. Charge your batteries until only the green LED indicator remains on. This indicates the
charging process is completed and your batteries are fully charged and are now being
maintained in a gentle float / storage mode. (recommended while your boat is not in use).
The ProMite can be left on in this mode indefinitely and will never overcharge your batteries.
Refer to the page 4.
6. When ready to use your boat, unplug the extension cord from the 120 VAC outlet first,
followed by unplugging the charger.
Optional Battery Bank Status Monitor
See your local dealer or retailer for the ProMariner Remote Battery Bank Status Monitor.
The Remote Monitor is easy to install and connects directly to your boats batteries. Once
installed simply hold down the "Push-To-Test" button and observe the charge level indicator
for each battery. (up to 3 batteries can be monitored). Note: AC power and the boats engine
must be off when using the Remote Battery Bank Status Monitor.
Important Notice: FCC Class A Part 15 Notification.
Your ProMite On-Board Marine Battery Charger has been designed and tested to
comply with FCC Class A part 15. These regulations are to provide adequate
protection against harmful interference while operated in a commercial application.
If in a residential setting you are encountering interference with TV and radio
reception. Simply remove AC from the ProMite to confirm if your battery charger
is causing interference. End user can explore the following to minimize interference.
1) Chose a different AC circuit to power your On-board Marine Charger
2) Make sure your outlet is properly grounded
3) Re-position receiving antenna
4) Purchase a separate AC line filter
5) Relocate charger so that it is at the furthest point from home receiving
equipment. TV, radio, etc
9
Charging Your Batteries