ProStalk PC5000 Nature Camera User Manual 1
Index 1. Introduction ....................................................................................................................... 3 2. Digital Nature Camera Specifications ................................................................................ 3 3. Parts Identification ............................................................................................................ 5 4. Packing Contents ...................................................................................
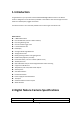
1. Introduction Congratulations on your purchase of the ProStalk PC5000 Digital Nature Camera. This Nature Camera is designed to record the activity of wildlife in the outdoors with its still image and movie modes and weatherproof, rugged construction. The Nature Camera is ultra small and portable with an extra longer surveillance time. Main Features: 5.
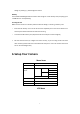
Image Sensor Type 1/2.5 Inch CMOS Effective Pixels 5.0 Megapixels Effective Focal Length 7.6 mm Lens Aperture F/3.
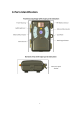
3.
4. Packing Contents Model ProStalk PC5000 Digital Nature Camera • User Manual • USB cable • Mounting Kit 5. Battery and SD Card Installation The ProStalk PC5000 Digital Nature Camera is designed to operate using 8 x AA Cell Batteries. We recommend using alkaline batteries. NOTE: Always have the camera switched OFF when installing or removing batteries. ▲ Please make sure the voltage and polarity (+/-) are correct before connection.
voltage or polarity (+/-) will damage the camera. Memory The ProStalk PC5000 Digital Nature Camera saves images to an SD memory card (accepting up to a 32GB SD card - sold separately). Inserting SD card Make sure the camera is in the OFF position whenever adding or removing a memory card. • Insert the SD memory card in to the SD card slot completely and in the correct direction as shown by the sticker located at the side of the housing.
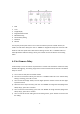
1. 2. 3. 4. 5. 6. 7. 8. Date Time 4 Digit Display Image Resolution Select Movie Recording Camera Delay Setting Password SD Card It is very easy to setup this camera. Turn on the unit and then press the “SETUP” button, the “DATE” icon will start to blink, press “UP” or “DOWN” to navigate the setup menu. Press the “OK” button to enter the specific menu item which is blinking. Use the “UP” or “DOWN” buttons to make adjustments.
6.2 Set Camera State and Photo Resolution To set the number of pictures or movie the camera will take per PIR triggering. The user can choose 1P, 3P or movie mode. a) Turn on the unit and press the “SETUP” button b) The menu icon will start to blink, press the “UP” or “DOWN” button till icon 4 (still image) or 5 (movie mode) is blinking, press “OK” to enter. c) Press the “UP” or “DOWN” button to select picture or movie.
2) Set Time a) Turn on the unit and press the “SETUP” button b) The menu icon will start to blink, press the “UP” or “DOWN” button till icon 2 “TIME” is blinking, press “OK” to enter. c) Then the LCD first two digits represent hour (HH) and last two digits represents minutes (MM). d) Press “UP” or “DOWN” to select hour between 00-23, Press “OK” to confirm. Then it comes to minutes setting. e) Press “UP” or “DOWN” to select minute between 00-59, Press “OK” to confirm.
6.5 Display How Many Pictures and Video Taken a) Turn on the unit and then press the “SETUP” button b) The menu icon will start to blink, press the “UP” or “DOWN” button till icon 8 “SD Card” is blinking. c) Then the LCD will display the total number of the picture and video taken in this SD card. 7. Using the Camera 7.1 Mounting the Camera It is recommended that you mount the camera 1.2~1.5 metres off the ground with the camera pointed at a slight downward angle.
7.2 Turn on the Camera The default password for the camera is “0000”. When using the camera for the first time, just turn on the power switch and press “OK” for 4 times (this inputs the password of “0000” ) to get into the system. If you setup a private password, when turning on the power switch, the LCD will display “HHHH” which means you need to input your chosen 4 digit password which you set before. Once the password has been entered correctly the camera will enter ‘Sleep Mode’.
▲ Make sure to switch the “Power” to “On” and press the "SETUP" button again after setting is complete. Otherwise the camera will not take any pictures or movies. 7.5 Secure Your Camera The ProStalk PC5000 Nature Camera has a lock hole to secure the device using a padlock. 7.6 Replacing the Battery If the battery is low, the red light indicator will flash 3 times and then turn off. This indicates that the user should replace a new set of battery.
8. Viewing the Images and Movies Connect the Camera directly to a PC 1. Sliding the “Power” toggle switch to “on” position 2. Press “SETUP” button 3. Connect your camera to the PC by the USB cable, the PC will recognize the new device and enter into “mass storage” model. It will display a new disk symbol in your “file explorer”. The CD will display “STO” means the camera is in mass storage mode. 4. Then the user can copy, move or delete the photos and videos that inside the SD card.
1. 2. 3. 4. 5. Sliding the “Power” toggle switch to “on” position Press “SETUP” button Connect the TV cable to the camera and TV Then the LCD will display “TV” Then the real time image will be transfer to the TV 10. Glossary PIR: Passive Infrared Sensor. Senses motion like a typical security motion detector. Requires infrared energy (heat) in addition to motion to trip the sensor and assure detection of live animals. Camera Delay: Time elapsed between photos while events are sensed and recorded.
images and number of flashes during that time. Based on our new advanced power system, this camera can support 30 pictures/day for one year surveillance.