
User manual


9
6.2 Set Camera State and Photo Resolution
To set the number of pictures or movie the camera will take per PIR triggering. The user can
choose 1P, 3P or movie mode.
a) Turn on the unit and press the “SETUP” button
b) The menu icon will start to blink, press the “UP” or “DOWN” button till icon 4 (still image) or
5 (movie mode) is blinking, press “OK” to enter.
c) Press the “UP” or “DOWN” button to select picture or movie.
d) If selecting the “Picture” mode, press “OK”, the LCD will display “1P” (shot 1 photo a time) or
“3P” (shot 3 photos a time), press “UP” or “DOWN” to select and press “OK” to confirm.
e) Then the LCD will display “LoHi” which comes to setting the image resolution. “Lo”
represents 3.0MP and “Hi” represents is 5.0MP. Press “UP” or “DOWN” to select and press
“OK” to confirm. Default is “Hi”.
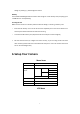
Model
Lo
Hi
PC5000
2048x1536 (3.1M)
2560*1920 (5.0M)
f) If selecting the “Movie” mode, press “OK” to confirm.
▲ The movie length default is set to 15 seconds..
g) Press “SETUP” to save and exit the setting.
6.3 Set Date, Year and Time
Setting the Date, Year and Time to make them stamp in the picture.
1) Set Date
a) Turn on the unit and press the “SETUP” button
b) The menu icon will start to blink, press the “UP” or “DOWN” button till icon 1“DATE” is
blinking, press “OK” to enter.
c) Then the LCD first two digits represents month (MM) and last two digits represents
day(DD).
d) Press “UP” or “DOWN” to select month between 01-12, Press “OK” to confirm. Then it
comes to day setting.
e) Press “UP” or “DOWN” to select month between 01-31, Press “OK” to confirm. Then it
comes to year setting.
f) Press “UP” or “DOWN” to select year between 00-99 (2000-2099), Press “OK” to confirm.
g) If the setting is done, press “SETUP” to save and exit the setting.