Table of Contents 1....What’s in the Box 2....Overview 3....Quick Start Guide 4....Rear Panel Layout 5....Front Panel Controls 6....IR Remote Control 7....Setup Menu 10..Using the Home Theater Bypass 10..Using the Loop function 10..Using the 12 Volt Triggers 10..Using the PS Bus 12..Troubleshooting Guide 15..Appendix 15..Warranty and Service Issues 16..
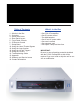
Overview • Expansion slot accommodates optional upgrade cards The PCA-2 is a reference level stereo preamplifier that can integrate into any type of audio or home theater system. • Optional rack mount capability The PCA-2 Preamplifier is designed to accommodate input switching and volume control to a number of external source components while providing a signal as faithful and musically satisfying as technologically possible today.
Quick Start Guide * The PCA-2 does not include a phono preamplifier stage. To connect a turntable, use a phono peamplifier. 1. Place the PCA-2 in a rack or on a shelf in the audio/video system. 2. Turn off all associated components 3a. Connect the left and right analog audio outputs from all audio/video source equipment to any of the inputs labeled 1-7 on the back of the PCA-2. Use input 1 for XLR type connections and inputs 2-7 for RCA type connections. For a complete list of input names see appendix A.
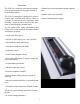
Rear Panel Layout Note: Unplug the power cord before checking the fuse. 1. PS Bus and 12 Volt Triggers The PCA-2 comes equipped with a built in PS Bus. The PS Bus allows other PS Audio products equipped with a PS Bus to communicate via standard RJ11 phone cable. 6. Analog Inputs One analog XLR (balanced) and six analog RCA (single-ended) inputs allow for the connection of up to seven external sources. For a complete list of input names see Appendix A.
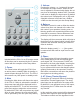
Front Panel Controls Mute Pressing the Mute button will silence the output of the PCA-2. If Mute is activated, the number of the current input will still be displayed while the display will read MUTE. To exit the mute status, press mute again or simply adjust the volume control. The PCA-2 front panel includes a volume knob and the following five buttons: 1. 2. 3. 4. 5.
3. Volume Pressing the volume + or - buttons will increase or decrease the output volume. When the volume is adjusted it will numerically display the volume level in the display window. After 3 seconds it will return to display the input name. By default the volume level is displayed in a 0 to 100 scale. A decibel reference level scale from -90dB to +10dB can also be used (see also Setup Menu). 4. Balance The Balance control is used to offset the relative volume level from one channel to the other.
Setup Menu mode. For more information on setting up a system to use the Home Theater bypass function, see the section called "Using Home Theater Bypass". There are 25 additional parameters that you can access in the Setup Menu. The Setup Menu is activated by pressing the Input Up and Input Down buttons simultaneously while powering on the PCA-2. CAUTION: Engaging the HT input without using a separate HT controller to control the volume may result in damage to your speakers.
To exit the setup menu at any time, press the power button on the front panel and all changes will be saved and the PCA-2 will go into standby. thus eliminating the need to adjust the volume when selecting different sources. Press the loop button to enter the gain setting for the desired input. Use the volume knob to make an adjustment from -10 to +10 decibels in .5 decibel increments. The settings in the Setup Menu are non-volatile.
from -90 to +10 dB. maximum value that the volume will reach. The readout will display either a 0 to 100 scale or -90 to +10 dB scale, depending on what scale is chosen in Volume Display Mode. Press the loop button to access the selction screen. Rotate the volume knob to select between STD (standard) or DB (decibel) mode. The default setting is either 100 (standard mode) or +10 (decibel mode). The default setting is STD.
be selected by rotating the volume know while in the Network Group mode. Reset If at any time it is necessary to reset all parameters of the PCA-2 to their default settings, it can be done by pressing the Loop button twice while in RESET mode (See also the troubleshooting guide). troller. Any 2-channel sources can be selected directly with the PCA-2 while multi-channel sources can be selected by the HT controller while the PCA-2 is set to HT bypass mode.
change the power status of the PCA-2 when connected. Use a 3.5 mm mini jack cable to connect the device to the PCA-2. Since control is bi-directional, one unit does not act as the “slave” or “master”. Instead each component has the capability to control the other. While the PS Bus and the 12 Volt triggers can be used simultaneously they should not both be used with the same piece of equipment.
Trouble Shooting Guide The PCA-2 was designed to provide many years or reliable, trouble-free operation. In the event the PCA-2 is not working correctly, please refer to the following suggestions: Unit will not turn on 1. Check the obvious.
every time you press the “Mute” button. Exit the setup mode by pressing the power button. Exit the setup mode by pressing the power button. The PCA-2 does not return to the last volume setting The PCA-2 was designed to remember the volume setting from the last time it was used and ensure that this volume setting is safe for immediate playback. This information will be stored in memory even if the PCA-2 is powered down into standby.
CAUTION: Engaging the HT input without using a separate HT controller to control the volume may result in damage to your speakers. With the unit powered down, hold down both Input buttons (Up and Down) and press the power button. This will activate the Setup Mode. Using the Input Up or Down buttons, cycle to the “RESET” mode. Press the loop button and the display will read “GO ->” to confirm your choice. Press Loop button again to perform the reset function.
Appendix A. Default Input Names 1. XLR 2. CD 3. VIDEO 4. PHONO 5. TUNER 6. TAPE 7. LOOP B. Character selection list [space] 0 1 2 3 4 5 6 7 8 9 10 % * # . ! .0 .5 A B C DEFGHIJKLMNOPQRSTUVWXYZ <- - -> + Warranty inside the U.S. and Canada PS Audio’s warranty is 3 years parts and labor, from the date of original purchase, and is fully transferable. This means that we warranty the product itself regardless of ownership, new or used.
PS Audio International, Inc. 4824 Sterling Dr. Boulder, CO 80301 USA Toll Free: 877-772-8340 Ph: 720-406-8946 Fax: 720-406-8967 www.psaudio.