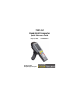
7535 G2 Hand-Held Computer Quick Reference Guide May 29, 2006 ISO 9001 Certified Quality Management System PN 8000076.
© Copyright 2006 by Psion Teklogix Inc., Mississauga, Ontario, Canada This document and the information it contains is the property of Psion Teklogix Inc., is issued in strict confidence, and is not to be reproduced or copied, in whole or in part, except for the sole purpose of promoting the sale of Psion Teklogix manufactured goods and services.
Return-To-Factory Warranty Psion Teklogix provides a return to factory warranty on this product for a period of twelve (12) months in accordance with the Statement of Limited Warranty and Limitation of Liability provided at www.psionteklogix.com/warranty. (If you are not already a member of Teknet and you attempt to view this warranty, you will be asked to register. As a member of Teknet, you’ll have access to helpful information about your Psion Teklogix products at no charge to you.
Waste Electrical and Electronic Equipment (WEEE) Directive 2002/96/EC This Product, and its accessories, comply with the requirements of the Waste Electrical and Electronic Equipment (WEEE) Directive 2002/96/EC. If your end-of-life Psion Teklogix product or accessory carries a label as shown here, please contact your local country representative for details on how to arrange recycling. For a list of international subsidiaries, please go to: www.psionteklogix.com/public.
neath the battery in the battery compartment (or on a related accessory such as the charger or docking station) signifies that the product is RoHS-compliant as per the EU directive. Other than as noted below, a Psion Teklogix product that does not have an accompanying RoHS logo signifies that it was placed on the EU market prior to July 1, 2006, and is thereby exempt from the directive.
Table Of Contents Approval. . . . . . . . . . . . . . . . . . . . . . . . . . . . . . . . . . . . . . . . . . 3 Safety Summary . . . . . . . . . . . . . . . . . . . . . . . . . . . . . . . . . . . . 4 Program License Agreements . . . . . . . . . . . . . . . . . . . . . . . . . 11 1. Basic Preparation . . . . . . . . . . . . . . . . . . . . . . . . . . . . . . . . . 19 1.1 Charging The Battery . . . . . . . . . . . . . . . . . . . . . . . . . . 19 1.2 Attaching The Hand Strap . . . . . . . . . . . . . . . .
4.1 SE 1200HP, LR & ALR . . . . . . . . . . . . . . . . . . . . . . . . 54 4.2 SE 1224HP, SE 2223 PDF & SE 1524ER . . . . . . . . . . 54 4.3 EV15 & SX5303. . . . . . . . . . . . . . . . . . . . . . . . . . . . . . 55 5. General Maintenance. . . . . . . . . . . . . . . . . . . . . . . . . . . . . . . 55 5.1 Caring For The Touchscreen . . . . . . . . . . . . . . . . . . . . 55 5.2 Cleaning The 7535 G2 . . . . . . . . . . . . . . . . . . . . . . . . . 56 6. Support Services & Worldwide Offices . . . . . . . .
Approval FCC DECLARATION OF CONFORMITY (DoC) Applicant’s Name & Address: PSION TEKLOGIX 2100 Meadowvale Blvd. Mississauga, Ontario Canada L5N 7J9 Contact Person: Iain Roy Telephone No.: (905) 813-9900 US Representative’s Name & Address: 1810 Airport Exchange Blvd., Suite 500 Erlanger, KY, 41018, USA Contact Person: Kyle Day Telephone No.: (859) 372-4329 Equipment Type/Environment: Computing Devices Trade Name / Model No.
Safety Summary CE Marking When used in a residential, commercial or light industrial environment the product and its approved UK and European peripherals fulfil all requirements for CE marking. R&TTE Directive 1999/5/EC This equipment complies with the essential requirements of EU Directive 1999/5/EC (Declaration available: www.psionteklogix.com). Cet équipement est conforme aux principales caractéristiques définies dans la Directive européenne RTTE 1999/5/CE. (Déclaration disponible sur le site: www.
Dette udstyr opfylder de Væsentlige krav i EU's direktiv 1999/5/EC om Radio- og teleterminaludstyr. (Erklæring findes på: www.psionteklogix.com). Dette utstyret er i overensstemmelse med hovedkravene i R&TTEdirektivet (1999/5/EC) fra EU. (Erklæring finnes på: www.psionteklogix.com). Utrustningen uppfyller kraven för EU-direktivet 1999/5/EC om ansluten teleutrustning och ömsesidigt erkännande av utrustningens överensstämmelse (R&TTE). (Förklaringen finns att läsa på: www.psionteklogix.com).
FCC Information To Users Federal Communication Commission Interference Statement This equipment has been tested and found to comply with the limits for a Class B digital device, pursuant to Part 15 of the FCC Rules. These limits are designed to provide reasonable protection against harmful interference in a residential installation.
graph (d)(2), for use in a PDA. End users must follow the specific operating instructions for satisfying RF exposure compliance. This transmitter must not be co-located or operating in conjunction with any other antenna or transmitter. Some equipment in hospitals and aircraft are not shielded from radio frequency energy. Do not use the 7535 G2 hand-held onboard aircraft, or in hospitals, without first obtaining permission. Do not use near pacemakers.
Warning to Users This product is a Class I/Class II laser product according to CDRH 21 CFR 1040.10 and 1040.11 and Class1/Class 2 laser product according to IEC 60825-1:1993+A1:1997+A2:2001 Laser Warnings For your own safety, it is critical that you comply with the following warnings: Caution! Do not look into the laser beam or point the beam at people or animals. Aperture A label is affixed below the aperture.
Do Not Remove Covers Or Open Enclosures To avoid injury, the equipment covers and enclosures should only be removed by qualified service personnel. Do not operate the equipment without the covers and enclosures properly installed. Caution! Danger of explosion if a 7535 G2 battery is incorrectly handled, charged, disposed of or replaced. Replace only with the same or equivalent type recommended by the manufacturer. Dispose of used batteries according to the instructions described in “The Battery” on page 22.
Warning: TO PREVENT the battery from leaking acid, generating heat or exploding, adhere to precautions below. • The battery incorporates built-in safety devices. To ensure their proper function, do not disassemble or alter any parts of the battery. • Do not short-circuit the battery by directly connecting any of the exposed terminals with metal objects such as wire. Do not transport or store the battery together with metal objects such as necklaces, hair pins, etc. • Do not dispose of batteries in fire.
• If leaking electrolyte sprays into your eyes, rinse them with clean running water, and immediately seek medical attention. • Do not store the battery in extremely high temperatures (e.g., a vehicle, strong direct sunlight, etc.). This may cause the battery to overheat or ignite, and it may also reduce the performance and service life of the battery. • Do not use in areas where static electricity is greater than what the manufacturer guarantees. • Keep batteries out of reach of children.
• • • • • 12 TO CONDUCT SUFFICIENT TESTING TO DETERMINE THAT THE SOFTWARE IS SUITABLE FOR SUCH USE. NO WARRANTIES FOR THE SOFTWARE. THE SOFTWARE is provided “AS IS” and with all faults. THE ENTIRE RISK AS TO SATISFACTORY QUALITY, PERFORMANCE, ACCURACY, AND EFFORT (INCLUDING LACK OF NEGLIGENCE) IS WITH YOU. ALSO, THERE IS NO WARRANTY AGAINST INTERFERENCE WITH YOUR ENJOYMENT OF THE SOFTWARE OR AGAINST INFRINGEMENT.
• recipient agrees to this EULA. If the SOFTWARE is an upgrade, any transfer must also include all prior versions of the SOFTWARE. EXPORT RESTRICTIONS. You acknowledge that SOFTWARE is subject to U.S. export jurisdiction. You agree to comply with all applicable international and national laws that apply to the SOFTWARE, including the U.S. Export Administration Regulations, as well as end-user, end-use and destination restrictions issued by U.S. and other governments.
2. DESCRIPTION OF REQUIREMENTS, RESTRICTIONS, RIGHTS AND LIMITATIONS a. Copy. The right and license granted to you shall be limited to installation and use of the Software up to but not exceeding the number of copies you have licensed. However, you may make a copy of the Software for backup or archival purposes. You shall not remove any copyright notice or proprietary notices, labels or marks in or on the Software. b. Evaluation.
3.
applies whether you are entitled to claim damages from us or our third party suppliers as a matter of contract or tort. 6. COPYRIGHTS, OWNERSHIP AND PROPRIETARY RIGHTS All title and copyrights in and to the Software, and any copies thereof, are owned by Psion Teklogix Inc. or its suppliers. The Software also contains copyrighted material licensed from our suppliers or obtained from open source and all rights to such copyrighted material rests with such suppliers.
No modifications of this Agreement shall be effective unless in writing and approved by us. You acknowledge that you have read this Agreement, understand it, and that it is the complete agreement between you and Psion Teklogix with respect to the subject matter hereof and supersedes all prior agreements, oral or written.
1. Basic Preparation Important: All approval and safety information is outlined in the ‘7535 G2 Hand-Held Computer User Manual’ – part number 8000075. It is important that you review all safety guidelines before charging a battery or operating a scanner. This quick start guide provides basic information on the operation and features of the Psion Teklogix 7535 G2 hand-held computer.
• Use a Phillips screwdriver to attach the strap to the two threaded inserts at the back of the 7535 G2 at the top of the unit.
• Stretch the handstrap toward the base of the 7535 G2, and hook the bottom of the handstrap into the slot near the base of the battery pack. 1.3 Attaching A Pistol Grip The pistol grip is attached to the back of the 7535 G2 using the four threaded inserts in the upper part of the 7535 G2 casing. Four black #4-40 Phillips head screws are provided with this accessory.
• Position the pistol grip so that it fits snugly over the back of the unit and the inserts on the back of the 7535 G2 align with the holes in the pistol grip. • Use a Phillips screwdriver to securely fasten the pistol grip to the back of the 7535 G2. 1.4 The Battery Important: It is critical that you review “Lithium-Ion Battery Safety Precautions” on page 9 before handling a 7535 G2 battery. The 7535 G2 hand-held operates with a Lithium-Ion battery pack.
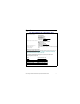
1.4.1 Installing The Battery • Slide the charged battery with the contoured plastic facing you into the 7535 G2. • Click the battery into place. 1.4.2 Battery Swap And Runtime Important: Always switch the unit off before changing the battery. While the battery is being replaced, the 7535 G2 will save its current data for at least 20 minutes. The 7535 G2 battery will operate for 8 hours under typical operating conditions after a full charge. Typical battery life is 300 charge cycles or 2 years average use.
A splash screen displaying the Psion Teklogix logo and the Windows CE logo appears followed by the startup desktop. Note: If the 7535 G2 is in suspend state, pressing [ENTER] ‘wakes’ the unit from this state. The screen in which you were working before the computer entered suspend state is displayed. 1.6 Switching The 7535 G2 Off Important: Keep in mind that turning off the 7535 G2 does not result in a complete reboot; rather, the unit enters a power-saving, “suspend” state.
1.7 Connecting To An 802.11 Network In most cases, the 7535 G2 must be configured before it can connect to an 802.11 wireless network. Chapter 2, Section 2.2.2, “Configuring An IEEE 802.11 Radio Installed In The 7535 G2” in the 7535 G2 Hand-Held Computer User Manual (PN 8000075) describes this configuration process. Once the 7535 G2 is properly configured, it automatically connects to your wireless network within a few moments of switching on.
Scanner Window Stylus (Pointing Tool) Battery Pack Tether Port 2.2 The Keyboard Note: Refer to “Navigating Using The Keyboard” on page 42 for details about using keys to move around Windows CE. The 7535 G2 offers two types of keyboard layouts—a 58-key keyboard and a 36-key, large button keyboard. The [BLUE] and [ORANGE] modifier keys provide access to additional keys and system functions. These functions are colour coded in orange and blue print above the keyboard keys. 2.2.
The [SHIFT], [CTRL] and [ALT] keys operate much like a desktop keyboard except that they are not chorded (two keys held down simultaneously). The modifier key must be pressed first followed by the key whose function you want modified. Activating Modifier Keys When a modifier key is pressed once, it is displayed in lowercase letters in the taskbar at the bottom of the 7535 G2 screen. For example, if the [CTRL] key is pressed, ctrl key is displayed at the bottom of the unit screen.
The [CTRL] And [ALT] Key Modify the function of the next key pressed and are applicationdependent. The [TAB] Key Usually moves the cursor to the next field to the right or downward. The [ESC] Key Generally used as a keyboard shortcut to close the current menu, dialog box or activity and return to the previous one. The [SPACE] Key Inserts a blank space between characters. In a Windows dialog box, the [SPACE] key enables or disables a checkbox. The [SCAN] Key Activates the scanner beam while pressed.
Choosing A Single Alpha Character Note: The following examples assume that the [ORANGE] key is enabled as ‘Lock’ mode in the ‘One Shot’ screen (accessible through the Control Panel ‘Keyboard’ icon). In ‘Lock’ mode, pressing the [ORANGE] key once locks it ‘on’. The examples below illustrate how to access A, B and C, all of which are printed in orange characters above the numeric key, [2]. To choose the letter ‘a’: • Press the [ORANGE] key, and press the numeric key [2].
For example, suppose you want to type the letters ‘a’, ‘b’ and ‘c’. These letters are all accessible from the numeric key, [2]. To type the letter ‘a’: • Press the [ORANGE] key, and then press the numeric key, [2]. • Press the ‘Accept’ key [⇒] (zero key) to indicate that the letter ‘a’ should be accepted and that another letter from the same key will be chosen. To type the letter ‘b’: • Press the [2] key twice, and press [⇒] to accept the letter ‘b’. To type the letter ‘c’: • Press the [2] key three times.
• With the [ORANGE] key locked ‘on’, press [2] to type the letter ‘a’. • Press [3] to type ‘d’, and press [4] to type the letter ‘g’. • To end alpha selection, press the [ORANGE] key again to unlock it. 2.2.5 Adjusting The Keypad Backlight To adjust the intensity of the keypad backlight and the conditions under which this backlight is activated. • In the Control Panel, choose the Keyboard icon. Note: Access may be restricted to supervisory use.
2.3.1 Adjusting The Display Backlight • In the Windows CE Control Panel, choose the Display icon and select the Backlight tab. Note: Keep in mind that this option may be restricted to supervisory use only. Determines how dark the ambient light light needs to be before the backlight switches on. Adjusts the light intensity of the backlight. Sets the duration of time that the backlight stays on at the configured intensity when the unit is not in use.
2.3.3 Calibrating The Touchscreen Note: This function may be restricted to supervisory use. If your 7535 G2 touchscreen has never been calibrated or if you find that the stylus pointer is not accurate when you tap on an item: • In the Control Panel, choose the Stylus icon, and select the Calibration tab, and then choose the [Recalibrate] button. • Follow the onscreen directions to calibrate the display. 2.
Radio Traffic LED Scanner LED User Application LED Charge LED Charge LED The lower-right LED is reserved for internal charger/power status.. Function Charge LED Behaviour External power not available. Fully charged to within 95% of charge capacity. Quick charge successfully completed to within 75% of charge capacity. Charge in progress. LED off. LED displays solid green colour. LED flashes slow green. LED displays solid yellow colour. Cell temperature out of range for charge. LED flashes yellow.
Radio Traffic LED The upper-left LED on your 7535 G2 flashes either orange (transmit) or green (receive). Note: Keep in mind that while the standard 802.11.g radio supports the transmit/receive LED, not all radios support this function. Scan LED Successful scans are indicated in two ways—with a scan LED and with an audio tone. Function Scan in progress Successful scan Unsuccessful scan Scan LED Behaviour LED displays solid red during scan. LED displays solid green after decode. Off when scan ended.
The taskbar changes dynamically, and only those icons that are applicable are displayed. For example, if a radio is not installed in your 7535 G2, the radio signal icon is not displayed in the taskbar. Windows Start Button The Windows Start button in the taskbar displays the Start Menu. Keep in mind that this button is visible only if the configuration of the computer allows it.
twice, it is ‘locked on’ and the onscreen indicator is displayed in uppercase letters in the taskbar. Battery Gauge The battery-shaped icon displayed in the taskbar provides a visual indication of the remaining battery power. When the battery level is low—approximately 15 minutes from empty—a warning window pops up. When the battery power is completely depleted, a final warning window indicates that the 7535 G2 will be powered down. If the 7535 G2 is using external AC power, an AC icon is displayed.
Tethered Devices When a peripheral is attached to the tether port and activated, an associated icon appears in the taskbar. Scanner USB Device RFID Serial Device Docking Device When a 7535 G2 is inserted in a docking station, charger or cradle, an associated icon like some of the samples below appears in the taskbar.
Wireless WAN These icons provide access to and information about the 7535 G2 GSM/GPRS (if your unit is equipped with a GSM radio). Signal Status Fatal Error 0% 1 to 20% 21 to 40% 41 to 60% 61 to 80% 81 to 100% 2.4.3 Audio Indicators The 7535 G2 beeper provides a variety of sounds and can be configured to emit a sound under a variety of conditions. Refer to ‘Volume Adjustment’ in Chapter 5 of the ‘7535 G2 Hand-Held Computer User Manual’ for details about determining when your unit will beep.
quality meter in the taskbar indicates the relative strength of the communication link. To access the radio signal icon from the keyboard: • Press [BLUE] [0]. Choose Shortcuts>System Tray from the Start Menu. • Use the arrow keys to highlight the radio signal icon in the taskbar. • Press [ENTER] to display the radio quality dialog box. If you’re using a touchscreen: • Tap on the radio icon in the taskbar to display the radio quality dialog box.
• • • • on the bar code, including the margins on either end of the symbol. If you are using a 2D imaging scanner, make certain the red, oval-shaped framing mark is centered within the bar code you want to scan. When using imaging scanners, do not move the scanner while decoding the bar code. Movement blurs the image. Hold the scanner farther away for larger bar codes. Hold the scanner closer for bar codes with bars that are close together. 2.6.
3. Navigating In Windows CE Graphic user interfaces like Windows CE for portable devices and desktop Windows (2000, XP, etc.) utilize ‘point and click’ navigation. On 7535 G2s, the ‘point and click’ action is accomplished by tapping the stylus on the touchscreen rather than using a mouse. An equivalent keyboard shortcut is also available for every ‘point and click’ action.
Keep in mind that unlike a desktop computer, the 7535 G2 does not support key chording (pressing two keys at the same time). You must press one key followed by the next in sequence.
3.3 The Startup Desktop When the 7535 G2 boots up, the startup desktop is displayed. Any applications stored in the Startup folder will start up immediately. The Startup folder is located in \Windows\Startup and \Flash Disk\Startup. 3.3.1 Accessing Desktop Icons • Use the arrow keys to highlight the icon, and press [ENTER] to launch the highlighted icon. Note: If the arrow keys do not highlight the desktop icons, the desktop may not be selected.
3.3.2 The Taskbar The 7535 G2 is equipped with a taskbar at the bottom of the screen. It displays icons through which you can view the security level, battery capacity and radio signal quality of your unit. A 7535 G2 attached to a charger, cradle, docking station or PDM displays the associated icon. The taskbar also displays active modifier keys—[SHIFT], [ALT], [CTRL], [BLUE] and [ORANGE]. Keys that have been locked “on” are displayed in uppercase letters.
If you’re using a touchscreen: • Tap and hold the stylus on an icon to display the icon's tooltip. Double-tap the icon to open the Control Panel dialog box associated with the icon. 3.4 The Start Menu The Start Menu lists operations you can access and work with. It is available from the startup desktop or from within any application. To display the menu: • Press [BLUE] [0] (zero).
The Desktop Choosing Desktop from the Start Menu displays the 7535 G2 desktop. Security Settings To assign a security level: • Choose Security from the Start Menu. • Choose a security level from the dialog box. To allow access to all the Start Menu and taskbar options, choose the Supervisor security level. • Type the appropriate password in the Password: text box, and press [ENTER].
Programs The Programs menu contains a sub-menu of programs available on your hand-held. Shortcuts Choosing Shortcuts provides access to the System Tray, Cycle Tasks and the Task Manager.
The System Tray The System Tray option allows access to the icons in the taskbar at the bottom of the screen. The taskbar displays indicators such as a battery capacity gauge and the security level. These indicators are attached to dialog boxes that provide additional information. • Choose System Tray from the Start Menu. When System Tray is chosen, the taskbar icons become accessible.
Press [ALT][ESC]. Settings The Settings menu provides access to the Control Panel applets, lets you configure your radio (Network and Dial-up Connections) and customize the Taskbar and Start Menu.
Run Choosing the Run option displays a dialog box in which you can enter the name of the program, folder or document you want to open. Shutdown Suspends the 7535 G2 immediately – equivalent to turning the unit off. Resets the 7535 G2, leaving all saved files and (registry) settings intact. Unsaved data is lost. Resets the 7535 G2. Files stored outside of permanent memory are lost. Note: The Shutdown menu varies depending on the security level chosen.
3.5 Using A Dialog Box A dialog box appears when you need to make selections and enter further information. Tabs Radio Button Textbox Checkbox Button Dropdown Menu Important: If you’re using a touchscreen, use the stylus to tap on an element in a dialog box to select or deselect it, display dropdown menus, save your selections, and so on. If you’re using a keyboard, follow the directions below.
Textbox: A textbox requires that you type information. Press the [TAB] key to highlight the textbox and then type the appropriate information. Dropdown: This type of menu is identified by up and down arrows next to the dropdown menu to indicate that additional options are available. Press the [TAB] key to highlight the menu, and use the arrow keys on your keyboard to cycle through the options. Checkbox: This box allows you to select or deselect an option.
4. Scanner Specifications 4.1 SE 1200HP, LR & ALR Parameter SE 1200HP Type Laser Class 2 Visible laser diode Light Source 650 nm Output Power 0.83 mW Scan Patterns Linear Scan Angle/ 42º ± 2º Field of View Symbologies Most linear codes Supported SE 1200LR SE 1200ALR Laser Class 2 Visible laser diode 650 nm 1.33 mW Linear Laser Class 2 Visible laser diode 650 nm 1.35 mW Linear 23º ± 2º 13º ± 2º Most linear codes Most linear codes 4.
4.3 EV15 & SX5303 Parameter Type Light Source Scan Patterns Scan Angle/ Field of View Symbologies Supported EV15 SX5303 Imager LED Class 1 Visible LED 617 nm Linear Imager LED Class 1 Visible LED 623 nm Image capture field 40º 26cm x 21cm @ 15cm Most linear codes, PDF417 & MicroPDF417 Most linear codes & most 2D codes 5. General Maintenance 5.1 Caring For The Touchscreen The top of the touchscreen is a thin, flexible polyester plastic sheet with a conductive coating on the inside.
5.2 Cleaning The 7535 G2 Important: Do not immerse the unit in water. Dampen a soft cloth with mild detergent to wipe the unit clean. • Use only mild detergent or soapy water to clean the hand-held unit. • Avoid abrasive cleaners, solvents or strong chemicals for cleaning. The 7535 G2 has a plastic case that is susceptible to harsh chemicals. The plastic is partially soluble in oils, mineral spirits and gasoline. The plastic slowly decomposes in strong alkaline solutions.
6.2 Product Repairs International For technical support outside of Canada or the U.S.A., please contact your local Psion Teklogix office listed on our worldwide website: www.psionteklogix.com Click on the heading labelled “Contacts” to choose a Psion Teklogix technical support representative closest to you. Canada/U.S.A Canadian and U.S. customers can receive access to repair services by calling the toll-free number below or through our secure website (see “Technical Support” on page 56).
NORTH AMERICAN HEADQUARTERS AND U.S. SERVICE CENTRE Psion Teklogix Corp. 1810 Airport Exchange Boulevard Suite 500 Erlanger, Kentucky USA 41018 Tel: +1 859 371 6006 Fax: +1 859 371 6422 E-mail: salesusa@psion.com INTERNATIONAL SUBSIDIARIES (SEE ALSO WWW.PSIONTEKLOGIX.COM) Psion Teklogix S.A. La Duranne 135 Rue Rene Descartes BP 421000 13591 Aix-En-Provence Cedex 3; France Tel: +33 4 42 90 88 09 Fax: +33 4 42 90 88 88 E-mail: tekeuro@psion.