
Instructions / Assembly


- 5 -
3 Eyebolt screws (trees with plastic stands or pot bases do not have
eyebolt screws)
Packet of replacement bulbs and fuses.
2 or more tree sections depending on the size of the tree
Now that you have opened the box, you will notice that each section of the tree
is wrapped in bubble wrap for protection during shipping. Depending on the size
of your tree, you may have as few as 2 sections or as many as 9 sections.
Either way, Section A is always the top section of the tree.
Lay each section in alphabetical order according to the tags. Remove the
bubble wrap as well as the plastic protective cap at the end of each pole to
save and reuse.
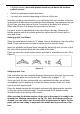
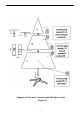
Setting up the Tree Stand
Open the metal stand to form an “X” shape. Line up the holes on the tube of the
stand. Three eyebolts are included to secure the tree into the stand.
Insert the eyebolts and thread them through the stand only until you see or feel
the ends of the eyebolts flush with the inside of the tube.
Place the stand on a level surface where you plan to assemble your tree. (See
Figure 1)
(Figure 1)
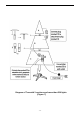
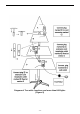
Setting up the Tree
Find and follow the tree assembly diagram that matches your tree for your easy
reference and quick set up of your tree. Please refer to pages 7 - 11.
Since you have the tree sections laid out in alphabetical order, we will start
assembling from the bottom up. Locate the bottom section of the tree. It will
have a pointed, tapered pole.
Place the bottom section into the stand and secure by tightening the eyebolts
so that the section stands straight. The pointed end of the bottom section
should fit firmly in the bottom of the stand.
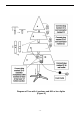
After securing the bottom section of the tree in the stand, it is ready to be
shaped (see shaping instructions on Pg. 12). After the bottom section is
shaped, you can plug it into the wall outlet to illuminate the lights. At this
point you are now ready to assemble the middle and top sections of the
tree.