Model: HD6580B Generator OPERATOR’S MANUAL Warning: The Engine Exhaust from this product contains chemicals known to the State of California to cause cancer, birth defects or other reproductive harm. support@pulsar-products.
TABLE OF CONTENTS Introduction. ............................................................................................................................................................................3 Product Specifications. ................................................................................................................................................3 Parts Ordering / Customer Service. .....................................................................................................
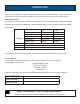
INTRODUCTION Thank you for purchasing this superior quality portable generator from Pulsar Products I nIc. When operating and maintaining this product as instructed in this manual, your generator will give you many years of reliable service. Product Specifications: This generator is an engine-driven, revolving field, alternating current (AC) portable generator.
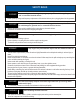
SAFETY RULES Safety Symbols WARNING! Indicates a potentially hazardous situation which could result in serious injury or death if not avoided. CAUTION! Indicates a potentially hazardous situation which could result in damage to equipment or property. Toxic Fumes Risk of electric shock Risk of fire Risk of explosion Hot surface Lifting hazard Safety Instructions The manufacturer cannot anticipate every possible hazardous circumstance that the user may encounter.
SAFETY RULES WARNING! Never exceed generator’s wattage / amperage capacity. This could damage the generator and / or connected electrical devices. • Check operating voltage and frequency requirements of all electrical devices prior to plugging them into the generator. • • Never start or stop engine with electrical devices plugged in to the receptacles. Failure to do so could damage the generator and / or connected electrical devices.
SAFETY RULES This generator produces a very high voltage which could result in burns or electrocution causing serious injury or death. Never handle the generator, electronic devices, or any cord while standing in water, while barefoot, or when hands or feet are wet. Always keep the generator dry. Never operate generator in rain or under wet conditions. Use a ground fault circuit interrupter (GFCI) in a damp or highly conductive area, such as metal decking or steel work.
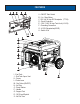
FEATURES A - ON/OFF Start Switch B - 3 in 1 Hour Meter C -120 Volt 30 Amp RV Receptacle(TT-30) D - Circuit Protectors E - 120V / 240V 30 Amp Twist Lock (L14-30) F - Grounding Connection G - 4-120V Receptacles(5-20R) H - Switch & Go I - Fuel Tank J - Fuel Tank Vapor Vent K - Frame L- Choke Lever M - Fuel Valve (ON/OFF) N - Air Filter O - Recoil Starter P - Handle Q - Support Foot R - Oil Fill and Dipstick S - No Flat Tires 7
ASSEMBLY Unpacking 1. Place box on a level surface. 2. Remove all items from box except the generator. Make sure all items listed on the packing list are included and not damaged. 3. Cut down the sides of box being careful to avoid hitting the generator. 4. Leave generator on box to install wheel assembly. Packing List Check all loose parts to the following list. Contact your dealer if any loose parts are not included.
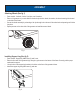
ASSEMBLY Attaching Wheels (See fig 1) • • • • Parts needed - 2 wheels, 2 axles, 2 hair pins, and 2 washers. Raise or tilt generator so you can slide the wheel axle pin into the wheel, the washer, the wheel mounting hole located on the side of the frame. Secure the wheel assembly by reinserting a hair pin through hole at the end of the wheel axle and pressing until it locks into place. Repeat process on the other side of the generator to install the second wheel.
ASSEMBLY • • • Installing The Handles (See fig 4) Place 2 bushings on handle and slide handle in place with the pre-drilled hole on the generator frame. Insert bolt through the handle and frame and tighten with nut. Repeat on opposite side. Fig 4 • • • • • Adding / Checking Engine Oil (See fig 5) Place generator on a level surface. Remove the crankcase dipstick to ensure you do not overfill the engine.
ASSEMBLY Adding Fuel (See fig 6) • • • Set generator on a clean and level surface in an area that is well ventilated. Remove fuel cap. Insert a funnel into the fuel tank and carefully pour gasoline into the tank until fuel level reaches 1 ½ inches below the top of the neck. Be careful not to overfill the tank to provide space for fuel expansion. CAUTION! You must add oil before first operating this generator. Always check oil level before each operation. DO NOT USE E85 FUEL IN THIS UNIT.
OPERATION Grounding the Generator (See fig 7) Fig 7 The ground terminal located on the front panel of the generator may be used for additional grounding, or when connected to a structure. Connect the ground terminal to an earthen ground rod, driven six feet into the ground. with a No 8 AWG (American Wire Gauge) copper wire. The wire connects to the terminal between the lock washer and nut. Tighten the nut securely to ensure proper connection.
OPERATION Never start or stop engine with electrical devices plugged in to the receptacles. Failure to do so could damage the generator and / or connected electrical devices. Always start the engine and let it stabilize before connecting any electronic devices. Disconnect all electronic devices before stopping the engine. WARNING! • • WARNING! • Pull cord recoils rapidly and pulls arm towards engine faster than you can let go which could result in injury.
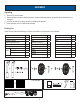
OPERATION 120 / 240 Volt AC, 30 Amp locking receptacle • This receptacle has a 30 Amp push-to reset circuit breaker to protect against overload. • This receptacle is rated to operate 120 Volt, AC, single phase, 60Hz loads requiring up to 3600 watts (3.6 kW) at 30 Amps. It is also rated to operate 240 Volt AC, single phase, 60Hz loads requiring up to 7,200 watts (7.2 kW). • Use a NEMA L14-30 plug with this receptacle. • Use a 4-wire cord rated for 240 Volts AC, 30 Amps to the plug.
OPERATION Operating voltage and frequency requirement of all electronic equipment should be checked prior to plugging them into this generator. Damage may result if the equipment is not designed to operate within a +/- 10% voltage variation, and +/- 3 Hz frequency variation from the generator name plate ratings. To reduce the risk of damage, always have an additional load plugged into the generator if solid state equipment (such as television set) is used.
OPERATION Hour Meter (See Fig 18) Use this meter along with the manual to determine when and what type of service on the unit is needed. The display will show the word “LUBE” at the first 25 hours of operation and again at every 100 hours of operation after. Power Management • • • Start engine without anything connected to generator. When engine has stabilized, plug in and turn on first load.
MAINTENANCE Regular maintenance will extend the life of this generator and improve its performance. The warranty does not cover items that result from operator negligence, misuse, or abuse. To receive full value from the warranty, operator must maintain the generator as instructed in this manual, including proper storage. Before inspecting or servicing this machine, make sure the engine is off and no parts are WARNING! moving. Disconnect the spark plug wire and move it away from the spark plug.
MAINTENANCE Changing Oil (See Fig 19) • • • • • • • • Run the Generator until the Engine is warm. Place generator on a level surface. Remove the crankcase dipstick. Place an oil pan underneath the oil drainage bolt to collect used oil. Remove the oil drainage plug and allow oil to drain completely. Reinstall oil drainage plug, tighten securely. Carefully add SAE 10W-30 to empty reservoir until the oil reaches the outer edge of the oil fill hole (Crankcase Dipstick hole). Replace crankcase dipstick.
MAINTENANCE CAUTION! Used oil should be disposed of at an approved disposal site. Air Filter (See Fig 20) A dirty air filter will reduce the life span of the engine, make it difficult to start the engine, and reduce the unit’s performance. • To clean, remove the air filter cover. • Carefully pull the air filter out by lifting up along the edges. • Remove dirt from filter by tapping on it or having it blown out. Replace with new filter annually.
MAINTENANCE High Altitude Operation Hi At high altitude, the standard carburetor air/fuel mixture will be too rich. Performance will decrease, and fuel consumption will increase. A very rich mixture will also foul the spark plug and cause hard starting. Operation at an altitude that differs from that at which this engine was certified, for extended periods of time, may increase emissions. High altitude performance can be improved by specific modifications to the carburetor.
MAINTENANCE CAUTION! Consult your local hazardous waste management in your area for the proper way to dispose of used fuel. Storage and Transportation of the Generator: (See Fig 22) • • • • • • • Remove any debris that has collected on the generator and around the muffler and control panel. Use a brush or vacuum to remove loose dirt. Inspect air cooling slots. Remove any debris if obstructed. For short-term storage, start generator once every 7 days.
TROUBLESHOOTING Problem Engine is running, but AC output is not available Cause 1. Open circuit breaker 2. Poor connection 3. Defective cord set 4. Connected device is faulty 5. Fault in generator Engine runs well without load but bogs 1. Short circuit in connected device down when loads are connected 2. Generator is overloaded 3. Clogged fuel filter 4. Engine speed is too slow 5. Short circuit in generator Engine will not start, shuts down during 1.
DIAGRAMS HD6580B 23
WARRANTY Pulsar Products Inc. Limited 3 Year Warranty: From the date of original purchase, Pulsar Products Inc. warrants to the original purchaser that each portable generator sold, shall be free from defect in material and workmanship for the items and time period set forth below. Pulsar Products Inc., at its discretion, agrees to repair or replace any defective part that upon examination, inspection, and testing by a Pulsar Products Inc.
WARRANTY What this Warranty Does Not Cover: • Normal wear: This warranty excludes normal wear items such as filters, spark plugs, gaskets, O-rings, adapter cord sets, wheels, and starting batteries. • Maintenance: This warranty does not apply to tune-ups or routine maintenance and does not cover any adjustments or repairs not performed by an authorized repair facility.
Modelo: HD6580B Generador MANUAL DEL USUARIO Advertencia: El escape del motor de este producto contiene productos químicos que el estado de California reconoce que causan cáncer, defectos de nacimiento y otros daños reproductivos. www.pulsar-products.
CONTENIDO Introducción............................................................................................................................................................................ 3 Especificaciones del Producto .................................................................................................................................... 3 Pedido de Piezas / Servicio al Cliente ...............................................................................................................
INTRODUCTION Gracias por comprar este generador portátil de calidad superior de Pulsar Products Inc. Al usar y mantener este producto como se indica en este manual, el generador le ofrecerá muchos años de servicio confiable. Especificaciones del producto Este generador es un generador portátil impulsado por motor.
REGLAS DE SEGURIDAD Símbolos de seguridad ! ¡ADVERTENCIA! Indica una situación potencialmente peligrosa que, si no se evita, podría causar lesiones graves o la muerte. ! ¡PRECAUCIÓN! Indica una situación potencialmente peligrosa que, si no se evita, podría causar daños al equipo o daños materiales de otro tipo.
REGLAS DE SEGURIDAD ! • ! • • No arranque o detenga nunca el motor con dispositivos eléctricos conectados en las tomas. Hacerlo podría dañar el generador y/o los dispositivos eléctricos conectados. Siempre que arranque el motor, deje que se estabilice antes de conectar dispositivos eléctricos. Desconecte todos los dispositivos electrónicos antes de detener el motor. ¡ADVERTENCIA! ! El sistema de arranque y otras partes móviles pueden engancharse en la ropa, joyas o cabello.
REGLAS DE SEGURIDAD ! • • • • • • • ! ¡ADVERTENCIA! • ! ¡ADVERTENCIA! Nunca modifique esta unidad de ninguna manera ni cambie la velocidad regulada. • • • ! Use esta unidad solo para uso previsto; de lo contrario, podrían producirse lesiones graves o la muerte. No evite ninguno de los dispositivos de seguridad. Las partes móviles están cubiertas con protecciones. Asegúrese de que no falte ninguna cubierta de protección. Nunca transporte o haga ajustes a esta unidad mientras está en funcionamiento.
CARACTERÍSTICAS A - Interruptor de arranque B - 3 en 1 Medidor de (Voltajes, Frequencia, Horas) C -120 voltios 30 amperios RV Enchufe D - Protectores de circuito E - 120V / 240V 30 amperios twist lock (L14-30) F - Terminal de tierra G - 4-120V Enchufes H - Depósito de combustible I - Respiradero J - Marco K- Palanca del estrangulador L - Válvula de gasolina (ON/OFF) M - Filtro de Aire N - Sistema de arranque O - Asa P - Pie de apoyo Q - Llenado de aceite y varilla medidora R - Llantas 7
MONTAJE Desempacar 1. Coloque la caja sobre una superficie plana. 2. Saque todos los artículos de la caja excepto el generador. Asegúrese de que todos los artículos que figuran en la lista de empaque están incluidos y no dañados. 3. Corte los lados de la caja con cuidado para evitar golpear el generador. 4. Mantenga el generador en la caja para el montaje de las llantas. Lista de Embalaje Porfavor revise todas las partes en la lista. Comuníquese con su vendedor si faltan partes.
MONTAJE Colocación de las Ruedas (See fig 1) • • • • Piezas necesarias: 2 ruedas, 2 ejes, 2 horquillas y 2 arandelas. Eleve o incline el generador para que pueda deslizar el pasador del eje de la rueda en la rueda, la arandela y el orificio de montaje de la rueda ubicado en el costado del marco. Asegure el conjunto de la rueda insertando una horquilla a través de un orificio en el extremo del eje de la rueda y presionando hasta que “HAGA CLIC”.
MONTAJE • • • Instalación de las manijas (Ver figura 4) Coloque 2 bujes en la manija y deslice la manija en su lugar con el orificio pretaladrado en el marco del generador. Inserte el perno a través del mango y el marco y apriete con la tuerca. Repita en el lado opuesto. Fig 4 Agregando/Chequeado el aceite del motor (vea fig. 5) • Coloque el generador sobre una superficie nivelada. • Retire la varilla del cárter para asegurarse de que no desborde el motor.
MONTAJE Poniendo Gasolina (See fig 6) • Ajuste el generador en una superficie limpia y nivelada en una área bien ventilada. • Retire la tapa de la gasolina. • Insertar un embudo en el depósito de gasolina y llene el tanque de gasolina con cuidado hasta que los niveles de gasolina alcanza 1 1/2 pulgadas por debajo de la parte superior del cuello. Tenga cuidado de no llenar demasiado el tanque paraproporcionar espacio para la expansión del combustible.
FUNCIONAMIENTO Puesta a tierra del Generador (See fig 7) Fig 7 El terminal de tierra situado en la parte posterior del marco de l generador siempre debe ser utilizado para conectar el generador a una varilla de tierra impulsado. El terminal de tierra situado en la parte posterior del bastidor del generador siempre debe ser utilizado para conectar el generador a una varilla de tierra impulsado.
FUNCIONAMIENTO Nunca arranque o detenga el motor con los dispositivos eléctricos conectados a los ADVERTENCIA receptáculos. No hacerlo, podría dañar el generador y los dispositivos eléctricos conectados. • Siempre arranque el motor y dejar que se estabilice antes de conectar cualquier dispositivo electrónico. • Desconecte todos los dispositivos electrónicos antes de parar el motor.
FUNCIONAMIENTO Enchufe de bloqueo de 240 voltios CA, 30 amperios • Este enchufe tiene un empuje de 30 amperios para restablecer el disyuntor de protección contra sobrecarga. • Este enchufe está clasificado para operar 240 voltios CA, monofásico, cargas de 60Hz que requieren hasta 7200 vatios (7.2 kW). • Use un enchufe NEMA L14-30 con este receptáculo. ¡PRECAUCIÓN! No conecte cargas trifásicas al generador.
FUNCIONAMIENTO Voltaje de operación y frecuencia exigencia de todos los equipos electrónicos debe comprobarse antes de enchufarlos a este generador. Pueden ocurrir daños si el equipo no está diseñado para operar dentro de un + / - 10% arriation voltaje, y + / - 3 Hz variación de frecuencia a partir de los valores nominales que aparecen generador de placas. Para reducir el riesgo de daños, siempre tenga una carga adicional enchufada al generador de equipos de estado sólido (como el televisor) se utiliza.
FUNCIONAMIENTO Medidor de Hora (vea fig. 18) El contador de horas digital opera cada vez que el motor está en funcionamiento y mantiene la cuenta de cuántas horas se ha utilizado la unidad. Utilice este medidor, junto con el manual para determinar cuándo y qué tipo de servicio necesita la unidad. la pantalla mostrará la palabra "LUBE" en las primeras 25 horas de funcionamiento y de nuevo a cada 100 horas de funcionamiento después.
MANTENIMIENTO Mantenimiento regular extendera la vida del generador y mejorara el rendimiento. La garantia no cubre partes que resultan por negligencia, mal uso, o abuso del operador. Para recibir el valor complete de la garantia el operador tendra que mantener el generador como indique este manual incluyendo almacenamiento adecuado. ADVERTENCIA Antes de la inspeccion y mantenimiento de esta maquina asegurese que el motor este apagado y no se muevan partes.
MANTENIMIENTO Cambiar el aceite (fig. 19) • Corra el generador hasta que el motor este caliente. • Colocar el generador en una superficie plana. • Saque la barilla del cárter. • Ponga un recipinte de aceite de bajo del perno del drenaje de aceite. • Quite el tapón de drenaje de aceite y deje que el aceite drene completamente • Reinstalar el tapón del drenaje, apriete firmemente.
MANTENIMIENTO ¡PRECAUCIÓN! El aceite usado debe eliminarse en un sitio de eliminación aprobado. Consulte a su distribuidor local de petróleo para obtener más información. Filtro de Aire (vea fig. 20) Un filtro de aire sucio puede reducir la vida del motor, haciendo dificultosamente el prender el motor y reduce el funcionamiento de la unidad. • Para limpiar, remoeva el covertor del filtro de aire. • Cuidadosamente saque el filtro de aire levantandolo por las orillas.
MANTENIMIENTO Operación a gran altitud A gran altitud, la mezcla estándar de combustible / aire del carburador será demasiado alta. El rendimiento disminuirá y el consumo de combustible incrementará. Una mezcla muy alta también ensuciará la bujía y provocará un arranque difícil. Operación a una altitud que difiere a partir de la cual se certificó este motor, por largos períodos de tiempo, puede aumentar las emisiones.
MANTENIMIENTO PRECAUCIÓN Consulte con su manejo de residuas peligrosos local en su area para desaserce de la gasolina correctamente. Almacenamiento (vea fig. 22) • Remueva algun desecho que haya colectado el generador y al rededor del mofel y controles. Use una aspiradora para recoger desechos sueltos. Si hay tierra pegada, use un cepillo de alambre. • Inspeccione las ranuras del enfriamiento. Remueva desechos que obstrullen. • Deconectar cable de la bateria negative de la bateria.
SOLUCIÓN DE PROBLEMAS Problema El motor esta corriendo pero la salida del aire condicionado no esta disponible El motor corer bien sin carga pero se atasca cuando se conecta. Engine will not start, shuts down during operation, or starts and runs rough. Causa Solución 1. Abre el cortacircuitos 2. Conexión pobre 3. Juego de cables defectuosos 4. Depositivo Conectado está defectuoso 5. Falta en el generador 1. Reajustar el cortacircuitos 2. Examine y Reparar 3. Examine y Reparar 4.
DIAGRAMA HD6580B 23
GARANTÍA Del dia original de la copmora Pulsar Products Inc. garantiza al comprador original que cada generador portatil vendido sera libre de defectos en el material y en la hechura de trabajo. Para los articulos y periodos de tiempo establecido a continuación. Pulsar Products Inc., en su discreción, acue rda a reparar o reemplasar cualquier parte defectuosa que examinandola, inspeccionandola y probandola por un Pulsar Products Inc.
GARANTÍA Lo que No Cubre esta Garantia • Desgaste normal: Esta garantia excluye desgaste normal de articulos como filtros, bujias, empaques, juntas toricas juegos de cable de adaptador, ruedas y bateria de arranque. • Mantenimiento: Esta garantia no se aplica a afinamientos o a mantenimiento rutinario y no cubre ajustes o reparos que no sean realizados por un centro de reparación autorizada.