
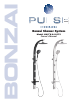
Installation Guide


3
Installation
Thank you for choosing the Bonzai Shower System by PULSE ShowerSpas!
Assembly and installation of the Bonzai Shower System is de-
signed to be quick and easy. If you have installation questions or
performance problems, call PULSE Customer Service toll free at
888-785-7320 or visit www.pulseshowerspas.com.
Please read instructions carefully, become familiar with all parts,
installation procedures and tools required. Follow the steps in the
order presented to help avoid any mistakes.
FOR NEW CONSTRUCTION OR
COMPLETE REMODEL
• A hot/cold mixing valve is required (NOT INCLUDED)
• Nipple should extend
1
⁄
2
" past finished wall surface
FOR FIBERGLASS ENCLOSURES
IMPORTANT: PULSE does not recommend mounting through
fiberglass wall surfaces without adequate wood or sheetrock
backing! If mounting Bonzai to a fiberglass wall you must
purchase appropriate mounting hardware (sold separately).
TOOLS REQUIRED
Philips screwdriver, adjustable wrench, level, pencil or marker,
drill,
1
⁄
4
" masonry/tile drill bit, hammer
INSTALLATION
For a helpful installation video go to:
www.pulseshowerspas.com/flash/bonzai_installation.html
1. Remove your showerhead and escutcheon (trim cover) from
your existing shower arm. Leave shower arm in place.
2. Determine the length of brass NPT nipple (1) needed:
a. Place mark on existing shower arm at wall surface.
Unscrew shower arm from elbow in wall.
b. Measure distance from mark on shower arm to end of
shower arm threads. Add
1
⁄
2
" to this measurement, and
then round to nearest
1
⁄
2
".
Example 1: If measurement = 1
1
⁄
4
", add
1
⁄
2
" = 1
3
⁄
4
",
rounded = 2" NPT nipple—this is the length needed.
Example 2: If measurement = 1
5
⁄
8
", add
1
⁄
2
" = 2
1
⁄
8
",
rounded = 2" NPT nipple—this is the length needed.
IMPORTANT: If your shower arm is located in wall above tile/
fiberglass surface you must add the distance from the wall to
face of tile/fiberglass surface to the above measurement.
NOTE: If supplied 2
1
⁄
2
" nipple (1) is not the correct length based
on above formula, you must obtain the correct size NPT brass
nipple (sold separately), available at most hardware stores.
3. Apply a generous amount of PTFE (plumber's) tape (2) to
both ends of the nipple (1).
4. Insert flow restrictor (10), then screened rubber washer (11)
into hexagon fitting of supply line (9). Connect to 90° inlet
(12) on backside of Bonzai body. DO NOT OVERTIGHTEN.
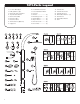
5. Slide mounts (13) over their male counterparts. [Figure A]
NOTE: Do not remove the tape backing on mounts at this time!
6. Hold Bonzai up to the wall and determine mounting loca-
tion. Evaluate showerhead and body jet heights, making
certain supply line (9) reaches nipple (1).
7. Use a level to check for vertical (plumb) position.
8. Mark the wall at top & bottom mounts (13) for reference.
9. Reposition mounts (13) to marks on wall. Mark the hole in
the center of each mount.
10. For solid surface walls (tile, marble, granite, etc.) use a ma-
sonry/tile bit and drill a
1
⁄
4
" hole at the center mark for each
mount that is 1
1
⁄
2
" deep. BEWARE— Live Plumbing In Wall!
11. Insert the nylon anchors (16) into the holes. [Figure B]
12. Remove tape backing from mounts (13) and reposition to
marks on wall. [Figure B]
13. Secure mounts (13) to wall with mounting screws (14) and
metal washers (15). DO NOT OVERTIGHTEN. [Figure B]
14. Remove tape backing on escutcheon base (6), slide over
nipple (1) and attach to wall. [Figure C]
NOTE: Optional thin escutcheon (8) is for installations where
the ABS escutcheon (6,7) interferes with desired mounting
height of Bonzai. For best look with thin escutcheon (8),
nipple should not extend more than
3
⁄
4
" from wall surface.
15. Secure chrome 90° w/ cone washer (3) to nipple (2).
DO NOT OVERTIGHTEN. [Figure C]
NOTE: Cone washer is already installed on chrome 90° (3).
16. Insert Bonzai into wall mounts.
17. Determine length of supply line (9). Supply line must install
completely over barbed portion of 90° connector (3). To
shorten, remove Bonzai from wall, cut supply line with sharp
utility knife and re-insert Bonzai into wall mounts.
17. Secure Bonzai to wall mounts (13) with screws (17). Choose
the holes that set the Bonzai at your desired distance from
the wall. [Figure D]
18. Insert cover plates (18) into side of mounts (13). [Figure D]
19. Slide chrome finned nut (5), then tapered plastic washer (4)
over supply line (9). Refer to Figure E for proper positioning.
20. Push hose onto barbed portion of chrome 90° (3). Slide
tapered plastic washer (4) over barbs and secure with chrome
finned nut (5). DO NOT OVERTIGHTEN. [Figure E]
HI NT: Apply a small amount of liquid soap to help hose slide onto
barbed connection.
21. Push escutcheon cover (6) into base plate (1). [Figure E]
22. Secure hand shower holder (20) to Bonzai with screws (17).
23. Insert 4mm rubber washer (22) into each end of hand shower
hose (21). Secure to Bonzai and hand shower (19).
24. Insert 6mm rubber washer (24) into showerhead (23) and
securely tighten to Bonzai. DO NOT OVERTIGHTEN.
25. Carefully insert shelf (25) into mounting bracket until tabs
lock in place. Secure shelf to Bonzai with screw (17).
Congratulations! You are now ready to enjoy your new
PULSE ShowerSpas Bonzai Rain Shower System!