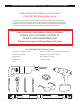
Leilani ShowerSpa Model #1022-B PW-91022-5225BL Owner's Manual
Leilani ShowerSpa Model #1022-B / PW-91022-5225BL Please Read The Following Instructions COMPLETELY Before Beginning! Our goal is to ensure your installation goes smoothly and safely. Please read these instructions carefully and follow recommendations for plumbing and mounting. After reading instructions, if you determine you do not have the necessary skills and/or tools, we recommend that a licensed plumbing contractor complete the installation.
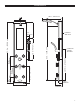
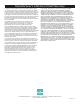
9 in. 228.6 mm 11 in. - 279.4 mm 18 in. - 457.2 mm 53.5 in. - 1358.9 mm 53 in. - 1346.2 mm 9 in. 228.6 mm 13 in. - 330.2 mm 2 in. 50.8 mm 26.75 in. - 679.45 mm 15.5 in. - 393.7 mm 6 in. 152.4 mm Dimensions 18 in. - 457.2 mm 10 in. - 254 mm Finished Wall Line Holes For Mount Bracket 2.75 in. 69.85 mm 5.75 in. 146.
Parts Legend 1. ShowerSpa 6. Cap....................................... (2) 11. Lock Washer....................... (4) 2. Showerhead 7. Handshower 12. Rubber Washer.................. (3) 3. Shower Arm 8. Handshower Holder 13. Mount Bracket 4. Slide Bar 9. Handshower Hose 14. Mounting Screw................ (2) 5. Bracket................................ (2) 4 10. Machine Screw................... (4) 15. Nylon Anchor.....................
Assembly After Unpacking Your ShowerSpa, Some Assembly Is Required Prior To Installation Slide Bar Assembly Refer to exploded line drawing for reference. 1. Hold slide bar (4) with grooves facing away from you. Press button on handshower holder (8) and place onto slide bar (4) with holder facing you and button on top. 2. With slide bar (4) facing you, align grooves on bracket (5) with grooves on back of slide bar (4). Screw holes on bracket (5) should extend to left side of bar.
New Construction or Extensive Remodel – New Finished Wall Surface 1. Prior to sheetrock, stub-out ½" hot and cold supply lines beyond finished wall surface, 4" on center. For best results, attach 90° brass fittings (available at most hardware stores) to the stub-outs maintaining ¼" – ½" of space between the fitting and finished wall. The open end of the 90° brass fittings should point down so the supply lines attach parallel to the wall. 1 2.
Usage Pressure Balance Mixing Valve This ShowerSpa is equipped with a cUPC® pressure balance mixing valve to adjust water flow and temperature. The valve automatically adjusts to changes in water pressure (i.e. someone flushes a toilet), keeping your temperature constant and preventing accidental scalding. To turn on the ShowerSpa simply raise the handle until the desired flow rate is achieved. Rotate to the right to decrease temperature and rotate to the left to increase temperature.
Manufacturer’s Lifetime Limited Warranty 1. Defects Covered; Warranty Period. Pulse Shower Spas, Inc. (“Pulse”) warrants to the original consumer purchaser who purchases this shower spa (the “Product”) for use in his or her own home, that the Product will be free from defects in material and manufacturing workmanship for as long as the original consumer purchaser owns that same home.