
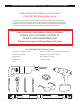
Installation Instructions


6
New Construction or Extensive Remodel – New Finished Wall Surface
1. Prior to sheetrock, stub-out ½" hot and cold supply lines
beyondnishedwallsurface,4"oncenter.Forbestresults,
attach90°brassttings(availableatmosthardwarestores)to
thestub-outsmaintaining¼"–½"ofspacebetweenthetting
andnishedwall.Theopenendofthe90°brassttingsshould
point down so the supply lines attach parallel to the wall.
1
2. For a person 5'8" – 6'2" we recommend the stub-outs be either
28"or38"abovenishedoor.
2
3. Before installation, make certain that water is COMPLETELY
TURNED OFF to both hot & cold supply lines of shower.
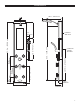
4a. Mark location of holes for the mounts, making sure holes are
plumb. For a person 5'8" – 6'2", we recommend placing the top
holeoftheuppermountatapprox.57"abovenishedoor.
3
4b. Determine location for the lower mount. Measure the distance
between indents on the bottom edges of the two brackets on
back of ShowerSpa. Using this distance, measure down from
the top hole in upper mount to get the location of the top hole
in lower mount.
4c. Use the mounts to mark only one of the lower holes in each
mount, whichever is most convenient.
5. Before drilling holes, make certain that connecting to stub-outs
DOES NOT INTERFERE with backside of ShowerSpa and it is
ushwithnishedwallatdesiredmountingheight.
2
6. Drill ¼" holes through wall surface using a masonry bit. Drill
slowly through wall surface to avoid cracking and chipping.
Insert anchors and securely screw brackets to wall. Before
connecting hot and cold supply lines, hang the ShowerSpa on
wall,checktheheightandmakesuretheShowerSpaisush
againstwallwithasecuret.
7. Connect hot and cold water supply lines to stub-outs—DO NOT
OVERTIGHTEN.BeforemountingtheShowerSpa,checkttings
to make sure they are secure. Turn on water and check for
leaks.Whenttingsareleak-free,mountShowerSpaonwall.
8. OPTIONAL—Seal around body of ShowerSpa with a bead of
silicone. DO NOT SEAL BOTTOM.
Retrot–ExistingShowerReplacement
NOTE—Inaremodelinwhichyouarenotreplacingthenishedwallsurface(tile,orbackingmaterial)itisadvisabletopurchaseaPULSE
ShowerSpa model that covers the location of your existing valve assembly—either single handle or two-handle type. If your PULSE
ShowerSpa model does not cover this area, you will need to either choose another PULSE ShowerSpa model that does or make necessary
repairswithappropriatematerials(i.e.wallboard,tile,berglass,etc).
1. TURN OFF WATER SUPPLY TO SHOWER. Typically there is a
gate valve where the water main enters the house. Turning the
watervalveoathotwatertankdoesnotturnocoldwater
supply line.
2. Makecertainwateriscompletelyturnedotobothhot&cold
supply lines of shower. Turn shower valve on, both hot and cold,
to VERIFY WATER SUPPLY IS OFF. Open a sink faucet in the
bathroom in which you are installing the ShowerSpa to relieve
any pressure and help adequately drain shower supply lines.
3. Remove handle(s) and trim cover(s) of your existing shower
valve, exposing valve body in wall.
4. Locate hot and cold supply lines entering valve. Using a
reciprocating saw with sharp metal saw blade, cut existing
valve out, preserving threads of the supply lines entering valve.
You should also cut the riser within wall supplying the existing
showerhead. Carefully twist and remove valve.
5. Unscrew old showerhead from shower arm, then unscrew
shower arm from wall.
6. Water lines must be extended to the outside of wall cavity, 4"
oncenter.Forbestresults,attach90°brassttings(available
at most hardware stores) to the stub-outs maintaining ¼" – ½"
ofspacebetweenthettingandnishedwall.Theopenend
ofthe90°brassttingsshouldpointdownsothesupplylines
attach parallel to the wall.
1
7a. Mark location of holes for the mounts, making sure holes are
plumb. For a person 5'8" – 6'2", we recommend placing the top
holeoftheuppermountatapprox.57"abovenishedoor.
3
7b. Determine location for the lower mount. Measure the distance
between indents on the bottom edges of the two brackets on
back of ShowerSpa. Using this distance, measure down from
the top hole in upper mount to get the location of the top hole
in lower mount.
7c. Use the mounts to mark only one of the lower holes in each
mount, whichever is most convenient.
8. Before drilling holes, make certain that connecting to stub-outs
DOES NOT INTERFERE with backside of ShowerSpa and it is
ushwithnishedwallatdesiredmountingheight.
2
9. Drill ¼" holes through wall surface using a masonry bit. Drill
slowly through wall surface to avoid cracking and chipping.
Insert anchors and securely screw brackets to wall. Before
connecting hot and cold supply lines, hang ShowerSpa on wall,
checktheheightandmakesureShowerSpaisushagainstthe
wallwithasecuret.
10. Connect hot and cold water supply lines to stub-outs—
DO NOT OVERTIGHTEN. Before mounting the ShowerSpa,
checkttingstomakesuretheyaresecure.Turnonwaterand
checkforleaks.Whenttingsareleak-free,mountShowerSpa
on wall.
11. OPTIONAL—Seal around body of ShowerSpa with a bead of
silicone. DO NOT SEAL BOTTOM.
1
Additionalttingsorlongersupplylinesmaybenecessarydependingonyourspecicsituation.
2
The desired mounting height of ShowerSpa determines, or is determined by location of the ½" stub-outs.
3
The mounting height can vary depending on several factors (i.e. location of supply lines, interference from ShowerSpa plumbing, old valve access area,
personal preference, etc.)