
Installation Guide
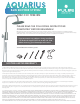

installation manual
rain shower system
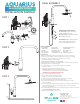
step 1
flange
front view
final assembly
operation instructions:
Showerhead: Rotate diverter(9)
for ON and OFF function.
Handshower(10): Rotate handle for
ON and OFF function.
IMPORTANT: When exiting shower
please make sure mixing valve
is in the OFF/CLOSED position.
step 3
wall
floor
CUSTOMER SERVICE
1-888-785-7320
support@PulseShowerSpas.com
Hours: Mon.-Fri. 8:30 to 5pm PST
For more information and shop for parts visit us at:
www.PulseShowerSpas.com
step 2
wall
5
2
3
3
4
13
5
6
7
Maximum distance
from finished wall
1 3/4 - inches
wall
8
9
10
11
14
14
14
12
1
1. showerhead
2. inlet fitting
3. flange
4. set screw (3)
5. shower body
parts legend
6. escutcheon
7. Extension (2)
8. Mounting screws
w/ anchors (2)
9. showerhead on/off
10. handshower on/off
11. handshower
12. shower hose
13. top-tee
14. rubber washer (3)
Instructions:
1. Remove inlet tting(2) from top-tee(14) by loosening set screws(4).
2. Remove top-tee(14) from shower body(5) by loosening set screws(4).
3. Determine length of nipple for your installation. If needed,
add extension(s)(7) for proper length.
Note: drawing on Step 1 for correct length.
4. Apply PTFE tape (clockwise) or plumber's thread sealant to nipple threads.
5. Thread ange(3) on to inlet tting(2).
6. Use Allen wrench to securely tighten nipple into wall tting
ensuring no leaks.
7. Tighten ange(3) against nished wall surface.
Optional: Drill two 3/16-in. holes through ange.
Insert anchors(8) and secure with screws provided(8).
CAUTION: Live plumbing behind the wall.
8. Slide escutcheon(6) onto top-tee(14).
9. Re-insert top-tee(14) over inlet tting(2).
Hint: Use soft soap to lubricate o-rings.
10. Vertically align top-tee(14)and secure with two set screws(4).
11. Slide escutcheon(6) against nished wall surface.
12. Attach shower body(5) to top-tee(14). Vertically align and secure
with set screw(4).
13. Insert a rubber washer(14), attach hose(12) to top-tee(14) and handshower.
Note: Hex nut fastens to top-tee tting(14). Tapered end of hose(12)
attaches to handshower.
15. Insert handshower into bottom of shower body(5) until magnet is activated.
Note: Held with Magnetic holder
16. Attach showerhead (1) to shower arm.