MONACO Monaco Rain Shower System Model #7005-CH, 7005-BN & 7005-ORB Owner's Manual
Monaco Shower System Model #7003 Please Read The Following Instructions COMPLETELY Before Beginning! Our goal is to ensure your installation goes smoothly and safely. Please read these instructions carefully and follow recommendations for plumbing and mounting. After reading instructions, if you determine you do not have the necessary skills and/or tools, we recommend that a licensed plumbing contractor complete the installation.
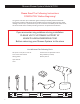
Monaco Shower System Parts Legend 1. 2. 3. 4. 5. 6. 7. 8. Nipple Inlet Fitting Escutcheon Set Screws Top T Shower Arm Shower Bar Washer 9. 10. 11. 12. 13. 14. 15. 16. Shower Head Hand Held Holder Soap Dish Swivel Joint Wall Mount Adhesive Tape Screws Wall Anchors 17. Diverter Cartridge 18. Diverter Handle 19. Hose 20. Hand Shower 21. Diverter Body 22. Allen Wrench 23.
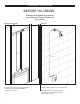
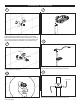
Installation Instructions BEFORE YOU BEGIN Measure the following to ensure your Monaco Shower System will fit properly. New Construction Retrofit 30” minimum 30” minimum Make sure distance from water outlet and mixing valve trim (NOT INCLUDED) is a minimum 30" or more. 4 Remove existing shower arm and shower head. Make sure distance from water outlet and mixing valve trim (NOT INCLUDED) is a minimum 30" or more.
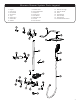
Installation Instructions 3 1 Step 1 Step 2 Step 1: Apply plumber's tape to the nipple (1). Step 2: Screw nipple (1) into pipe making sure you have 1/2" extending beyond finished wall surface. NOTE: If supplied 2" nipple (1) is not correct length you must obtain correct size NPT brass nipple (sold separately), available at most hardware stores. Slide soap dish (11) onto shower bar (7) from top.
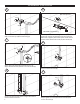
Installation Instructions 6 9 Drill-less option Step 2 Step 1 CAUTION: Live Plumbing Step 1: Slide escutcheon (3) onto Top T (5). Step 2: Connect Top T (5) with inlet fitting (2). 7 Drill-less option: Remove covering adhesive tape (14) and stick to wall. Hold for 30 seconds and let sit for 24 hours before use, to properly secure. Drill option: Center mount into the outline. Secure wall mount (13) with screws (15).
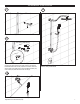
Installation Instructions 12 15 Unscrew set screw (4) and remove handheld holder mount (23). 13 CAUTION: Live Plumbing Step 1 Step 2 Step 1: Position handheld holder mount (23) on desired location and secure with screw (15). Position the second handheld holder wall mount (23) next to the first one and secure with screw (15). Step 2: Place handheld holder (10) onto mount (23) and secure with set screw (4).
MANUFACTURER'S LIFETIME LIMITED WARRANTY 1. Defects Covered; Warranty Period: Pulse Shower Spas, Inc. (“Pulse”) warrants to the original consumer purchaser who purchases this shower spa (the “Product”) for use in his or her own home, that the Product will be free from defects in material and manufacturing workmanship for as long as the original consumer purchaser owns that same home.