
Installation Instructions

5
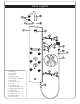
Assembly
After unpacking your ShowerSpa, some assembly is required prior to installation.
Shower Arm Assembly
1. Thread shower arm (3) into shower arm insert (4) completely. NOTE: Shower arm should pivot side-to-side.
2. Insert rubber washer (12) in shower head (2) and tighten shower head onto show arm (3).
Hand Shower Holder Assembly
1. Mark preferred mounting location of hand shower holder (7). Drill ¼" hole into wall surface (CAUTION: LIVE PLUMBING) for hand shower
mount anchor (11).
2. Secure hand shower holder mount (5) to wall surface by tightening hand shower mount screw (10) into anchor (11).
3. Slide hand shower holder (7) onto mount (11) and secure with set screw (8).
After ShowerSpa is mounted to the wall
Hand Shower Assembly
1. Insert washer (12) into hexagon shaped end of hand shower hose (9) and attach to threaded outlet on bottom of ShowerSpa (1).
Do not over-tighten.
2. Insert washer (12) into tapered end of hand shower hose (9) and attach to hand shower (6). Insert hand shower into holder (7).
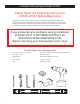
Installation – New Construction
Extensive Remodel – New Finished Wall Surface
1. Prior to sheetrock, stub-out ½" hot and cold supply lines beyond
nished wall surface, 4" on center. For best results, attach 90°
brass ttings (available at most hardware stores) to the
stub-outs maintaining ¼" – ½" of space between the tting and
nished wall. The open end of the 90° brass ttings should point
down so the ShowerSpa's supply lines attach parallel to wall.
1
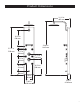
2. For a person 5'8" – 6'2" we recommend stub-outs be 40" above
nished oor.
2
3. Before installation, make certain water is COMPLETELY
TURNED OFF to both hot & cold supply lines of shower.
4a. Mark location of holes for top mount, making sure holes are
level. For a person 5'8" – 6'2", we recommend placing holes of
upper mount at approx. 60" above nished oor.
3
4b. To determine location for lower mount measure distance
between indents on bottom edge of horizontal mounting bars
on back of ShowerSpa (approx. 23
1
⁄
8
"). Using this distance,
measure down from holes in upper mount to obtain location of
holes in lower mount making certain mounts are plumb.
4c. Use mounts to mark location of holes for each mount.
5. Before drilling holes, make certain that connecting to stub-outs
DOES NOT INTERFERE with backside of ShowerSpa and it is
ush with nished wall at desired mounting height.
2
6. Drill ¼" holes through wall surface using a masonry bit. Drill
slowly through wall surface to avoid cracking and chipping.
Insert anchors and securely screw brackets to wall. Before
connecting hot and cold supply lines, hang ShowerSpa on wall,
check height and make sure ShowerSpa is ush against wall
with a secure t.
7. Connect hot and cold water supply lines to stub-outs—DO NOT
OVERTIGHTEN. Before mounting ShowerSpa, check ttings to
make sure they are secure. Turn on water and check for leaks.
When ttings are leak-free, mount ShowerSpa on wall.
8. OPTIONAL—Seal around body of ShowerSpa with a bead of
silicone. DO NOT SEAL BOTTOM.