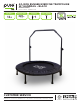
40-INCH BUNGEE EXERCISE TRAMPOLINE W/ HANDRAIL - BLACK MODEL# 9005BTH PRODUCT MANUAL - VERSION 3.21.01 FOR AGES: 13+ WEIGHT LIMIT: 220 Lbs 100 Kgs TO BUILD: X TOOLS NEEDED: 1 CUSTOMER SERVICE GQBrands.com • CustomerService@GQBrands.
CUSTOMER SERVICE INFORMATION Thank you for purchasing: Please Note: In the interest of better quality and value, we are constantly improving and updating our product information. Most up to date manuals, warnings and product information can be found at: https://www.globalqualitybrands.com/warnings 40-INCH BUNGEE EXERCISE TRAMPOLINE - BLACK MODEL# 9005BTH To register you product please visit: www.globalqualitybrands.com/product-registration or Scan code If you have an issue with your item, do not return.
WARNINGS IMPORTANT MESSAGE Please read all of the warnings and directions below prior to assembly. This trampoline comes equipped with warnings and instructions for the assembly, care, maintenance and use of the trampoline. This information must be read by all trampoline supervisors and users before any person is allowed to jump on the trampoline. ADULT ASSEMBLY REQUIRED CHOKING HAZARD - Small Parts NOT for children under 3 years of age.
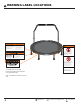
WARNING LABEL LOCATIONS WARNING - Do not attemp or allow somersaults. Landing on the head or neck can cause serious injury, paralysis, or death, even when landing in the middle of the bed. - Do not allow more than one person on the trampoline. Use by more than on person at the same time increases the chance of injury. - Use trampoline only with mature, knowledgeable supervision. - Read the users manual. All warnings and instructions must be read and followed.
WARNINGS & SAFETY INFORMATION Please read these warnings and the information in this manual in its entirety. Failure to comply with the following instructions may increase the risk of serious injury and/or death: • The owner and supervisors of this trampoline are responsible to make sure all users are aware of the warnings and use specified in this manual. • Ensure the trampoline has been assembled correctly, per the instructions in the manual.
PARTS LIST 1- Jump Mat and Frame 2- Safety Hook 3- Frame Pad x2 x1 x1 4- Leg 5- Large Pin Lock Knob 6- Small Lock Knob x2 x2 x6 7- Left Side Rail Base x1 6 8- Right Side Rail Base 9- Left Side Handrail x1 x1 GQBrands.com 10- Right Side Handrail x1 CustomerService@GQBrands.
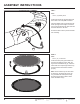
ASSEMBLY INSTRUCTIONS To assemble the trampoline properly, you must follow all instruction steps below. Do not attempt to alter any trampoline frame components or parts or skip any steps below. Use gloves to protect your hands from pinch points during assembly. STEP 1: 1 Parts: Part 1 (x1) - Jump Mat and Frame Locate the middle of the Jump Mat and Frame (1) and unfold to make half a circle in shape.
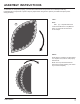
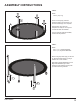
ASSEMBLY INSTRUCTIONS STEP 3: Parts: Part 2 (x2) -Safety Hook Locate both hinges at opposite sides from each other in the Jump Mat and Frame. Insert the Safety Hook (2) bolt through the small openings of the hinges, and secure it once it shows through the other side with the Hook attached in its head. Do this with both hooks to prevent the Mat from unfolding. 2 STEP 4 Parts: Part 3 (x1) - Frame Pad Locate the frame pad (2) and attach it to the frame like diagram shown.
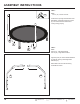
ASSEMBLY INSTRUCTIONS STEP 5: Parts: Part 4 (x6) - Leg 4 Screw on all Legs (4) into their respective places on the frame. You will have 6 total legs once complete. Flip the frame over and your trampoline is ready for use if you do not want to utilize the handrail. If you do want to install the handrail, continue to step 6 below. STEP 6: Parts: Part 7 (x1) - Left Side Rail Base Part 8 (x1) - Right Side Rail Base Remove leg caps from legs you will use to add the handrail.
ASSEMBLY INSTRUCTIONS 6- Small Lock Knob x2 STEP 7: Parts: Part 6 (x2) - Small Lock Knob Locate the 2 openings at the bottom of the Rail Bases, and tighten the Knob Screws (6). This will secure the handrail from moving during jumping. 6 STEP 8: 6 Parts: Part 9 (x1) - Left Side Handrail Part 10 (x1) - Right Side Handrail Align the push pin of the Left Side Handrail (9) with the opening of the Right Side Handrail (10) Note: Make sure the holes are facing outwards like shown. 9 10 10 GQBrands.
ASSEMBLY INSTRUCTIONS STEP 9: Push down on the push pin and slide until the push pin locks into place as shown.
ASSEMBLY INSTRUCTIONS STEP 9: Part 5 (x2) - Large Pin Lock Knob Locate the 2 openings at the top of the handrail bases. Select the height you prefer by aligning the holes. Insert each Large Pin Lock Knob (5) into the hole and tighten. To adjust the height, loosen the Adjustable Knob and move handrail up or down, then tighten Pin Lock knob. 5 5 12 GQBrands.com CustomerService@GQBrands.
ASSEMBLY INSTRUCTIONS MODEL# 9005BTH 13
FREQUENTLY ASKED QUESTIONS • Question: “The foam padding or mat is damaged, what should I do?” Answer: If you are still within your warranty period (90 Days from initial purchase) you should contact customer service. You can also purchase replacement padding and mats at: www.PureFun.