
Use and Care Manual
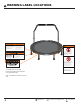

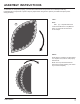
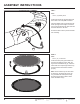
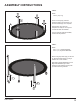
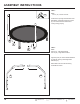
Table Of Contents

8
CustomerService@GQBrands.comGQBrands.com
1-866-498-5269
ASSEMBLY INSTRUCTIONS
STEP 3:
Parts:
Part 2 (x2) -Safety Hook
Locate both hinges at opposite sides from
each other in the Jump Mat and Frame.
Insert the Safety Hook (2) bolt through the
small openings of the hinges, and secure
it once it shows through the other side with
the Hook attached in its head.
Do this with both hooks to prevent the Mat
from unfolding.
STEP 4
Parts:
Part 3 (x1) - Frame Pad
Locate the frame pad (2) and attach it to
the frame like diagram shown. With the
leg screws of the Mat facing up, insert the
Frame Pad so all 6 openings meet the leg
screws and the Frame Pad is installed
properly.
Note: Some models may not have holes
for all legs on the frame pad. If they do
not, just attach the frame pad securely
around the frame with at least 2 holes
where handlebar will go.
2
3