
Instructions / Assembly


4PC TRAMPOLINE WIND STAKES
CustomerService@GQBrands.com
1-866-498-5269
GQBrands.com
WARNING/ADVERTENCIA CUSTOMER SERVICE
• The 4PC Wind Stakes is only meant to assist
in keeping your trampoline secure in low
to moderate winds. If the soil under your
trampoline is of insufficient consistency, or if
you live in an area which experiences high winds
and/or high wind gusts, Pure Fun recommends
that you disassemble your trampoline and safely
store it during severe weather.
• ADULT ASSEMBLY REQUIRED
• The installation and use of this kit does not
guarantee your trampoline will not be damaged
by wind or other severe weather nor does it
affect the trampoline warranty
• Do not install in mud, dry soil, sand, frozen or
extremely rocky ground.
• Contact your local utility officials to make sure
there are no underground utilities where you will
be placing the 4PC Wind Stakes.
4401 Samuell Blvd, Ste 150
Mesquite, TX 75149
MODEL# 9301AK
PRODUCT MANUAL VERSION 01.18.03
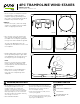
1. Locate 4 legs of the trampoline to install
the wind stakes. In order to keep the
trampoline properly grounded you must
place stakes evenly distributed around the
trampoline as pictured to the right.
EXAMPLE:
Locate Letters A, B, C, & D on the image
shown as an example of where the Wind
Stakes can properly be attached.
2. Once you have chosen the locations you
wish to install the Wind Stakes to, locate
the middle of the U-Shaped Leg and point
the legs of the Stakes towards the ground.
The legs of the Wind Stakes must be
separated, this will allow the arch to secure
the trampoline.
3. Using a rubber mallet, hammer the Stake
into the ground by hitting the upper knob
of the Wind Stake. Do this until the arch is
touching the leg of the U-Shaped Leg.
NOTE:
Do not use any tool other than a rubber
mallet to hammer the Wind Stake into
the ground, failure to do this will break or
crack the product.
4. Repeat Steps 1-3 until all Wind Stakes
have been successfully secured into
their respective U-Shaped Legs of the
Trampoline.
1
2
3
A
A
B
B
C
C
D
D
Side View Top View