JUMP AND PLAY 7-FOOT TRAMPOLINE SET PRODUCT MANUAL - MODEL# 9307TS - VERSION 2.19.1 FOR AGES: 3-9 WEIGHT LIMIT: TO BUILD: 120 Lbs 54 Kgs X 2 TOOLS NEEDED: Tools Provided Manual en español ubicado en GQBrands.com Spanish Manual located at GQBrands.com CUSTOMER SERVICE GQBrands.com • CustomerService@GQBrands.
CUSTOMER SERVICE INFORMATION Thank you for purchasing: JUMP AND PLAY 7-FOOT TRAMPOLINE SET MODEL# 9307TS To order these parts, or if you have any other questions or concerns about this GQBrands product, please contact us at Please do not return your item. Please report items that are damaged or missing parts to the manufacturer GQ Brands within 3days of delivery. Email customerservice@gqbrands.com or call toll-free at 1-866-498-5269 PureFun.
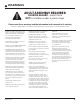
WARNINGS ADULT ASSEMBLY REQUIRED CHOKING HAZARD - Small Parts NOT for children under 3 years of age. Please read these warnings and the information in this manual in its entirety. Failure to comply with the following instructions may increase the risk of serious injury and/or death: • DO NOT allow children under the age of 3 to handle or use chalk pieces. Broken chalk or chalk remnants present a choking hazard and serious injury or death may occur.
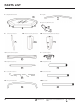
PARTS LIST 1 - Jump Mat and Frame Pad 2 - Top Rail x1 x6 3 - Corner Top Rail with Socket x6 4- Vertical Leg Extension 5A - Plastic Vertical Leg Extension 5B - Plastic Vertical Leg Extension-Abacus x2 x4 x6 6 - Plastic Horizontal Leg Base 7- Galvanized Spring x36 x3 8 - Straight Enclosure Pole 8A - Straight Pole Foam x6 9- x6 9A - Curved Pole Foam Curved Enclosure Pole x6 10 - Arc Top Enclosure Rail x6 10A - Arc Foam x3 4 x3 GQBrands.com CustomerService@GQBrands.
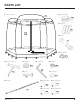
PARTS LIST 11 - Enclosure Netting 12 - x1 Plastic Flat Plate x10 13 - Chalk Set x1 14 - Wrench x1 15 - Spring Washer x6 16 - Spring Loading Tool 17 - 19- Arc Washer 20- Allen Wrench x12 M8 Nut x14 x1 x1 21- 18 - Screw x4 x6 22- 23- Red Abacus Ball Metal Rod x12 x2 24- Blue Abacus Ball x12 MODEL# 9307TS Flat Washer 25- Green Abacus Ball x12 26- Yellow Abacus Ball x12 5
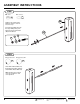
ASSEMBLY INSTRUCTIONS STEP 1 20- 21- M8 Nut Flat Washer x1 x2 5B Tighten to the metal rod the hardware shown to ensure it doesn’t escape. Insert the Metal Rod (22) from the larger TOP opening of he Plastic Vertical Leg Extension (5B) for the Abacus. 20 21 22 20 STEP 2 23- Red Abacus Ball 24- Blue Abacus Ball x12 x12 Slide 12x Red Abacus Balls (23) through the Metal Rod, and then slide 12x Blue Abacus Balls (24) NOTE: You may choose which colors go first between all 4 colors provided.
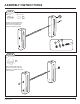
ASSEMBLY INSTRUCTIONS STEP 3 20- 21- M8 Nut Flat Washer 5B x1 x2 Push the Vertical Leg Extension towards the Abacus balls to be able to secure the Metal Rod using the hardware provided. 20 21 20 STEP 4 12- Plastic Flat Plate x2 Using 2 Abacus Flat Caps (12), place 1 on each side of the Leg Extension to avoid the metal rod from escaping.
ASSEMBLY INSTRUCTIONS STEP 5 20- 21- M8 Nut Flat Washer x1 x2 Tighten to the metal rod the hardware shown to ensure it doesn’t escape. Insert the Metal Rod (22) from the larger BOTTOM opening of he Plastic Vertical Leg Extension (5B) for the Abacus. 22 20 21 20 STEP 6 25- Green Abacus Ball 26- Yellow Abacus Ball x12 x12 Slide 12x Green Abacus Balls (25)through the Metal Rod, and then slide 12x Yellow Abacus Balls (26) NOTE: You may choose which colors go first between all 4 colors provided.
ASSEMBLY INSTRUCTIONS STEP 7 20- 21- M8 Nut Flat Washer x1 x2 Push the Vertical Leg Extension towards the Abacus balls to be able to secure the Metal Rod using the hardware provided. 20 21 20 STEP 8 12- Plastic Flat Plate x2 Using 2 Abacus Flat Caps (12), place 1 on each side of the Leg Extension to avoid the metal rod from escaping.
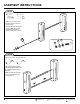
ASSEMBLY INSTRUCTIONS STEP 9 Locate all the Vertical Leg Extensions (4) and twist the Plastic Flat Plates (12) until snug. To make sure they are secure and properly tightened, use the Allen wrench provided. 4 12 STEP 10 Insert the 2x Vertical Leg Extensions at both openings of the Plastic Horizontal Leg Base (6). The flat area of the Horizontal Base must face the floor. Both indents in the Base must be facing upwards. 4 10 4 GQBrands.com CustomerService@GQBrands.
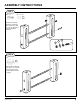
ASSEMBLY INSTRUCTIONS STEP 11 Slide the completed Abacus into the Vertical Leg Extensions with the bottom portion closest to the Horizontal Leg Base The emboss indent at he bottom of the legs will align to the openings of the Horizontal Leg Base. STEP 12 Slide 2x Corner Top Rail with Socket (Part 3) and align to the upper opening of the Vertical Leg Extensions. Spring holes must be facing upward NOTE: Make sure that you locate the upper openings of the corner arms and they are facing upwards.
ASSEMBLY INSTRUCTIONS STEP 13 The Straight Enclosure Poles should have Foam (8A) already pre-installed. Slide into the corner Top Rails from the upper opening, and slide the Top Rail to the arms of the corners.
ASSEMBLY INSTRUCTIONS STEP 15 Complete two more assembled legs 6 4 6 4 4 4 STEP 16 5A MODEL# 9307TS 5A 5A 5A 13
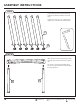
ASSEMBLY INSTRUCTIONS STEP 17 8 2 8 8 8 2 STEP 18 15- Spring Washer x1 18- Screw 20 15 20- 17- M8 Nut Arc Washer x2 x1 19- Allen Wrench x1 x1 17 17 Align all the openings, and with the Screw (18) facing the outside, tighten all hardware shown using the Phillips Screwdriver from the Allen Wrench (19) 18 19 14 GQBrands.com CustomerService@GQBrands.
ASSEMBLY INSTRUCTIONS STEP 19 3 Completed Legs STEP 20 Once you have 3 completed sections, slide the remainder of the Top Rails facing upwards to the legs of the trampoline.
ASSEMBLY INSTRUCTIONS STEP 21 Place the Jump Mat and Frame Pad (1) with the Logo and Tic-Tac-Toe facing upwards. 1 Each corner of the Jump Mat and Frame Pad will have an opening. Slide the Straight Frame Tubes through these openings. The loop is elastic giving you enough give to stretch and insert. Dont push the Mat all the way down, make sure to leave yourself a little room to install the springs to the mat.
ASSEMBLY INSTRUCTIONS STEP 23 1 5 2 To ensure that Jump Mat and Frame Pad won’t suffer from any excessive tension that will cause ripping or tearing on the Mat, the springs must be installed in a specific order. 6 10 11 9 12 7 4 8 Follow the Spring order shown for the best way to properly install and secure the Jump Mat and Frame Pad to the Top Rails. Once the first 16 Springs have been installed on the Top Rail, install the remaining 20 Springs.
ASSEMBLY INSTRUCTIONS STEP 24 All ribbons must be attached and secured to the Top Rail to make sure no skipping, tearing, or loose jumping occurs STEP 25 10 9 9 Assemble 3 Upper Arcs 18 GQBrands.com CustomerService@GQBrands.
ASSEMBLY INSTRUCTIONS STEP 26 3 Completed Upper Arcs STEP 27 Slide all 3 completed upper arcs to the top section of the Curved enclosure poles NOTE: Make sure arcs are placed away from horizontal bases as shown.
ASSEMBLY INSTRUCTIONS STEP 28 Place the Enclosure Netting (11) on top of the trampoline making sure all arcs are inside. The zipper and safety buckle must be facing the outside of the trampoline. 20 GQBrands.com CustomerService@GQBrands.
ASSEMBLY INSTRUCTIONS STEP 29 Pull the Enclosure Netting all the way to the bottom of the trampoline mat. Place all the hoods on top of the netting to each corresponding arc. Push the Velcro between both section to make sure the hood stays on top of the arc of the enclosure.
ASSEMBLY INSTRUCTIONS STEP 30 Secure on the bottom the Enclosure Ribbons to the Top Rail from the Safety Net STEP 31 When the Trampoline is not in use, make sure to close the Enclosure Netting door by using the zippers. For extra security, close the clasps from the outside as shown until the click. 22 GQBrands.com CustomerService@GQBrands.
ASSEMBLY INSTRUCTIONS STEP 32 When the trampoline is not in use, make sure to store and put away the chalk in a dry and safe place. Chalk is not resistant to rain or elements and will break if left untended.
FREQUENTLY ASKED QUESTIONS • Question: “The foam padding or mat is damaged, what should I do?” Answer: If you are still within your warranty period (90 Days from initial purchase) you should contact customer service. You can also purchase replacement padding and mats at: www.PureFun.