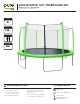
SUPA-BOUNCE 14FT TRAMPOLINE SET MODEL# 9414TS - TRAMPOLINE PRODUCT MANUAL - VERSION 7.20.03 FOR AGES: 6+ WEIGHT LIMIT: 320 Lbs 145 Kgs ADULT(S) NEEDED: TOOLS NEEDED: N/A WARNING/ADVERTENCIA • Do not allow more than one person on the trampoline at any time. • Do not allow small children to use unless supervised by an adult. • ADULT ASSEMBLY REQUIRED. • The contents of this package are not suitable for children under 3 years of age. Contains small parts which may cause choking.
CUSTOMER SERVICE INFORMATION Thank you for purchasing: SUPA-BOUNCE 14FT TRAMPOLINE SET MODEL# 9414TS If you have an issue with your item, do not return. Please report items that are damaged or missing parts to the manufacturer GQ Brands within three days of delivery. Contact customer service at customerservice@gqbrands.com to open a ticket. At GQBrands®, we want all of our customers to be completely satisfied with their purchase.
WARNINGS IMPORTANT MESSAGE WARNING - PLEASE READ ADULT ASSEMBLY REQUIRED CHOKING HAZARD - Small Parts NOT for children under 3 years of age. WARNING: While every attempt is made to ensure the highest degree of protection in all equipment, we cannot guarantee freedom from injury. The user assumes all risks of injury due to use. All merchandise is sold on this condition, which no representative of the company can waive or change. 3 GQBrands.com CustomerService@GQBrands.
WARNINGS Please read these warnings and the information in this manual in its entirety. Failure to comply with the following instructions may increase the risk of serious injury and/or death: • Ensure the trampoline has been assembled correctly, per the instructions in the manual. • It is essential that the intended site for this trampoline is completely flat and level. If the ground is not level this will cause movement in the frame and could cause stress on the joined sections.
SAFETY INFORMATION • Safety Information: This trampoline is designed and manufactured to provide you and your family with many years of fun and exercise, but for your benefit and safety, please read this manual carefully and in full before assembling and using your trampoline. • DO NOT allow more than one (1) person on the trampoline at a time. Multiple jumpers increase the chance of someone becoming injured.
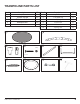
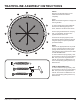
TRAMPOLINE PARTS LIST Part # 1 Description Jump Mat QTY Description QTY x1 Part# 5 Leg Extension x12 2 Curved Top Rail x12 6 U Shaped Leg x6 3 T-Section with Bolt x12 7 Spring x96 4 M6x45mm Bolt x18 8 Frame Pad x1 4a Nut x18 9 Wrench x1 10 Spring Tool x1 1 3 2 4 5 6 9 10 (4a) M6 x 45mm 7 MODEL# 9414TS - TRAMPOLINE 8 6
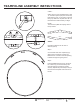
TRAMPOLINE ASSEMBLY INSTRUCTIONS STEP 1: Gather all 12 Curved Top Rails (Part 2) and 12 T-Sections (Part 3).Flip the Curved Top Rails (Part 2) over so the spring holes are facing up. Make sure to place them all on a flat and secure surface before you begin. NOTE: The Curved Top Rail has 8 spring holes in the top section. Top 1 2 Bottom STEP 2: Unscrew the bolt from all 12 of the TSections (Part 3) Step 3: Connect both ends of the Top Rail (2) by sliding each end into the T-Section (3).
TRAMPOLINE ASSEMBLY INSTRUCTIONS STEP 4: Gather all Leg Extensions (Part 5) and UShaped Legs (Part 6). You will be attaching 2 leg extensions (5) to each UShaped Leg. NOTE: The Leg Extension will have 3 openings. The 2 openings closest to each other, will go on the top and connect to the TSection at the top of the trampoline. Make sure to connect the U-Shaped leg to the single horizontal hole on the leg extension.
TRAMPOLINE ASSEMBLY INSTRUCTIONS Figure C Repeat step 7 until you have attached 6 of the leg extensions to the T-Sections which will look like figure shown. 9 GQBrands.com CustomerService@GQBrands.
TRAMPOLINE ASSEMBLY INSTRUCTIONS 10 STEP 8: Place the Jumping Mat (Part 1) in the middle of the frame and unfold it completely. 1 11 5 7 NOTE: Make sure the stitching of the Jumping mat is facing the floor 14 16 3 In order to avoid ripping and to distribute tension when attaching springs to the frame, follow the numbered order shown. 4 15 13 8 6 9 12 2 Once a spring is attached to the Jumping mat, you must attach the other in the opposite direction of the mat.
TRAMPOLINE ASSEMBLY INSTRUCTIONS STEP 9: Unfold the Frame Pad (Part 8) and place it on top of the Top Rail and springs. The skirt of the Frame Pad must cover the Top Rails completely to avoid injury. NOTE: Make sure the connecting straps are facing down towards the Top Rails in order to secure the Frame Pad to them in Step 10. 11 GQBrands.com CustomerService@GQBrands.
TRAMPOLINE ASSEMBLY INSTRUCTIONS STEP 10: Find all the bottom connecting straps of the trampoline frame pad and secure them by tying them in a knot around to the top rail to avoid moving or shuffling when jumping on the trampoline as shown below.
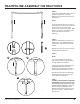
ENCLOSURE PARTS LIST Part # Description QTY Part# Description QTY 1 Straight Enclosure Pole x6 6 Washer x12 2 Curved Enclosure Pole x6 7 Nut x12 3 Enclosure Pole Cap x6 8 Black String x1 4 M6x75mm Bolt Spacer x12 9 x1 x12 10 Enclosure Net Lime Pole Cover 5 1 x6 9 2 3 4 M6x75mm Bolt 5 7 8 MODEL# 9414TS - ENCLOSURE 6 10 13
ENCLOSURE ASSEMBLY INSTRUCTIONS STEP 1: Gather all Curved Enclosure Poles (Part 2) and Enclosure Pole Caps (Part 3). IMPORTANT: Do not attach the Enclosure Pole Caps to the Straight Enclosure Poles. If an Enclosure Pole Cap has been accidentally installed on a straight pole it cannot be removed. Slide all Enclosure Pole caps onto the top of the Curved Enclosure Pole. The top of the Curved Enclosure Pole will not have any holes at all.
ENCLOSURE ASSEMBLY INSTRUCTIONS Step 1 A. Put the Upper (1) and Lower (2) sections of the Enclosure Poles together as shown on the left. B. If necessary, Attached the Pole Caps (3) to the tops of each Enclosure Pole A 15 B C C. Slide the Pole Covers (10) over the connected Enclosure Poles. GQBrands.com CustomerService@GQBrands.
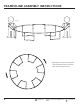
ENCLOSURE ASSEMBLY INSTRUCTIONS STEP 3: A. With the help of another adult, hold the completed enclosure pole by aligning both square holes to begin installation. NOTE: Curved Enclosure Pole must face towards the center of the trampoline. B. Once aligned, attach the completed enclosure pole to the trampoline leg. Follow the directions on the next page (Page 16) for the order and right parts to attach properly. 4 5 6 7 4 5 6 7 MODEL# 9414TS - ENCLOSURE C.
ENCLOSURE ASSEMBLY INSTRUCTIONS 4 M6x75mm Bolt 17 5 6 Spacer Washer 7 Nut 4 5 6 7 4 5 6 7 GQBrands.com CustomerService@GQBrands.
ENCLOSURE ASSEMBLY INSTRUCTIONS STEP 4: Place the Enclosure Net (Part 9) on top of the trampoline. Align the straps to the corresponding Enclosure Poles so they are as near to each other as possible when lifted. NOTE: Make sure that zipper and buckle snap are facing the outside of the trampoline. This is good to ensure that Enclosure is not reversed. STEP 5: Use the Black String (Part 8) to attach the Enclosure Net to the Jump Mat.
FREQUENTLY ASKED QUESTIONS • Question: “The foam padding or mat is damaged, what should I do?” Answer: If you are still within your warranty period (90 Days from initial purchase) you should contact customer service. You can also purchase replacement padding and mats at: www.PureFun.