
Installation Guide


8
MODEL# 9414TS - TRAMPOLINE
TRAMPOLINE ASSEMBLY INSTRUCTIONS
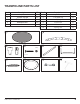
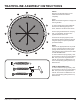
STEP 4:
Gather all Leg Extensions (Part 5) and U-
Shaped Legs (Part 6). You will be
attaching 2 leg extensions (5) to each U-
Shaped Leg.
NOTE:
The Leg Extension will have 3 openings.
The 2 openings closest to each other, will
go on the top and connect to the T-
Section at the top of the trampoline. Make
sure to connect the U-Shaped leg to the
single horizontal hole on the leg
extension.
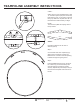
STEP 5:
Attach the U-Shaped Leg (6) to the Leg
Extension(5) with 1 M6x45mm bolt (4)
and Nut (4a). Tighten with the Wrench
Tool (9).
Repeat step 5 until you have 6 sets of U-
Shaped legs with extensions.
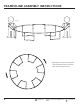
STEP 6:
NOTE:
It is recommended that you use the
help of 2 more adults in order to attach
all Legs to Base of Trampoline.
Lift the Top Rail with T-Sections that you
completed earlier and insert the U-
Shaped Legs and Extensions into the T-
Sections like picture shown to the left.
Repeat step 6 until all 6 U-Shaped legs
are attached to the top rail to form the
entire base of the trampoline.
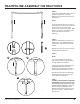
STEP 7:
THIS WILL BE ON EVERY OTHER LEG
EXTENSION (The Enclosure Poles will
be on the other leg extensions in step
4 of the enclosure section) - Attach the
TSection to the Leg Extension with 1
M6x45mm bolt and Nut into the top hole
as shown in figure C. Tighten with the
Wrench Tool.
A B
C