
Instructions / Assembly


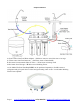

InstallationSteps
Note:Steps1–7areindependent,andcanbeperformedinanyorder.
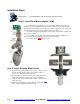
Step1:InstallFeedWaterAdapter(AFW)
1.1 TurnofftheColdWaterLineviatheColdWaterShutoffValve(CWSV)
underthesink.Openthekitchenfaucettoreleasepressureandmakesurewaterhas
stoppedbeforeproceedingtothenextstep.Getatowelorbuckettocatchwaterspill.
DisconnectKitchenFaucetConnector(KFC)pipefromCWSV.
1.2 CheckOringinsideAFWfemaleend,andtwistitontoCWSV.Tightenitup
usingwrenchorpliers.
1.3 TwistKFContothemaleendofAFW.TurnthehandleofAFWtocross
(OFF)position.TurnonCWSVslowly,checkandfixanyleaks.
1.4 Connectthe1/4”REDtubingtoAFW.
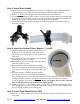
Step2:InstallDrinkingWaterFaucet
2.1 Ifyourkitchensinkdoesnothaveanexisting½”hole,youwill
havetodrillone.(RefertoHowto
drillaHoleonSinkor
Countertop
).Wipecleananddrythearea.
2.2 Slipthefrontplateonthefaucetstem,followedbytherubber
washer.Insertthefaucetstemintotheholeoncountertop
2.3 Underthesink,sliponthebackrubberwasher,tightenthenut
withplasticwing.
2.4 Screwthetubingadapterontothefaucetstem.InserttheBLUE
tubing1/2inchdeepintothePushinfitting.
Page7www.VenusTreasureIsland.com|(678)9004702|puredrop@VenusTreasureIsland.com