
Use and Care Guide


10
Installation and Maintenance
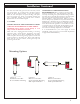
Red LED on, then off
Solenoid / Relay connection on, then off
Pause with beeps
Green LED on = System Check OK, UV System is
operational.
Set the 1 Year Lamp Timer – WITH NEW UV LAMP –
Make sure the control box is plugged into the wall outlet
and the UV lamp is on. Press and hold the reset push
button. A tone that descends in frequency once per second
will be heard. Hold the reset button down for approximately
5-8 seconds until you hear a continuous tone. At this point
release the button. The 1 year lamp timer has just been
reset.
The above procedures are followed for the 1 year UV lamp
replacement interval to reset the control box 1 Year Lamp
Timer.
UV lamp Detector and Timer circuit board Lamp
Operation and Alarm features:
• UV System OK – Green LED will flash every 5 - 10
seconds During Normal Operation.
• 30 Days remaining on Lamp Life – Flashing Yellow
LED with an intermittent audible tone.
• End of Lamp Life- Flashing Red LED with an
intermittent audible tone.
• Lamp Out- Continuous Red LED with a continuous
audible tone.
• If your UV System has a 120Vac Normally Closed
Solenoid Valve or Remote Alarm connected to the UV
Unit plug-in connection, this will activate at End of
Lamp Life or Lamp Out alarm conditions.
To Silence the Audible Alarm with Snooze Button:
1. 30 Days remaining on Lamp Life Alarm - Push reset
button – Silences the audible tone for two weeks while
the Yellow Led continues to Flash. (You can Silence
audible alarm 2 times Max.) You have up to 30 days to
replace the lamp. Service Unit - Replace the UV Lamp
within 30 Days.
2. End of Lamp Life Alarm - Push reset button- Silences
the audible tone for one week while the RED LED
continues to flash. (You can Silence audible alarm 4
times Max.)
3. Service Unit Immediately - Replace the UV Lamp.
4. Lamp Out Alarm- Push reset button- Silences the
audible tone for one week while the continuous Red
LED stays on. (You can Silence audible alarm 1 time
only.)
5. Service Unit Immediately - Replace the UV Lamp.
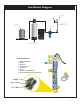
REQUIREMENTS FOR CLEANING THE QUARTZ
SLEEVE:
As water passes through the U.V., minerals, debris and other
matter in the water may deposit onto the quartz sleeve. After
sufficient film has formed on the quartz sleeve, the ability of
the ultraviolet germicidal rays to pass though the quartz sleeve
and into the water may be impaired. Therefore, it is necessary
to determine a cleaning schedule for the quartz sleeve. The
frequency will depend on the specific type of water conditions.
If the water has been processed through deionization, reverse
osmosis, or is distilled, cleaning may be required only once per
year. If untreated water is used, the cleaning frequency will
vary. A minimum of once yearly is standard recommendation
for cleaning and lamp replacement. Contact your local dealer
for scheduling this service. Your specific situation will vary
the frequency time according to the water quality of the home
or facility application.
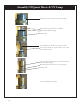
QUARTZ SLEEVE CLEANING PROCEDURES:
To clean the quartz sleeve, turn off the water flow to the
disinfection unit, turn power off, and at a separate faucet or
valve relieve the water pressure from the UV. Then disconnect
the electrical service to the lamp pins. Carefully remove the
U.V. lamp. Loosen the end nut and remove the O-Ring and
quartz sleeve. The quartz sleeve may then be washed with a
mild soap and hot water solution and rinsed clean with hot
water. Should this be insufficient to clean the quartz sleeve, a
mild acid may be used (i.e. vinegar). Be certain to follow all
recommended safety and handling procedures on the acid
container. It is important to handle the quartz sleeve with
care to prevent breakage. Make certain that all finger prints
are wiped clean before reinstalling (see installation of the
quartz sleeve). Replace O-Ring [PT8-544(1)] every time a
quartz sleeve is cleaned or replaced. We recommend replacing
the quartz sleeve once a year.
ELECTRICAL:
The PT series are furnished with 6’ line cord that will plug
into a 110V outlet. Electrical receptacles must be properly
grounded for safe operation. Improper grounding will void
any warranty.
When possible use a separate breaker to minimize voltage
fluctuations and avoid accidental shut off and a dedicated
electrical circuit rated with GFI protection is recommended..
After unit is installed and water is turned on, plug the unit into
110V wall receptacle. View lamp operation through safety
Sight Port lens. NOTE: Avoid exposing your eyes to U.V.
light.
UV CONTROL BOX START UP PROCEDURE
Make sure the UV lamp is inserted per instructions into the
quartz sleeve and UV chamber. Then plug the UV lamp into
the lamp connector. Plug the electrical control box into a
120volt wall plug outlet.
Upon start up the UV lamp Detector and Timer circuit
board will perform a self diagnostic test. When power is
applied the UV lamp will go on and a circuit board output
check is performed as follows:
Quick Beep
Green LED on, then off