
User Guide

HP0051401-00 A 1
Applications Note
Converting mpx100 to HP
®
Data Migration Appliance
To convert an mpx100 to an HP data migration appliance, follow these steps:
1. Reset factory defaults:
If the mpx100 unit has been previously used, it must be reset to the factory defaults. If the mpx100 is
brand new, skip to Step 2.
To reset the router and restore it to the factory default configuration, use a pointed, nonmetallic tool
to press and hold the maintenance button until the heartbeat LED flashes 20 times, then release the
button. The router boots and is restored to the factory defaults. The boot time is less than one minute.
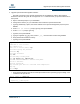
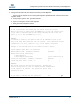
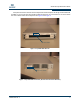
Figure 1 shows the LEDs and maintenance button.
Figure 1. LEDs and Maintenance Button Locations
2. Configure access to the mpx100 management port:
a. Connect the router’s 10/100 Ethernet port to your workstation using a switch or hub. Alternatively,
connect your workstation directly to the router using an Ethernet crossover cable. The mpx100’s
management port’s default IP address is 10.0.0.1 subnet 255.0.0.0.
b. Make sure the workstation connected to the mpx100 router has Ethernet address 10.0.0.x,
where x is other than 1 and the subnet mask is 255.0.0.0.
c. From the workstation, open a command window. Using a telnet session, connect to the mpx100
using IP address 10.0.0.1. Login as guest and enter the password password. The Command
Line Interface (CLI) prompt displays (mpx100 #>).
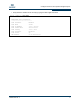
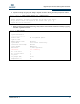
Product Affected
Device Name Part Number
mpx100 AE324-63003
1. HEARTBEAT LED
2. POWER LED
3. SYSTEM FAULT LED
4. MAINTENANCE BUTTON
123
4