
Technical Manual


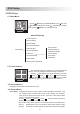


5.14Hard Disk Setup
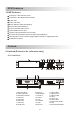
POWRE
Monitor
UP DATA+
DATA
MENU
DOWN
Digital video Recoder Monitor
4
Dual
PAL NTSC
If you choose YES, recording
continues and overwrite previous recording when hard disk
drive space is full.
If you choose NO, the recording session stops when all
hard disk drive is full for recording.
It shows the size of the primary
hard disk drive installed in the DVR.
OVERWRITE ENABLED:
MASTER HDD SIZE:
...........................................................
..................................
.................................
It shows the space used on the first hard disk drive for
recording and the percent Of the used hard disk.
If you format the hard drive, it will erase all the data
recorded on the first hard disk drive.
It shows the space the secondary hard disk drive installed in the
DVR.
It shows the space used on the primary hard disk drive for
recording.
If you format the hard drive, it will erase all the data recorded
on the secondary hard disk drive.
MASTER HDD USED:
MASTER HDD FORMAT:
Notice: when you first use a HDD in the DVR, please use this function to format
the HDD. Otherwise the computer will not find the HDD when you connect the DVR
to the computer by using the USB cable
SLAVE HDD SIZE:
SLAVE HDD USED:
SLAVE HDD FORMAT:
.......................................................
.........................................................................
................................................................
.....................................................................................................................
.............................................................................................................
.............................................................................
.
5.15 Alarm Setup
POWRE
Monitor
UP DATA+
DATA
MENU
DOWN
Digital video Recoder Monitor
4
Dual
PAL NTSC
ALARM SETUP
ALARM RECORD DURATION 10
ALARM DURATION OFF
BUZZER DURATION OFF
SENSOR SETUP
MOTION SETUP
PRESS(UP,DOWN). THEN(SELECT)
PRESS(MENU) TO EXIT
Alarm Record Duration:
Alarm Duration:
Buzzer Duration:
Sensor Setup:
The number indicates how long
triggered recording lasts after the sensors are triggered or
the movements in front of the camera.
It controls how long (in seconds) the
alarm lasts after the system is triggered.
Buzzer time set (OFF 05 10 15
20 25 30 seconds and CONT) , User can press
[ SEL/EDIT ] to set the time .When Buzzer Time is OFF ,
All the buzzers will be shut off. When Buzzers Time is
CONT ,the buzzer will work continuously.
There are 3 different modes for sensor setting: NOT
INSTALLED, NORMAL-CLOSE and NORMAL-OPEN.
It depends on what type of external sensor you use. If
sensor's output is NORMAL-OPEN then select NORMAL-
OPEN mode in DVR.
If sensor triggered by an intruder then the cable line
connects to DVR input terminal will notify system to start
recording.
There are four pairs of input terminal supported by DVR.
...............................
...........................
....................
...........................................................
........
.......................................................
......................................................................
POWRE
Monitor
UP DATA+
DATA
MENU
DOWN
Digital video Recoder Monitor
4
Dual
PAL NTSC
SENSOR SETUP
CHANNEL-1 NOT INSTALLED TYPE: NORMAL-OPEN
CHANNEL-2 NOT INSTALLED TYPE: NORMAL-OPEN
CHANNEL-3 NOT INSTALLED TYPE: NORMAL-OPEN
CHANNEL-4 NOT INSTALLED TYPE: NORMAL-OPEN
PRESS(UP,DOWN). THEN(SELECT)
PRESS(MENU) TO EXIT
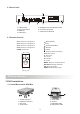
<
2
3
41
RS485RS485 SENSORSENSOR
ALARMALARM
Push the UNLOCK BUTTON above the wire hole to insert
or pull out a wire.
9