Quadro Manual I: Installation Guide Copyright and Trademarks Copyright © 2003-2007 Epygi Technologies, Ltd. All Rights Reserved. Quadro is a registered trademark of Epygi Technologies, Ltd. Microsoft, Windows, and the Windows logo are registered trademarks of Microsoft Corporation. All other trademarks and brand names are the property of their respective proprietors. Limited Warranty Epygi Technologies, Ltd.
Quadro Manual I: Installation Guide Administrative Council for Terminal Attachments (ACTA) Customer Information This equipment complies with Part 68 of the FCC rules and the requirements adopted by the ACTA. On the back of this equipment is a label that contains, among other information, a product identifier in the format US:AAAEQ###TXXXX, made out to HX7OT00BHX70100. If requested, this number must be provided to the telephone company.
Quadro Manual I: Installation Guide Table of Contents Manual I: Installation Guide About This Installation Guide ........................................................ 6 Requirements............................................................................. 8 Hardware Overview..................................................................... 9 The Connectors Panel of Quadro2x, 4x and 16x.........................................9 The Connectors Panels of Quadro2xi, 4xi and 16xi ......................
Quadro Manual I: Installation Guide Appendix: Changing the Admin Password ..................................... 48 Appendix: Configuring NAT Traversal ........................................... 49 Appendix: Registering on Epygi’s SIP Server................................. 51 Appendix: Checking the Connections ........................................... 55 Manual II: see Administrator's Guide This guide describes in detail the menus available for administrators only.
Quadro Manual I: Installation Guide About This Installation Guide About This Installation Guide This Installation Guide explains the installation of the Quadro IP PBXs of Quadro2x, Quadro4x and Quadro16x series.
Quadro Manual I: Installation Guide About This Installation Guide Appendix: Changing the Admin Password explains how to change the default administrator password. Appendix: Configuring NAT Traversal explains configuration of the Quadro if it is placed behind a NAT enabled router. Appendix: Registering on Epygi’s SIP Server explains how to register on Epygi's powerful SIP server. Appendix: Checking the Connections gives hints on solving common problems.
Quadro Manual I: Installation Guide Requirements Requirements • • One 120/240 VAC power outlet in close proximity to the Quadro. • At least one RJ11 telephone connection is recommended to connect the Quadro to the PSTN network (all Quadro IP PBXs with FXO ports). For ISDN Quadros an RJ45 CAT 5 cable is needed to connect Quadro to ISDN. • • • • • At least one off-the-shelf analog phone with an RJ11 telephone cable.
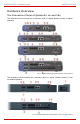
Quadro Manual I: Installation Guide Hardware Overview Hardware Overview The Connectors Panel of Quadro2x, 4x and 16x The illustration below includes the connectors panel of regular Quadro models in plastic enclosure. Fig. I-1: Regular Quadro's Connectors Panels in plastic enclosure The illustration below includes the connectors panel of regular Quadro models in rack mountable enclosure. Fig.
Quadro Manual I: Installation Guide 1 2 3 4 5 6 7 8 Hardware Overview Power supply socket. Use only the power adapter delivered with the Quadro. LINE sockets to connect the Quadro to the PSTN network using standard analog phone service. These are FXO (Foreign Exchange Office) analog ports. In the event of a power failure, PHONE 1 is connected to LINE 1, allowing the phone to send/receive phone calls directly to the PSTN network. PHONE 1 is powered by the PSTN.
Quadro Manual I: Installation Guide Hardware Overview The Connectors Panels of Quadro2xi, 4xi and 16xi The illustration below includes the connectors panel of ISDN flavored Quadro models in plastic enclosure. Fig. I-3: ISDN/Ethernet flavored Quadro's Connectors Panels in plastic enclosure The illustration below includes the connectors panel of ISDN flavored Quadro models in rack mountable enclosure. Fig.
Quadro Manual I: Installation Guide Hardware Overview The Connectors Panels of Quadro4xa The illustration below includes the connectors panel of ADSL flavored Quadro models in plastic enclosure. Fig. I-5: FXO/ADSL flavored Quadro's Connectors Panel in plastic enclosure 10 RJ11 socket to connect the Quadro via ADSL to the Internet. Quadro2x, 2xi, Quadro4x, 4xi, 4xa, Quadro16x, 16xi; (SW Version 4.1.
Quadro Manual I: Installation Guide Hardware Overview Quadro’s Front Panel LEDs Fig.
Quadro Manual I: Installation Guide Hardware Overview LED indication during a firmware update A firmware update is indicated by the red (Fault) and yellow (Info) LEDs. Both will blink simultaneously for about two minutes while the firmware is being updated. The Quadro will then reboot automatically showing the boot LED sequence.
Quadro Manual I: Installation Guide Step 1: Installing the Quadro Step 1: Installing the Quadro Networking Overview To establish a connection between the Internet and your local area network (LAN), an access router is needed. The Quadro IP PBX serves, among other functions, as an access router, and will perform the task of connecting your LAN, or a group of one or more PCs, to the wide area network (WAN) or the Internet. The Quadro will process and regulate the data traffic between these two networks.
Quadro Manual I: Installation Guide Step 1: Installing the Quadro LAN/WAN Connection Options • A Quadro IP PBX with an Ethernet WAN port behind a router, which is connected to a cable or xDSL modem. Fig. I-7: Configuration: Quadro behind a router In this configuration (Fig.I-7), the IP router typically acts as a DHCP server for the LAN and assigns the IP addresses to the PCs and other devices.
Quadro Manual I: Installation Guide Step 1: Installing the Quadro Please Note: The Admin PC is connected to the Quadro LAN port to access the Web Management of the Quadro. After the initial configuration has been completed, this PC can then be moved to the LAN and connect to the Quadro over a switch (see Fig.I-7). You also may reach the Quadro for its first configuration from an Admin PC within the LAN, but this may cause collisions in case of non-fitting IP addresses and competing DHCP servers. Fig.
Quadro Manual I: Installation Guide Step 1: Installing the Quadro Connecting the Hardware • Quadro4x behind a router Quadro2x and Quadro16x are connected accordingly. Fig. I-11: Installation: Quadro4x behind a router • Quadro4x used as Internet access router Quadro2x and Quadro16x are connected accordingly. Fig. I-12: Installation: Quadro4x used as an Internet Access Router • Quadro4xi used as Internet access router All Quadro ISDN IP PBXs are connected accordingly.
Quadro Manual I: Installation Guide • Step 1: Installing the Quadro Quadro4xa used as Internet access router All Quadro IP PBXs using ADSL or G.SHDSL as their Internet uplink are connected accordingly in the Fig.I-12. Fig. I-14: Installation: Quadro4xa used as Internet Access Router • Verify the product package contents are complete. Refer to the contents sheet included in the packaging to determine if all the items were shipped in the box.
Quadro Manual I: Installation Guide Step 2: Configuring the Quadro Step 2: Configuring the Quadro Quadro IP PBXs with Ethernet WAN uplink do not require further configuration in two cases: • The Quadro is connected behind a basic router that has no conflicts with the STUN protocol. • The Quadro is used as the Internet access router and your ISP supports DHCP. There are no other router devices between the Quadro and the DSL or cable modem and you get the IP address assigned automatically by the ISP.
Quadro Manual I: Installation Guide Step 2: Configuring the Quadro Step 2.1: Logging in to Quadro • Start a browser (MS Internet Explorer, Netscape, Opera) on a PC connected to the LAN port. • Enter http://172.30.0.1 (Quadro’s default LAN IP address) into the address field. • The Login page of the Quadro will be displayed (see Fig.I-13). Fig. I-15: Login page Enter admin as the Username and 19 as the password to log in as the administrator.
Quadro Manual I: Installation Guide Step 2: Configuring the Quadro Step 2.2: System Configuration Wizard Select the System Configuration Wizard from the System menu. The System Configuration Wizard is a tool for the administrator to define the Quadro's Local Area Network settings and to specify regional configuration settings to make Quadro operational in its LAN. The System Configuration Wizard must be run upon Quadro first startup.
Quadro Manual I: Installation Guide Step 2: Configuring the Quadro DHCP Settings for the LAN Interface If the DHCP server is enabled, the Quadro will automatically assign dynamic IP addresses to the stations connected to its LAN port. If you didn’t change the default LAN IP address of the Quadro, you also may leave the default values for the IP Address Range. Make sure your connected LAN devices belong to the same network as the LAN port of your Quadro.
Quadro Manual I: Installation Guide Step 2: Configuring the Quadro (ISDN) and PHONE ports of the Quadro for the specified country. Select the country where the Quadro is located. If you do not find your country in the list, pick the closest in your timezone. The Quadro obtains the correct time automatically over the Internet from a time server. If you are not located in the US/Central standard time zone, you will need to change the Timezone to your region.
Quadro Manual I: Installation Guide Step 2: Configuring the Quadro Finishing the System Configuration Wizard Fig. I-21: System Configuration Wizard finishing page Click on Finish to complete the System Configuration Wizard. The Quadro will then stop internal functions and apply the changes made in the Wizard. Fig. I-22: Wizard Execution Progress page After this is complete, the Quadro will reply with the Confirm Settings page requesting confirmation of the changes. Press on OK to confirm the settings.
Quadro Manual I: Installation Guide Step 2: Configuring the Quadro Fig. I-23: Confirm Settings page Please Note: you must confirm the settings within 20 minutes. Otherwise the device will revert back to the previous configuration and reboot. Please Note: If you do not use DHCP for your LAN and you have changed your LAN settings, make sure that the IP address of the PC connected to Quadro is still within the specified IP address range, otherwise your PC may not establish a connection to Quadro.
Quadro Manual I: Installation Guide Step 2: Configuring the Quadro Step 2.3: Internet Configuration Wizard Open the Internet Configuration Wizard by selecting the corresponding menu item on the System menu. The Internet Configuration Wizard is a tool for the administrator to configure the WAN settings and to adjust Quadro's connectivity in the global network. It must be run if Quadro is desired to be connected to the Internet. The page Getting Started will be displayed: Fig.
Quadro Manual I: Installation Guide Step 2: Configuring the Quadro Uplink Configuration Select the desired WAN Interface Protocol and enter the WAN Interface Bandwidth to assure the quality of IP calls. Fig. I-25: Uplink Configuration If the available bandwidth is used to the point where the quality of an additional IP call would suffer, then new IP calls are rejected. The bandwidth provided by your ISP must be specified for both Upstream and Downstream fields.
Quadro Manual I: Installation Guide Step 2: Configuring the Quadro WAN IP Configuration Your Internet Service Provider (ISP) should provide this information. • Assign automatically via DHCP - The parameters are set automatically by the ISP. This is common with cable modem and DSL service. • Assign Manually requires the administrator to enter the external IP Address, the corresponding Subnet Mask, and the IP address of the Standard Gateway.
Quadro Manual I: Installation Guide Step 2: Configuring the Quadro PPP/PPTP Configuration Enter the IP address of the PPTP server into the PPTP Server text field. Choose the encryption for the traffic over the PPTP interface from the Encryption drop down list. Authentication Settings require the Username and the Password used for the authentication on the ISP server.
Quadro Manual I: Installation Guide Step 2: Configuring the Quadro WAN Interface Configuration If your ISP requires a specific MAC address, (for example, for authentication), it can be entered on this page. The required MAC address can be entered into the User defined field. If a specific MAC address is not required, leave the default selection This device selected. Fig. I-28: WAN Interface Configuration page Use the MTU drop down list to select the maximum packet size on the Ethernet (in bytes).
Quadro Manual I: Installation Guide Step 2: Configuring the Quadro Finishing the Internet Configuration Wizard Fig. I-30: Internet Configuration Wizard Summary page Click the Finish button to complete the Internet Configuration Wizard. The Quadro will then stop internal functions and apply the changes made in the Wizard. After this is complete, the Quadro will display the Confirm Settings page requesting confirmation of the changes. Press the OK button to confirm the settings.
Quadro Manual I: Installation Guide Step 2: Configuring the Quadro Step 2.4: Firewall Configuration By default, Firewall configuration on the Quadro has medium security, which denies any incoming traffic from the WAN except for voice traffic. Disabling the firewall is only required to access the Quadro’s management when the Quadro is connected behind a router. To disable the firewall, open Firewall Configuration from the Internet Uplink menu.
Quadro Manual I: Installation Guide Step 2: Configuring the Quadro Step 2-A: Using IP Lines The basic configuration procedure for Quadro IP PBXs that use IP lines is exactly the same as described in Step 2. Before starting the IP Lines specific configuration, the appropriate IP Phone (the list of SIP phones supported by Quadro is presented below) should be connected to the LAN port of the Quadro.
Quadro Manual I: Installation Guide Step 2: Configuring the Quadro In the Line Appearances text box, enter the number for simultaneous calls supported by the SIP IP phone – which is the sum of the number of active and held calls. For example, if this field is set to 1, only one active call is possible to have on the phone and making or accepting a second call while the other is on hold will not be allowed.
Quadro Manual I: Installation Guide Step 2: Configuring the Quadro Supported SIP Phones Below is the list of SIP phones that are officially supported by Epygi and can be automatically configured to work with Quadro2x/4x/16x: • • • • • • • Snom 300 (Application version snom300-SIP 6.5.1) Snom 320 (Application version snom320-SIP 6.5.1) Snom 360 (Application version snom360-SIP 6.5.1) Aastra 480i (Firmware version 1.4.1.1077) Aastra 9112i (Firmware version 1.4.1.1077) Aastra 9133i (Firmware version 1.4.1.
Quadro Manual I: Installation Guide Step 2: Configuring the Quadro Step 2-B: Using Receptionist If you wish to use the Receptionist’s features, the Receptionist should be set up on the Quadro. The Quadro’s basic configuration should be done in the same way as described in the Step 2.
Quadro Manual I: Installation Guide Step 2: Configuring the Quadro DDI (Device Dialing Inward) service and TEI mode can be selected from the first page of the ISDN Wizard. Fig. I-36: ISDN Wizard – Page 1 Leave DDI Service disabled if you wish to use MSN services (i.e. if you have more than one ISDN number provided by the Central Office). Configure TEI mode according to ISDN provider requirements. Clicking Next will refer to the ISDN Wizard page where MSN Settings can be configured. Fig.
Quadro Manual I: Installation Guide Step 2: Configuring the Quadro Select the Use Default outgoing MSN checkbox and define the Default Outgoing MSN value if you wish to send the custom caller information when placing calls over the ISDN trunk. Clicking Next will move to the page where L2&L3 Settings might be configured. Attention: If It is strongly recommended to consult with your ISDN provider before changing any of the settings on this page. Fig.
Quadro Manual I: Installation Guide Step 3: Registering on Epygi’s Technical Support Step 2-D: Using an ADSL or G.SHDSL Uplink If a Quadro IP PBX with ADSL or G.SHDSL uplink is used, the basic configuration of the WAN interface differs slightly from the procedure in Step2.3: Uplink Configuration, Step2.3: PPP/PPTP Configuration and Step2.3: WAN Interface Configuration. Each procedure has additional ADSL or G.SHDSL uplink interface specific components.
Quadro Manual I: Installation Guide Step 3: Registering on Epygi’s Technical Support Fig. I-40: PPP/PPTP Configuration page If your ISP assigns a dynamic IP address, activate the Dynamic IP Address radio button. Otherwise activate the Fixed IP Address radio button and enter the IP address you were assigned by your ISP. PPPoA specific selection is used to choose between manual or default ADSL or G.SHDSL connection parameters.
Quadro Manual I: Installation Guide Step 3: Registering on Epygi’s Technical Support WAN Interface Configuration Page If PPPoA or Ethernet is the selected WAN Interface Protocol, the WAN Interface Configuration page of the Internet Configuration Wizard shows additionally the ATM Bridge Settings (ATM) area. Fig.
Quadro Manual I: Installation Guide Step 3: Registering on Epygi’s Technical Support Step 3: Registering on Epygi’s Technical Support It is recommended that you register your Quadro on the Epygi Technical Support web page. Registration will give you access to the Technical Support Database. There, you can submit requests concerning technical problems as well as refer to the Frequently Asked Questions (FAQ) section.
Quadro Manual I: Installation Guide Step 4: Making/Receiving Calls Step 4: Making/Receiving Calls Please Note: The Quadro default settings are sufficient to make SIP phone calls. It is not necessary to make any changes unless the user wants to create new SIP extensions on the Epygi SIP Server, create a private directory for several Quadro units, or use alternate VoIP services. Refer to the Administrator's Guide for more information on these configurations.
Quadro Manual I: Installation Guide Step 4: Making/Receiving Calls To do so, click on the box in the first column next to the extension to edit and click the Edit button. When the page opens, go to General Settings and edit the Display Name and click the Save button. Do not change any other settings at this time. For more information on the Extensions Management settings, refer to the Administrator’s Guide and Appendix: Registering on Epygi’s SIP Server of this document.
Quadro Manual I: Installation Guide Appendix: PC DHCP Settings Appendix: PC DHCP Settings The Quadro LAN port has a DHCP server that provides DHCP IP addresses to devices connected to the LAN either directly or through an Ethernet hub or switch. This appendix describes how to configure Windows PCs for DHCP. The PC used to access the Quadro must meet the following conditions: • • TCP/IP network protocol has to be installed. DHCP has to be activated in order to request the IP address automatically.
Quadro Manual I: Installation Guide 4. Choose Obtain an IP address automatically and Obtain DNS server address automatically selections and press Advanced button. 5. 6. You will see the entry DHCP Enabled. Click OK three times to close all windows. Appendix: PC DHCP Settings TCP/IP and DHCP under Windows 95/98/ME 1. 2. Click the Start button. Choose Settings, then Control Panel. Double-click on the Network icon to open your Network window. Select the Configuration tab. 3. Click Add. 4.
Quadro Manual I: Installation Guide Appendix: Changing the Admin Password Appendix: Changing the Admin Password For security reasons, it is recommended that you change the default admin password. The username of the administrator (admin) cannot be changed. To change the administrator password, go to the System menu, User Rights Management. Fig. I-44: User Right Management page Choose admin from the list and press the Change Password functional button from the User Right Management page toolbar.
Quadro Manual I: Installation Guide Appendix: Configuring NAT Traversal Appendix: Configuring NAT Traversal NAT or Network Address Translation is a common feature used to expand the use of connected PCs and other networked devices without having to use multiple global Internet public IP addresses. Most ISP’s will assign one public IP address to each customer that is connected to the Internet.
Quadro Manual I: Installation Guide Appendix: Configuring NAT Traversal Fig. I-46: NAT Traversal Settings – General Setting Go to SIP Parameters page. Fig. I-47: NAT Traversal Settings - SIP Parameters Select Use Manual NAT Traversal and enter the WAN IP address of the router into the Mapped Host text field. For Mapped Port, enter the router's corresponding port number, in this case 5060. Save the entries. • Go to the RTP Parameters page and select Use Manual NAT Traversal. Fig.
Quadro Manual I: Installation Guide Appendix: Configuring NAT Traversal Appendix: Registering on Epygi’s SIP Server You may login directly to Epygi’s SIP Server if you have registered your Quadro at Epygi’s Technical Support Center. If you have not registered with Epygi Technical Support, you cannot login to the Epygi SIP Server. Log in to the Epygi SIP Server at www.epygi.com.Click on SIP, Login here. Use the same login name and password you used for Epygi Support for Customer Login. Fig.
Quadro Manual I: Installation Guide Appendix: Configuring NAT Traversal Fig. I-51: SIP Services Add New Extension page The Authentication password validates the entry and must match the password entered on the Quadro later. Make sure to record the name, Authentication Password and SIP extension number for entry into the Quadro later. Save will store the entered information and conclude the basic SIP registration. The following page then will be displayed: Fig.
Quadro Manual I: Installation Guide Appendix: Registering on Epygi SIP Server Configuring Quadro Extensions Once the SIP server has the created extensions with the user information, create these extensions in the Quadro devices. Once they are entered in the Quadro, they will be registered and can then be used. Login into the Quadro and go to Extensions Management. Fig.
Quadro Manual I: Installation Guide Appendix: Registering on Epygi SIP Server Fig. I-55: Extensions Management - Edit Entry – SIP Settings page • Enter the SIP registration number displayed in the column Ext# into the text field Registration User Name. • In the Password field, enter the password you specified when registering at the SIP server and confirm it in the field below. • In Registration SIP Server, the selected SIP server address must be entered.
Quadro Manual I: Installation Guide Appendix: Registering on Epygi SIP Server Appendix: Checking the Connections If the system doesn’t seem to be working properly, even when all the cables are connected properly, it may be helpful to Start Network Diagnostics: The WAN link, IP configuration, gateway, DNS server, and STUN-NAT will all be checked. To start diagnostics, open the System's menu item Diagnostics and click Start Network Diagnostics. Fig.
Quadro Manual I: Installation Guide Appendix: Registering on Epygi SIP Server If diagnostics are successful, but you are still unable to place a call to 899# then check the SIP registration status. Open the SIP Registration Status page using the Quadro management System menu item Status. Besides the SIP registration information for the auto attendant and each connected extension, the Detected Connection Type is shown.
Quadro Manual I: Installation Guide Appendix: Checking the Connections QIG-QUADRO-00-38 Quadro2x, 2xi, Quadro4x, 4xi, 4xa, Quadro16x, 16xi; (SW Version 4.1.