
Installation guide


Quadro Manual I: Installation Guide About This Installation Guide
Quadro2x, 2xi, Quadro4x, 4xi, 4xa, Quadro16x, 16xi; (SW Version 4.1.x) 6
About This Installation Guide
This Installation Guide explains the installation of the Quadro IP PBXs of Quadro2x,
Quadro4x and Quadro16x series. The Quadro models differ both in their feature sets and
the number of phone lines and extensions that are supported:
• Quadro2x offers 1 phone line (FXO), 2 phone extensions (FXS) and 1 Ethernet WAN
port
• Quadro2xi offers 1 phone line (ISDN), 2 phone extensions (FXS) and 1 Ethernet
WAN port
• Quadro4x supports 2 phone lines (FXO), 4 phone extensions (FXS) and 1 Ethernet
WAN port - a special version of Quadro4x offers 2 additional FXO lines
• Quadro4xi supports 1 phone line (ISDN), 4 phone extensions (FXS) and 1 Ethernet
WAN port - a special version of Quadro4xi offers 3 additional ISDN lines
• Quadro4xa supports 2 phone lines (FXO), 4 phone extensions (FXS) and 1 ADSL
WAN port
• Quadro16x supports 4 phone lines (FXO), 16 phone extensions (FXS) and 1 Ethernet
WAN port
• Quadro16xi supports 3 phone lines (ISDN), 16 phone extensions (FXS) and 1
Ethernet WAN port
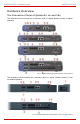
The installation procedure for all Quadro IP PBXs is the same. Throughout this Installation
Guide, the standard edition of the Quadro4x with two FXO ports is shown as the reference
system.
This Installation Guide gives step-by-step instructions to provision the Quadro and config-
ure the phone extensions with the Epygi SIP Server. After successfully configuring the
Quadro, a user will be able to make SIP phone calls to remote Quadro devices, make local
calls to the PSTN and access the Internet from devices connected to the LAN.
This Installation Guide neither describes the PBX, Auto Attendant, Call Relay, and Voice
Mail features of the Quadro nor does it provide advanced firewall and VPN configuration in-
formation. For these features, refer to the Administrator's and Extension User's Guides.
Step 1: Installing the Quadro explains the connection of cables and devices to the
Quadro.
Step 2: Configuring the Quadro describes the configuration steps necessary to integrate
the Quadro into your network environment.
Step 2-A: Using IP Lines explains how to configure IP lines on the Quadro IP PBX and to
connect IP phones to become functional in the Quadro’s LAN.
Step 2-B: Using Receptionist refers to the document describing Receptionist’s configura-
tion on the Quadro.
Step 2-C: Using ISDN Lines explains how to configure ISDN trunks and to define a de-
fault outgoing MSN.
Step 2-D: Using an ADSL or G.SHDSL Uplink explains the additional WAN specifications
needed if using a Quadro IP PBX with an ADSL Internet Uplink.
Step 3: Registering on Epygi’s Technical Support shows you how to access the Epygi
Technical Support Center and the Epygi SIP Server.
Step 4: Making/Receiving Calls explains how to enable the Quadro’s various telephony
features.
Appendix: PC DHCP Settings explains how to configure your PC to access the Quadro
Configuration GUI.