B TABLE OF CONTENTS A. Caution I . Warning -----------------------------------------------------------------------------2 I I . Electrical Requirements-------------------------------------------------------3 I I I . Utilization-----------------------------------------------------------------------3 B. Console 1. Drawing Overview --------------------------------------------------------------4 2. User Weight Measuring Position --------------------------------------------4 3.
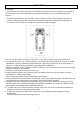
Caution 3 I . Warning To reduce the risk of electrical shock, fire hazards, please read this user manual in its entirety to ensure that you have full knowledge to operate all the features on your treadmill safely and properly. 1. Position this treadmill on solid surface, with a minimum of 2M (6 feet) between any walls or furniture. Make sure that the area behind the treadmill remains completely clear during use. A minimum of 2M (6 feet) of clearance is required for safety reasons. 2.
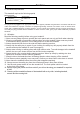
B Caution II . Electrical Requirements This treadmill requires the following special power source: Supply Voltage ______AC220 240V Frequency__________50 / 60Hz ± 5 Maximum Current___10A The plug must be plugged into an appropriate outlet that is properly installed and grounded in accordance with all local codes and ordinances. Improper connection of equipment-grounding conductor can result in a risk of electric shock.
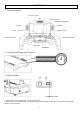
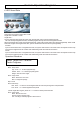
Console U 1. Drawing Overview 15" Touch Panel FAN MP3 Connector Head Phone Connector Speaker Speaker IPOD Connector USB Connector Hand Pulse Contact Hand Pulse Contact Safety Key Stop Button 2. User Weight Measuring Position Right Weight Measuring Position Left Weight Measuring Position 3. Power System Power supply socket 1. Power Switch: I to Turn Switch (ON), O to turn Switch (OFF) 2. When the current is overloaded, the circuit breaker will turn on automatically.
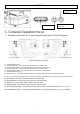
B Console 4. TV input and AV input socket Analogy TV signal connector AV signal connector Digital TV signal connector C. Console Operation Keys 1. Operation Instructions for Console Keypad and Handrail Thumb Keypads Left handrail buttons Right handrail buttons Console operation key pad a. Right handrail buttons a1. Left INCLINE UP : Press this key during workout to increase incline. a2. Left INCLINE DOWN : Press this key during workout to decrease incline. a3.
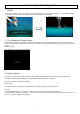
Console Operation Programs 1. Splash The system starting page is to convey brand recognition that a user will be brought to a comfortable workout environment directly. The Cushion Setting Screen should appear automatically. Turn on screen -1 Turn on screen -2 2. The Hibernation Sleep Screen Except workout page which happens during workout session, if the Cushion Setting Page or any other page is not in function for 10 minutes or longer, the machine will go in hibernation stage automatically.
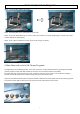
Console Operation Programs Step1 : Touch "START Weight Test “button Step2 : Stand both feet on the scale pads for 10 seconds Step3 : Once user weight shows up on screen, either press “Reset” to measure weight again, or press “Ok” to start cushion adjustment automatically. Step4 : Once cushion adjustment is ready, main screen will pop up directly. 4.
Console Operation Programs The following chart is a summary of all exercise programs: HRC Target HRC, Fat Burn, Cardio Programs Time Calorie Distance Quick Start Random, Hill, Manual, Customize 10 min, 30 min, 60 min, Customize 100Kcal, 300Kcal, 500Kcal, Customize 1km, 3km, 10km, Customize The user according to the default to get into the work out directly. 5. Quick Start Mode A user may choose to get into a workout routine without any data inputs.
9B Console Operation Programs 6. HRC Heart Rate There are three programs under HRC modes : Target HRC / Fat Burn / Cardio Target HRC: The user input the target heart rate value, HRC program help user to achieve target heart rate. The user first input targeted heart rate, and HRC program will help user achieve targeted heart rate. When actual heart rate is lower than targeted heart rate, system will increase incline level and speed gradually.
10B Console Operation Programs Step 3 : Workout A three minute warm-up session will start about 3 seconds after pressing GO. You may choose to skip the warm-up session by pressing STOP. The program will automatically adjust incline and speed levels to achieve targeted goal, however, the user may still adjust incline or speed levels manually. You may press STOP to pause the routine, and press GO to resume exercise, or press RESET to exit current program to go back to main screen.
Console Operation Programs Operation Procedure Select Random/ Hill/ Manual Programs Step 1 : Profiler Row1 : Value set up Age : Press −+ to select appropriate age Gender : Press −+ to select appropriate gender Weight : Show the user’s weight Row 2 : Page Control Menu : Back to main menu.
20B Console Operation Programs Operation Procedure Select Programs of Customize.
Console Operation Programs 8. Timed Programs Timed programs include 10 Min, 30 Min, 60 Min, and Customize sessions. Program will start based on selected time and will go directly into Cool Down session once timed session is over.
Console Operation Programs Step 4 : Workout screen A three minute warm-up session will start about 3 seconds after pressing GO. You may choose to skip the warm-up session by pressing STOP. Screen will show incline graph, however user may still manually adjust incline levels accordingly. Press FAN to turn fan on or off You may press STOP to pause the routine, and press GO to resume exercise, or press RESET to exit current program to go back to main screen.
Console Operation Programs Step 2 : Level Row1 : Value Set Up Incline : Press −+ button to select incline level Speed : Press −+ button to select speed level Row 2 : Page Control Menu : Back to main menu Previous : Back to previous page GO : to start Workout session Step3 : Workout Screen A three minute warm-up session will start about 3 seconds after pressing GO. You may choose to skip the warm-up session by pressing STOP.
Console Operation Programs Operation Procedure Select Targeted Distance Programs 1KM / 3KM / 10KM / Customize Step 1 : Profile Row1 : Value Set Up Age : Press −+to select appropriate age Gender : Press −+to select appropriate gender Weight : Show the user’s weight Row 2 : Page control Menu : Back to main menu Next : to Level set up Page Step 2 : Level Row1 : Value Set Up Incline : Press −+ button to select incline level Speed : Press −+ button to select speed level Row 2 : Page control Menu : Back to main m
Console Operation Programs 11. Entertainment Screen Operation There are a total of 5 Entertainment Programs: MP3 / TV / D-TV / Movie / and IPOD. User may shift between different entertainment screens during any workout session to enjoy music, TV, or movie at the same time. These five entertainment programs are independent from one another. When shifting between screens, voice and screen image output will be shifted at the same time to avoid voice or image overlaps.
Assembly 1. Pre-Assembly Check List Allen wrench M10*1 Allen wrench M5*1 Allen wrench M8*1 Bolt NO.S34*10PCS Washer NO.S24*10PCS Bolt NO.S33*8PCS Washer NO.S6*8PCS Safety Key NO1-33*1PC Lubricant Step 1 : 1. Take out the treadmill from the box. Step 2 : 1. Remove the no. 56 knob* 6 pcs, then can take off the motor cover. ( NO.
16B Assembly Step 3 : 1. Take out Left Aluminum Bar and connect all cables to the left corner base accordingly. 2. Secure Bolts No.S34 and Washer No.S24 (3 pieces each) to corresponding places as shown below. Attention Before assemble No. 58 upright aluminum piece, please make sure all cables are well connected and no cables are pressed against by any other bolted parts. Allen wrench M10*1 Bolt No.S34*3PCS Bolt NO.S34*3PCS Step 4 : 1.
17B Assembly Step 5 : 1. Secure Bolt No.S34 and Washer No.S24 (4 pieces each) to corresponding places as shown below. 2. Take Allen wrench M10 to tightly secure all 10 places on step 3-5. CAUTION Because this treadmill console is a touch panel screen, please note the following safety pointers : 1. Do not use sharp objects to operate the touch screen 2. Do not knock on the touch screen 3. Do not splash water on the touch screen. 4. Use only dry soft cloth to wipe and clean the screen.
Assembly Step 7 : 1. Take out the odometer panel with handle part from the small box included in packaging. 2. Place the odometer panel in place and connect all cables according to picture shown below. 3. After connecting all cables, place the console in upright position bars correctly. 4. Secure Bolt No.S33 and Washer No.S6 (8 pieces each) to corresponding places as shown in picture below. 5. Use Allen wrench M5 to secure the 8 bolts tightly. Allen wrench M5*1 Bolt NO.S33*8PCS Washer NO.
Maintenance 2. Maintenance If the Running Belt is Running out of Center: If the belt is not centered, please stop the machine immediately and use Allen wrench to secure all the bolts on the rear roller corners. If the running belt is moving towards the left, please secure the bolts in the left roller corner about 1/4 of a full clockwise turn. If the running belt is moving towards the right, please secure the bolts in the right roller corner about 1/4 of a full clockwise turn.
19B Trouble Shooting JK010001 T1100TFT 10105(00) Inverter Error Message Item Display message 1 Low Voltage 2 Thermo Sensor Abnormal 3 PFC Abnormal 4 Grounding Fault 5 Over Current 6 7 8 9 Over Voltage Over Heat Motor Over Load Inverter Over Load 10 11 12 13 14 15 16 17 System Over Load Flash Program Error EEPROM Error Low Voltage Driver Setting Error Too Low Power Too High Power Heat Warning Trouble shooting Turn off machine for 1 minute, turn on again for confirmation Turn off and lubricate running