
Installation Guide

Quick Step Studio
Laminate Flooring Installation Instructions
2
2018_0202_QS_LOW_INST
Site and Material Preparation
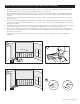
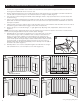
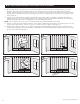
A) Remove carpet and padding. Also remove any wood flooring installed on concrete. Do not remove products
unless they are asbestos-free.
B) Undercut door frame and wallbase. Slide the flooring at least 1/4" underneath the door frame and wallbase. Also
leave a concealed 3/8" minimum expansion space under each.
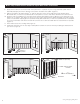
C) Remove bumps or peaks in subfloor and fill depressions with floor leveling compound to ensure no more than
3/16" unevenness per 10-foot span.
D) Acclimate unopened product before installation. If there is no time for acclimation, there should be no more
than a difference of 25° F and 20% relative humidity between the stocking/transportation environment of the
flooring and the final installation environment of the flooring.
E) Clean debris from subfloor before installation.
F) For concrete subfloors, install vapor barrier with overlapped seams of 8" or more.
G) For planks without attached underlayment, install over single layer of underlayment appropriate for
laminate floors. For planks with attached underlayment, it is acceptable to install Pergo Gold
™
underlayment
(Lowes Part # 670312) prior to flooring installation if desired. Make sure to follow the Pergo Gold installation
instructions, taking special care to seal all foam edges with sealing tape and repair all rips and perforations in
the underlayment vapor barrier prior to flooring installation. A separate vapor barrier should not be used in
conjunction with Pergo Gold.
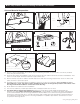
A
Door
Frame
Cutting Line
Wallbase
Casing
1 inch
(2,5 cm)
B
%
48 hours
60° – 85° F
15° – 29° C
35% – 65% RH
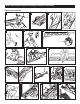
C
D
E
subfloor
6 mil (0.15 mm) virgin
polyethelene vapor barrier
> 8" (200 mm)
F
G