
Installation Sheet


2of2
Thank you for purchasing a Quoizel product.
Need assistance with parts or assembly? Call Quoizel customer service at 1-631-273-2700
or visit us on-line at www.quoizel.com
2015 QuoizelInc.
February2015
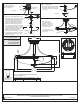
Ceiling Canopy using the
previously removed
mounting balls. Hand
tighten until snug.
Ceiling
Canopy
AA
Mounting
Screw
A
Mounting
Ball
STEP 6 Install Shade-
A. Place one Check Ring (D) over the
beaded end of the Center Stem (E).
And then thread the beaded end of
the Center Stem (E) into the Hex
Coupling underside of the Fixture
Body (A). Hand tighten until snug.
B. Place the following components
over the end of the Center Stem (E)
as shown: Spacer Tube (H), Check
Ring (D), Big Flat Washers (G), Big
Rubber Washers (F),Small Flat
Washers (I), Small Rubber
Washers (J) and Shade (K).Secure
by threading Hex Nut (L) onto the
end of the Center Stem (E). Hand
tighten until snug.
Figure 6
Figure 5
STEP 7 Install Cap-
A. Place the Cap (M) over the end of
the Center Stem (E) and secure
with the Finial (N). Hand tighten
until snug.
Figure 7
D
E
F
G
H
D
K
J
I
L
Hex
Coupling
A
STEP 8 Install Bulb-
A. This fixture uses
standard bulb with
medium screw base.
Maximum 100 watts.
B. Insert bulb and screw
snugly into place.
Your fixture is now
assembled and ready to
use. Enjoy!
Figure 8
Socket
Bulb
E
M
N
14”
4.5”
18.5” Dia.
21” Dia.
5.5” Dia.
1
GF1721AN\GF1721PN
\GF1721C\GF1721WS
FINISH: ANTIQUE NICKEL
PALLADIAN BRONZE
POLISHED CHROME
WEATHERED BRASS
(4) 100W
Bulbs
(Not Supplied)
Medium
Base
PART NUMBER REPLACEMENT PART
REQ.
NO.
1 G2445SH GLASS 1
NOTE: ALL DIMENSIONS ARE ROUNDED UP
TO THE NEAREST 1/2"