
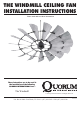
Installation Sheet


WARNING -Turn off the power!
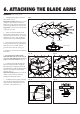
1. Carefully lift the blade circle to the
fan assembly. (Fig. 9)
Important assembly process, it is a must
to require 3 persons at least to lift the
blade circle evenly onto the fan body and
positioning the blade holes at inner circle.
Suggestion: 3 persons at least for the jobs
to prevent any cracks.
2. Fasten the blade assemblies to the
blade holder with the blade secure screws
with fiber washers (Screw No. 3). Securely
tighten the two screws. (Fig. 10) Repeat
this procedure with the remaining blades.
3. Secure the 5 blade arms to the motor
housing and blade circle by tightening the
blade arm screws with lock washers
provided. (Screw No. 4 & 5) (Fig. 11)
4. Repeat this procedure for the remaining
blade arms.
5. Now is the time to tighten all the
blade and blade arm screws. Be sure all
screws are fully tightened. Be sure not to
forget screws No. 1 and No. 2. (Fig. 12)
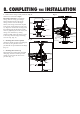
6.
Lift the fan motor with the blades and
place into the hanger bracket, rotating the
ball until the groove engages the tab on the
hanger bracket. This locks the ball mount and
fan motor, preventing fan rotation during
operation. (Fig. 13)
Important assembly process, it is a must to
require 3 persons at least to lift the fan
assembly onto the hanger bracket.
7.
An additional safety support is provided
to prevent the fan from falling. Secure the
safety cable to the ceiling joist with screw
and washer, as illustrated in Fig. 13.
6. ATTACHING THE BLADE ARMS
Fig. 9
Fig. 11Fig. 10
Blade circle
Motor assembly
Blade screws
(Screw No. 3)
Blade holder
Fig. 12 Fig. 13
Blade arm screws
(Screw No. 4)
Blade arms
Blade arm screws
(Screw No. 5)
Screw No. 2
Screw No. 1
Downrod
Hanger bracket
Safety cable