THE GUSTO CEILING FAN INSTALLATION INSTRUCTIONS Please read and save these instructions These instructions are to be used in the installation of the following QUORUM INTERNATIONAL fans... The Gusto © 2010 Quorum International. All Rights Reserved. P.O.
QUORUM'S UNIQUE LIMITED LIFETIME WARRANTY This warranty gives you specific legal rights, and you may also have other rights which vary from state to state. WHAT IS COVEREDExcept as specified below, the manufacturer of this product warrants it to be free of all defects in workmanship and material. WHAT IS NOT COVERED BY THIS WARRANTY1. All costs of removal or reinstallation of the fan. 2. Damage resulting from failure to follow instructions contained herein. 3.
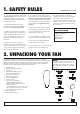
1. SAFETY RULES 1. To avoid possible electric shock, turn off the electricity at the main fuse box or circuit panel before you begin the fan installation or before servicing the fan or installing accessories. 2. Read all instructions and safety information carefully before installing your fan and save these instructions. 3. Make sure all electrical connections comply with local codes or ordinances as well as the National Electrical Code.
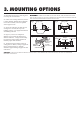
3. MOUNTING OPTIONS 1. Disconnect the power by removing fuses or turning off circuit breakers. 2. If there is an existing outlet box, ensure it is clearly marked "Suitable for Fan Support". If it is not so marked, it must be replaced with an approved one. WARNING: TO REDUCE THE RISK OF ELECTRIC SHOCK, FIRE, OR PERSONAL INJURY, MOUNT THE FAN ONLY TO AN OUTLET MARKED ACCEPTABLE FOR FAN SUPPORT AND USE MOUNTING SCREWS PROVIDED WITH THE OUTLET BOX. Fig. 1 Fig. 2 Ceiling Joists Ceiling Joists 3.
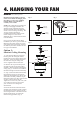
4. HANGING YOUR FAN WARNING -Turn off the power! DO NOT fasten the blades to the fan until it is assembled and hanging from the ceiling. To do so now will likely bend the blade arms and almost certainly cause wobble. Fig. 5 Fig. 7 NOTE: This ceiling fan is supplied with two types of hanging assemblies; the standard ceiling installation using the downrod with ball and socket mounting, and the "close-to-ceiling" mounting.
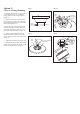
Option 2: Fig. 10 Fig. 8 Close-to-Ceiling Mounting 1. Remove the decorative canopy bottom cover from the canopy by turning the canopy bottom cover counterclockwise (Figure 8). 2. Remove three of the six screws and lock washers (every other one) securing the reinforcing plate to the top of the fan motor housing (Figure 9). Metal plate Screw and Lock Washer (3 Places) Ceiling Canopy Canopy Bottom Cover Remove 3. Route the wires exiting the top of the fan motor through the canopy.
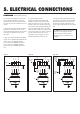
5. ELECTRICAL CONNECTIONS REMEMBER -Turn off the power! 4. Inside the ceiling junction box be sure to spread the wires apart so that the black and blue connections are on one side of the outlet box and the white/white and green/ copper connections are on the other side. Fig. 12a Fig. 12b BLK GROUND BLUE GRN Fan/light switch on wall WH BLUE Outlet box WH GROUND GRN GROUND GRN WH WH WH BLK Fan switch on wall BLK BLK BLK Fig. 12 WH 2. (Fig.
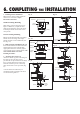
6. COMPLETING THE INSTALLATION 1. Finishing the Fan Installation Make sure the wiring is safely inside the outlet box as instructed in Step 5 Electrical Connections. Fig. 13 Fig. 15 Outlet Box Standard Ceiling Mounting Hanger Bracket Slide canopy up to the ceiling as shown in Figure 13. Make sure you place the wires safely into the outlet box. Secure the canopy to the hanger bracket with the four screws with your fan.
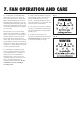
7. FAN OPERATION AND CARE 1. A ceiling fan is an environmentally smart choice to cool as well as to help warm your home or office. Adjust your HVAC thermostat during fan use to save additional energy and money on your air conditioning and heating utility bills. You should see a significant reduction in both your heating and cooling costs by regular use of your fan. Do not hesitate to use your fan during summer and winter months. In summer, (Fig.
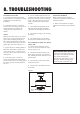
8. TROUBLESHOOTING FAN WILL NOT START 1. Check that the electricity has been turned on at the circuit breaker which had probably been turned off during installation. 2. Turn off the electricity. Check all connections in the wiring of the fan at the ceiling and make sure it follows the wiring instructions outlined in this manual. NOISE Note: Always allow a day or two "run-in" time for any new fan at medium or high speed.